This article is a part of a series of articles where I go through setting up RadSec (RADIUS over DTLS/TLS) between a Cisco device and Cisco ISE, using Microsoft's Active Directory Certificate Services to issue certificates to both the Cisco device (switch) and Cisco ISE.
You can find links to all of the articles in this series down below.
Cisco RadSec Part 1 - RADIUS over TLS/DTLS Overview
Cisco RadSec Part 2 - RadSec Certificate Template using Microsoft AD Certificate Services
Cisco RadSec Part 3 - Cisco Device Manual Certificate Enrollment
Cisco RadSec Part 4 - Cisco Device SCEP Certificate Enrollment
Cisco RadSec Part 5 - Cisco ISE RadSec Configuration
Cisco RadSec Part 6 - Cisco Device RadSec Configuration
Cisco RadSec Part 7 - Testing, Troubleshooting and Show Commands
Introduction
In this article, we will go through various ways to test and troubleshoot the RadSec configuration configured in the previous articles and go through some of the most useful show commands to verify your configuration.
In this series of articles, the following hardware and software are being used.
Cisco Catalyst C9200L-48P-4X Switch running IOS-XE 17.3.5
Cisco ISE version 2.7
Microsoft Windows Server 2016
Verifying successful RadSec connection in ISE
Before we start with various ways of testing RadSec, we will go through what a successful RadSec connection from a Cisco Device to Cisco ISE looks like. This process is actually recorded in the regular ISE Live Log, the same place where you can see all the network access authentications.
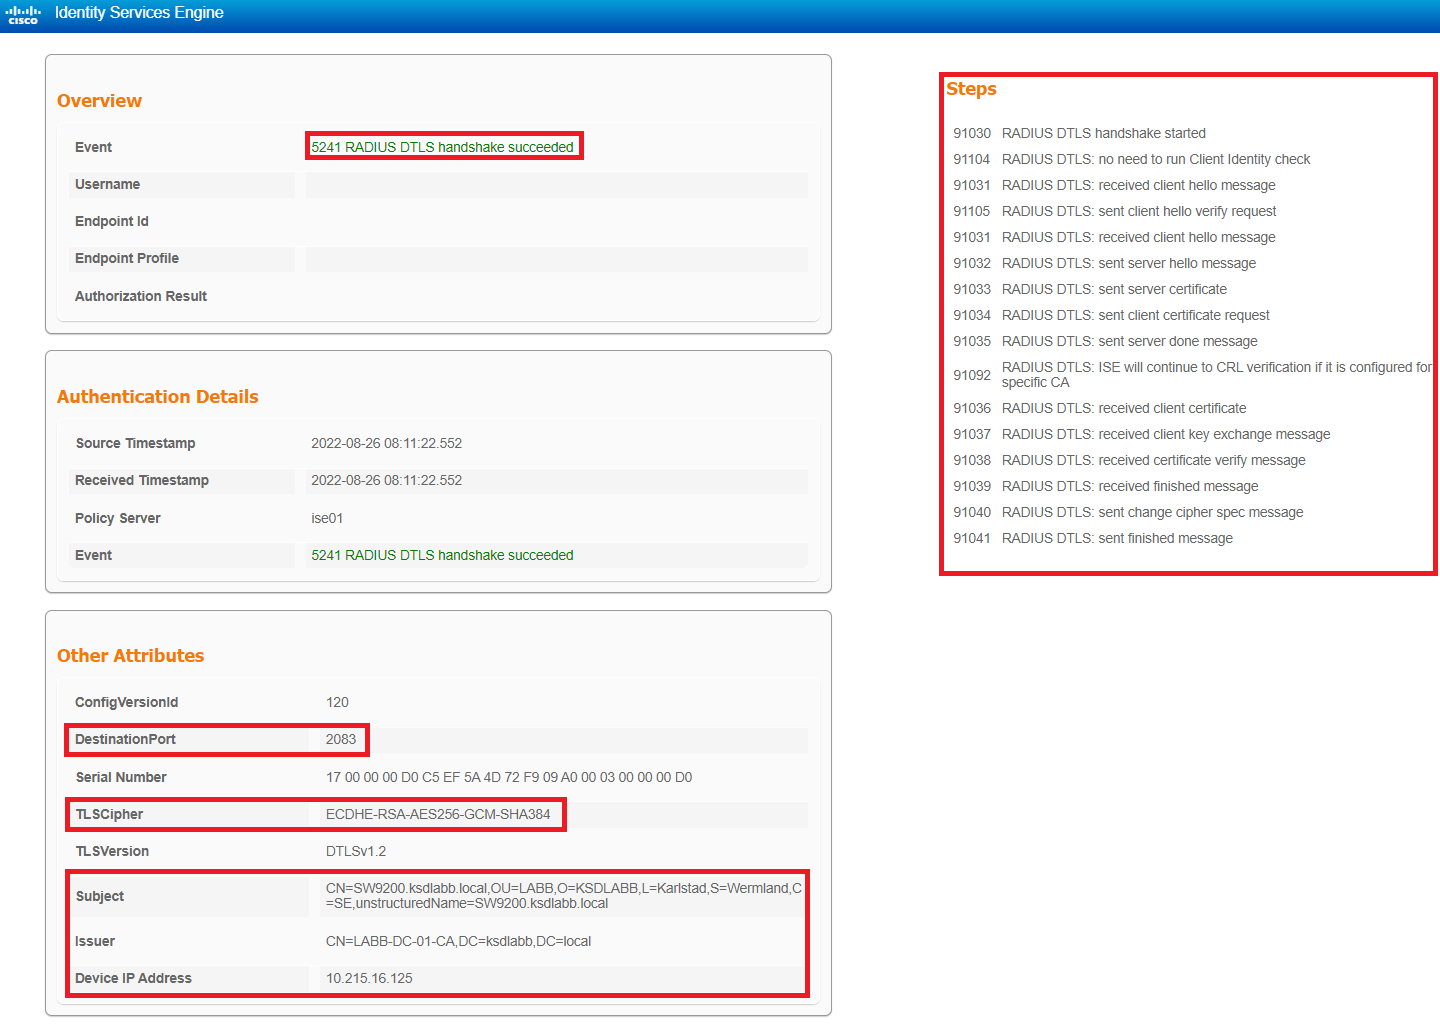
In the image below, I ran an AAA test (more on that later) from the Cisco device and it generated two logs in the Live Log; one for the RadSec (RADIUS over DTLS) connection set up and one for the actual user authentication (with username “JACOB_TEST”).
Unfortunately, the row for the RadSec log entry is rather empty in this view, but clicking on the little magnifying glass to open the Detailed Report shows us a lot of more useful data.
Here we can see that the RADIUS DTLS connection was successful, which encryption cipher is being used, the Subject of the certificate of the RadSec client (“SW9200”) and which IP address the RadSec request came from.
Testing basic RadSec from CLI
While you can test RadSec simply by running a few actual network access attempts by plugging in a computer or some other endpoint into a switch to trigger the 802.1x/MAB process for authentication, there is a better way to perform these tests initially.
There is a command called “test aaa…” that can be used to generate RADIUS requests directly on the Cisco device and send them to a designated RADIUS server. This type of authentication attempt uses the very dated (and insecure) “PAP ASCII” username and password method, but it does not matter for our initial testing.
We just want to confirm that the RadSec tunnel gets established from the Cisco device to ISE, so it does not even matter that the username and password used for these tests are invalid in ISE.
test aaa group radius server name ISE-PSN-RADSEC BAD_USER BAD_PASS new-code
There are three results that can be returned after running this command.
RadSec Failure (double “User Rejected”)
In this case, “User Rejected” is displayed twice after running the “test aaa…” command. This means that the Cisco device was unsuccessful in establishing a RadSec connection to ISE. This can happen if your certificates are not in order, if the clock is wrong or if there is incorrect configuration on either ISE or the Cisco device.
RadSec Successful (single “User Rejected”)
In this case, “User Rejected” is displayed only once after running the “test aaa…” command. This means that the Cisco device was successful in establishing a RadSec connection to ISE, (which is what matters to us) but the specified Username and Password could not be validated by ISE. Since the Username we used does not exist in ISE, this was an expected result.
RadSec Successful (“User successfully authenticated”)
In this case, “User successfully authenticated” is displayed only once after running the “test aaa…” command. This means that the Cisco device was successful in establishing a RadSec connection to ISE and that the credentials used for the test were valid.
For this test, I created a local user in ISE called “JACOB_TEST” with the password “Cisco123!” and made sure there was a Policy Set with PAP ASCII enabled that could accept these credentials. To be clear, you do not need to successfully authenticate a test-user to confirm that RadSec is working, the scenario above confirms that RadSec is working just as much as this one.
Test Change of Authorization (“CoA”) from ISE
This is a very important test to perform after you have confirmed that RadSec is working when authenticates are initiated from the Cisco device to ISE. Change of Authorization on the other hand, reverses this communication.
After you have connected some type of endpoint to your Network Device and its been authenticated via ISE, try to issue a Session Reauth by navigating to Context Visibility > Endpoints.
Make sure to perform this test after the initial RadSec connection between the Cisco device and ISE has been terminated. This happens 120 seconds after the initial authentication was completed (unless you changed this configuration in ISE). We want it to terminate because we don’t want this test to be performed inside the already established connection, we want ISE to set up a new connection on its own.
Select your Endpoint and under “Change Authorization” select CoA Session Reauth. This should immediately send out a Change of Authorization packet to the switch and you should see a popup in the bottom right corner telling you that the CoA was sent successfully.
If instead nothing happens or the ISE windows freezes for a minute, you know the CoA has failed. This means you need to double-check your configuration in ISE (mainly the RADIUS DTLS certificate, make sure it has all the parameters like Client Authentication and Server Authentication on it) and check the CoA configuration on the Cisco device (found under “aaa server radius dynamic-author…”).
Use ISE built-in “TCP Dump” for packet captures
To confirm that RADIUS requests from the Cisco device arrives to ISE, or to see that ISE is really sending Change of Authorization (“CoA”) messages to the Cisco device, use the built-in packet capture TCP Dump.
Find this tool under Operations > Troubleshooting > Diagnostic Tools > TCP Dump.
Start the capture, do a test or two, stop the test and then open up the packet capture file in Wireshark for analysis.
Various Certificate Issues / Errors
Depending on the phase of your RadSec deployment, problems with certificates can start to show as time goes on. Most of the time, the Detailed Report of an entry in the ISE Live Log will tell you what is wrong.
These problems could be:
Cisco device certificate not trusted or unknown
Cisco device certificate has expired
Cisco device certificate has been revoked
The only real strange error message I found was when ISE could not find the Certificate Revocation List (“CRL”) which threw the error “RADIUS DTLS: SSL/TLS handshake failed because of an unknown CA in the certificates chain”, so watch out for that scenario if you are using CRL or any other revocation check.
Show Commands
The “show crypto pki certificates verbose <Trustpoint>” command we used earlier will show us that we have a certificate installed on the Cisco device, and we can use this output to confirm the certificate is still valid and contains the proper settings (like Server Authentication and Client Authentication).
The “show aaa servers” commands shows basic information about configured AAA servers including counter for successful/failed authentication, authorization and accounting messages. You can also see RadSec connection statistics here.
The output below is just a fraction of the information displayed with this command.
The command “show radius server-group all” will display all of your AAA server groups and which server are configured within them together with some basic statistics. This show command has some conflicting information though, as it says references port 1812/1813 (non RadSec ports) for our RadSec AAA server.
While not specific to RadSec, the “show run aaa” command is great because it shows all of the AAA parts of the running configuration, including RadSec settings,
That is all for this series of articles, good luck with your implementation :)