This article is a part of a series of articles where I go through setting up RadSec (RADIUS over DTLS/TLS) between a Cisco device and Cisco ISE, using Microsoft's Active Directory Certificate Services to issue certificates to both the Cisco device (switch) and Cisco ISE.
You can find links to all of the articles in this series down below.
Cisco RadSec Part 1 - RADIUS over TLS/DTLS Overview
Cisco RadSec Part 2 - RadSec Certificate Template using Microsoft AD Certificate Services
Cisco RadSec Part 3 - Cisco Device Manual Certificate Enrollment
Cisco RadSec Part 4 - Cisco Device SCEP Certificate Enrollment
Cisco RadSec Part 5 - Cisco ISE RadSec Configuration
Cisco RadSec Part 6 - Cisco Device RadSec Configuration
Cisco RadSec Part 7 - Testing, Troubleshooting and Show Commands
Introduction
In this article, we will go through the configuration of Cisco ISE to communicate using RadSec (RADIUS over DTLS) to our Cisco device. This cover both general settings and settings related to specific Network Devices.
This configuration includes assigning (or issuing) a RADIUS DTLS certificate to ISE, configuring some general settings, and lastly, activate RADIUS DTLS support for specific Network Devices (like our Cisco switch).
In this series of articles, the following hardware and software are being used.
Cisco Catalyst C9200L-48P-4X Switch running IOS-XE 17.3.5
Cisco ISE version 2.7
Microsoft Windows Server 2016
ISE RADIUS DTLS Certificate
For RadSec communication to work between ISE and the Cisco device, both sides need to have their own certificate to show to each other to verify each other’s identity.
The certificate used for this feature will be issued by the same Active Directory Certificate Services we have used to issue the certificate to our Cisco device. Since ISE and the Cisco device will share the same Root CA certificate
Certificates are already a big part of ISE installations and since you are reading this series of articles, I assume you already have some experience working with both ISE and certificates. Therefore, we will not go through the complete step-by-step on how to install certificates on ISE.
If you already have ISE up and running, chances are you could use one of the currently installed certificates for RadSec. Most ISE deployments have certificates from the company’s internal certificate structure (“PKI”) installed to use for either “EAP Authentication” or simply for “Admin” features (including the certificate used for the Admin web UI and ISE inter-node trust in multi-server deployments).
It is very important that the certificate you choose to use for RADIUS DTLS has both the Enhanced Key Usage parameters “Server Authentication” and “Client Authentication”. Since the ISE server will act as both a Server (when the Cisco device initiates a connection to ISE) and as a Client (when ISE sends a Change of Authorization (“CoA”) to a Cisco device).
If none of your current certificates live up to the requirements above, you can also use the “RADSEC-CLIENT-CERT” template (created in Part 2 of this series) to issue a new certificate specifically to use with RadSec. All the necessary parameters are available in the Certificate Template. If you did like me and configured a validity period of 10 years for the template, that means you probably will have bought a new ISE server deployment before this certificate expires.
Regardless of how you obtain a certificate to use for RadSec, all you need to do with it in ISE is to assign the RADIUS DTLS role to the certificate.
Log in to the web UI and navigate to Administration > System > Certificates > Certificate Management.
My ISE server is already joined to my Active Directory and has EAP/Admin certificates issued from the Root CA server, which means I have already added the Root CA certificate to “Trusted Certificates”.
Using the Certificate Signing Requests feature, I created a new CSR and submitted it via the web enrollment to the Active Directory Certificate Services. After issuing this certificate and “binding” it to the CSR into ISE (which “binds” the private key to the certificate from ISE’s point of view), select “RADIUS DTLS” under the Usage section.
To use an already installed certificate for RADIUS DTLS, go to Administration > System > Certificates > Certificate Management > System Certificate to select your certificate and click on Edit. Here you can select “RADIUS DTLS” under the Usage section, click on Save when you are done.
Changing the RADIUS DTLS certificate does not require a server restart.
The finished result is that we have one or more certificates used for other features of ISE (like EAP Authentication, Admin, Portals, etc.) and one specific certificate for RADIUS DTLS connections.
For example, the CSR I generated on ISE to use for RADIUS DTLS had this content in it:
CommonName (“CN”) = ise.ksdlabb.local
Subject Alternative Name (“SAN”) DNS-name = ise.ksdlabb.local
Subject Alternative Name (“SAN”) DNS-name = *.ksdlabb.local
Do note that the RADIUS DTLS certificate only applies to setting up the DTLS connection to secure the RADIUS traffic, the certificate presented by ISE to endpoints (laptops, tablets, smartphones, etc.) authentication via EAP is still the certificate with the “EAP Authentication” role assigned to it.
In the next article regarding switch configuration, you will need to enter either the CommonName or a SAN from this certificate into the RadSec configuration. This is a security mechanism that has the switch verifying the name(s) of ISE’s certificate, making sure the switch is connecting to an “expected” RADIUS server based on the certificate’s name(s).
If you are interested in reading more about certificate structures and their relationship to ISE, I recommend reading a previous article of mine: Certificates in ISE. Personally, I like the SAN wildcard certificate structure that results in being able to install just the same certificate into every ISE server of a deployment.
ISE General RADIUS DTLS Configuration
In terms of general settings for RADIUS DTLS, the choices are pretty limited.
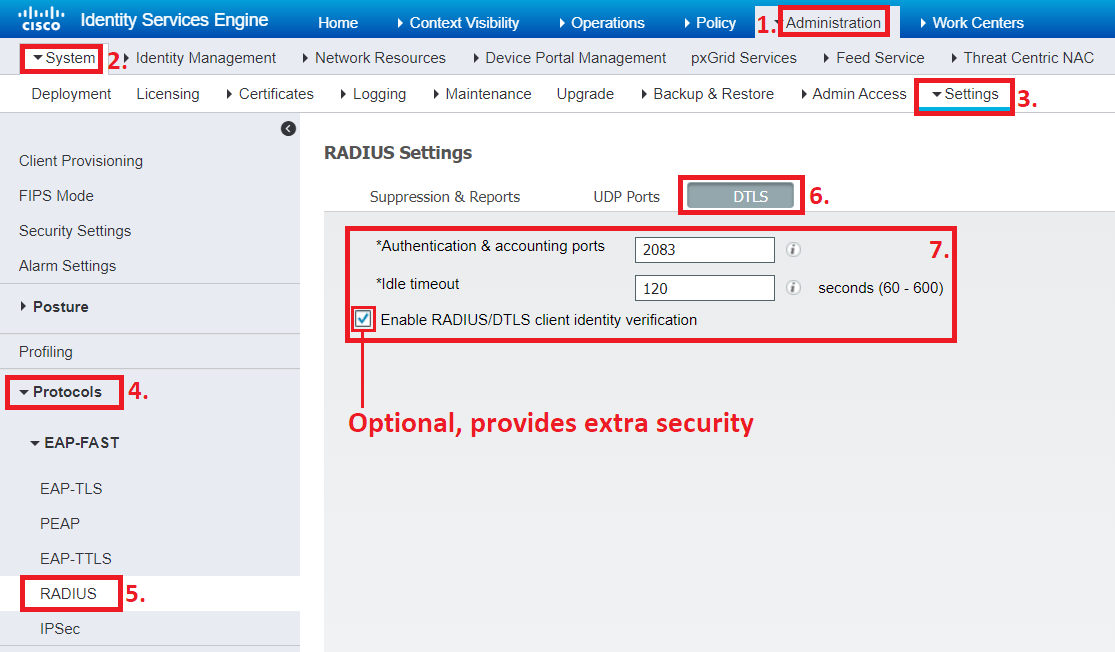
Navigate to Administration > System > Settings > Protocols > RADIUS and click on the DTLS tab to see the settings below.
You can change the port used for RADIUS DTLS (default UDP port 2083) and the idle timeout, which tears down the RADIUS DTLS tunnel to a Network Device after a certain period if no new requests are sent from the device to ISE.
If you check the “Enable RADIUS/DTLS client identity verification” box, ISE will verify that the DNS name configured on the Network Device in ISE (more on this further down) matches the CN/SAN of the device’s certificate, when it is presented to ISE during the DTLS handshake.
We are going to check this box since it adds another layer of security, but I believe the mutual certificate authentication between ISE and the Cisco device by itself already provides a solid control mechanism in terms of security.
If the SAN contains an IP address, this can also be used by ISE to match it to the Network Device’s IP address configured in ISE.
Network Device Configuration in ISE
The last step to configure in ISE is the settings for the Network Device itself. We need to enable RADIUS over DTLS and a few other settings.
Navigate to Administration > Network Resources > Network Devices. Add a new Network Device or modify an existing one.
In the RADIUS Authentication Settings, check the box for DTLS Required. This will disable the regular (non-DTLS) RADIUS settings.
Shared Secret is always set to “radius/dtls”, this cannot be changed.
Leave the CoA (Change of Authorization) port at the default UDP port 2083.
Issuer CA of ISE Certificate for CoA - to be honest, I am a bit unsure about what this setting does. I have tried setting it to anything just to see if something breaks, but so far, I have not seen it cause any issues. We will leave this one blank (“Select if required (optional)).
DNS Name enabled ISE to check that the DNS Name in the CN/SAN fields of the Cisco device’s certificate matches what is configured as the “DNS Name” for the Network Device in ISE. If you did indeed activate the extra control mechanism in the previous section above, you will need to enter the “DNS Name”, which is the name stated as the device certificate’s CN or SAN. In our case, this will be “SW9200.ksdlabb.local”. If you did not activate this optional feature, you can leave the “DNS Name” empty. Do note that you do not need to have your switches in your DNS server’s entries for this feature to work. ISE only matches the certificate’s content (CN/SAN) with the DNS Name written in this field inside ISE for this specific Network Device.
Click on Save to save your settings.
That’s all for configuration in ISE, next up is configuring a Cisco switch for RadSec communication with ISE using RADIUS over DTLS.
Next part: Cisco RadSec Part 6 - Cisco Device RadSec Configuration