This article is a part of a series of articles where I go through setting up RadSec (RADIUS over DTLS/TLS) between a Cisco device and Cisco ISE, using Microsoft's Active Directory Certificate Services to issue certificates to both the Cisco device (switch) and Cisco ISE.
You can find links to all of the articles in this series down below.
Cisco RadSec Part 1 - RADIUS over TLS/DTLS Overview
Cisco RadSec Part 2 - RadSec Certificate Template using Microsoft AD Certificate Services
Cisco RadSec Part 3 - Cisco Device Manual Certificate Enrollment
Cisco RadSec Part 4 - Cisco Device SCEP Certificate Enrollment
Cisco RadSec Part 5 - Cisco ISE RadSec Configuration
Cisco RadSec Part 6 - Cisco Device RadSec Configuration
Cisco RadSec Part 7 - Testing, Troubleshooting and Show Commands
Introduction
In this article, we will be using the Simple Certificate Enrollment Protocol ("SCEP") feature of the Network Device Enrollment Services ("NDES") within the Active Directory Certificate Services to automatically enroll a Cisco switch to get a certificate issued to it for use with RadSec.
The article assumes you have already completed Part 2, found in the links above.
While certificates on Cisco devices can be used for other things besides RadSec, this article is written with the purpose of using the certificate for RadSec specifically.
In this series of articles, the following hardware and software are being used.
Cisco Catalyst C9200L-48P-4X Switch running IOS-XE 17.3.5.
Cisco ISE version 2.7
Microsoft Windows Server 2016
Basics of SCEP
Before we get into the configuration, let's go through quickly how the SCEP protocol works.
As its name states, SCEP is a rather simple protocol to make it possible for devices to enroll in the certificate infrastructure that the SCEP server belongs to. A lot of MDM services like MobileIron, Intune, and more use SCEP to make sure that the devices they managed are issued certificates to be used for various purposes.
SCEP Initial Certificate Enrollment process
The SCEP process can be broken down into these steps:
A device creates a Trustpoint containing a Certificate Signing Request ("CSR") which includes the various parameters/values that it wants to be included in the certificate.
The device sends this CSR together with a SCEP Challenge password to the SCEP server. This connection is made using a typical web port (TCP 80/443) from the device to the SCEP server. The SCEP Challenge password can be one-time use only, statically configured or blank, depending on your specific /security needs. In general, the SCEP Challenge password is transmitted “out-of-band” and given from an Administrator to the one who has control of the device that needs a certificate. At the same time, the Root CA certificate from the SCEP server is automatically installed into the device’s Trustpoint.
The SCEP server receives the CSR and confirms that the SCEP Challenge password is correct.
The SCEP server sends the request to an issuing Certificate Authority ("CA"). In some cases (mostly in smaller environments), the SCEP server itself might also be an issuing CA server. This is the case in this article.
The CA issues (creates) the certificate and sends it back to the SCEP server.
The certificate is sent from the SCEP server to the device, where it is installed in the device's certificate store.
SCEP Certificate Renewal process
As far as certificate creation goes, the renewal process of a certificate is in general technically the same as issuing a new certificate. When it is time to renew the certificate, a CSR is created and sent to the SCEP server but instead of sending a SCEP Challenge password together with the CSR, the device signs/validates the CSR using its current certificate. The SCEP server then uses this signature to confirm that the CSR is valid and then sends the CSR onward to the issuing CA for certificate creation.
Thanks to this, you do not need to keep generating new SCEP Challenge passwords (if you are using them, to begin with) when it is time to renew the certificates for your devices.
Installing NDES to enable SCEP
Depending on your specific environment, you may need to install the Network Device Enrollment Service on the server running Certification Services. If you did not install this service ("role") during the initial setup of your Active Directory, you can install it afterward by starting the "Server Manager", and navigating to Dashboard > Manage > Add Roles and Features.
Via the installation wizard, you can install the Network Device Enrollment Service. Installing it is pretty straightforward, it's mostly just pressing "Next" several times and setting up a Service Account. The Service Account needs to be put into a specific group (IIS_IUSRS), then you need to give that Service Account the Read and the Enroll permissions on the Certificate Template ("RADSEC-CLIENT-CERT" created in Part 2 of this article series) to be used with SCEP.
You can set this permission by launching the Certification Authority > right-click on Certificate Template under your CA and click on Manage. Look for “RADSEC-CLIENT-CERT” in the long list of templates, open it up and under the Security tab, add the Service Account ("SVC_NDES") and give it the Read and the Enroll permissions.
With this, the installation is complete and we are now able to access the SCEP Admin portal via this URL:
http://10.20.20.100/CertSrv/mscep_admin/
On this page, you can see the "enrollment challenge password" which is the SCEP Challenge password.
By default, these SCEP Challenge passwords are for one-time use only and if you press “F5” to refresh the page, a new SCEP Challenge password will be generated. Further down you will find some tweaks that can be made to the process.
You can use the DNS server and the IIS Manager to set up "proper" hostnames/DNS for the admin portal to make it more professional, but that is outside the scope of this article. We will simply connect to the IP address directly.
Configuring NDES and SCEP
The nitty gritty configuration of NDES and SCEP is done using Registry parameters. Go into the Registry (launch "regedit") and navigate to the Folder below.
HKEY_LOCAL_MACHINE\SOFTWARE\Microsoft\Cryptography\MSCEPOn "MSCEP" we need to change some values for existing settings and add one setting of our own from scratch.
Change the settings of the EncryptionTemplate, GeneralPurposeTemplate, and SignatureTemplate to the name of the Certificate Template we are going to use for SCEP-issued certificates. In our case, the name should be "RADSEC-CLIENT-CERT". Make sure these three parameters match the name of the Certificate Template exactly!
In addition to this, right-click somewhere in the window and select to add a new DWORD Value. Name this parameter "DisableRenewalSubjectNameMatch" and set the value to "1".
This will allow our Cisco devices (or any other device using SCEP) to perform a certificate renewal in the future, even if the hostname of the device has changed the name from what was printed on the original certificate. This can save you some headaches if you are deploying certificates to devices that will be renewed at least once before the device is decommissioned, and for some reason, the hostname is changed during all this time (for example, during a company merger/acquisition where network devices are renamed).
Finally, right-click on "MSCEP" and click on Permissions...
Add the Service Account ("SVC_NDES") and assign it Full Control.
Click on Apply and OK when you are done.
There are a few other settings that can be made in the Registry, like setting a single SCEP password to be used at all times (not very secure). By default, SCEP Challenge passwords are for one-time use only and last for 60 minutes (this period can also be changed with a custom value). Up to 5 one-time passwords can be active at once (this password “cache” can also be modified using a custom value), if you try to generate more than 5 passwords on the Admin page you will be told you must use some of the already existing passwords before making new ones or simply wait for them to expire. You can also choose to remove the password requirement altogether (very much not secure).
What you do here is up to you, but for the sake of this article, we will keep the rotating SCEP passwords and their default validity timers enabled.
With that, the NDES/SCEP configuration is now done!
After applying all the settings, you will need to restart the server itself or the Certificate Services. However, restarting only the Certificate Service did not apply the settings for me, forcing me to restart the whole server instead, your mileage may vary here.
General Switch Configuration
Since we will be working with certificates, it is very important that we configure these general settings first, before getting into the certificate creation.
Adjust the time zone parameters to fit your needs.
hostname SW9200
ip domain-name yourCompany.com
clock timezone CET 1
clock summer-time CEST recurring last Sun Mar 2:00 last Sun Oct 3:00
ip name-server 10.10.10.111 10.10.10.222
ip ntp server 10.10.10.123
Use "show clock" and "show ntp associations" to verify that your clock is correct before moving on, otherwise, you can run into hard-to-find issues with your certificate implementation.
Choose Key pair Algorithm for CSR
Next up, create a new Key pair to be used to generate the Certificate Signing Request ("CSR") that will be used to create the certificate for the Cisco device.
You can use either RSA or ECC algorithms to create this key pair. RSA is more widely adapted but ECC can create stronger encryption using shorter key sizes.
The Active Directory Certificate Services (Windows Server 2016) in my lab did not have support for ECC installed at the moment of this writing, so I will be using RSA throughout this entire article.
However, I am including the ECC equivalent commands down below (but with "!" in front of them to prevent them from being activated).
Create Key Pair
Create the key pair using a strong key, at a minimum size of 2048 for RSA and a minimum size of 256 if you are using ECC. We will call this key pair “RADSEC-KEY-SCEP”.
crypto key generate rsa modulus 2048 label RADSEC-KEY-SCEP
! crypto key generate ec keysize 256 label RADSEC-KEY-SCEP
If for some reason you need to re-create the key pair above, use these commands to erase the current key pair first and then run the “crypto key generate…” command again.
crypto key zeroize rsa RADSEC-KEY-SCEP
crypto key zeroize ec RADSEC-KEY-SCEP
Activate “Terminal Monitor” (recommended)
If you are connected remotely to your network device via SSH/telnet, I highly recommend turning on "terminal monitor" from this point forward, before issuing the upcoming commands. This will help you more easily follow the SCEP certificate enrollment process.
Certificate enrollments (both initial enrollment and renewal enrollment) are logged to the Buffered Log on the device, which can be shown using the "show logging" command. With "terminal monitor" active, you will see these processes happening in real time.
Use the command “terminal no monitor” to turn off this feature.
Set short certificate validity periods for testing (optional)
Before moving on to creating our CSR and submitting it to the SCEP server, consider changing the validity period of the “RADSEC-CLIENT-CERT” Certificate Template to something very short like only 1 hour. This will allow you to much easier test and confirm that certificate renewal is working.
To do this, go back to Certification Authority > select your CA > right-click on Certificate Template > Manage > Open up the “RADSEC-CLENT-CERT” certificate template and in the General tab, change the validity period.
The switch configuration we will go through in a moment has a parameter where you can configure how long (a percentage of the validity period) the switch should wait until it attempts to renew its certificate. By adjusting this parameter, you can trigger a certificate renewal in just a few minutes, saving you some boring wait time.
Create a Trustpoint
Next up, we are going to create a Trustpoint, where we will store both the Root CA certificate from the Microsoft Certificate Service Certificate Authority and the Cisco device certificate, which will be created later. The Root CA certificate will be downloaded by the Cisco device, followed by the CSR being submitted to the SCEP server and the finished certificate getting installed inside the Cisco device.
Inside the Trustpoint (which we will call “TP-AD-PKI-SCEP”), we specify the information that will be used as parameters for the Certificate Signing Request ("CSR").
At the bottom, specify which key pair (RSA or ECC) to use for the creation of this CSR/certificate.
crypto pki trustpoint TP-AD-PKI-SCEP
enrollment retry count 100
enrollment retry period 60
enrollment mode ra
enrollment url http://10.20.20.100:80/certsrv/mscep/mscep.dll
subject-name C=SE, ST=Varmland, L=Karlstad, O=KSDLABB, OU=LABB, CN=SW9200.ksdlabb.local
! Select VRF if needed
! vrf MGMT
serial-number none
ip-address none
password 24DD53497FD04B5A
revocation-check none
source interface vlan VLAN
rsakeypair RADSEC-KEY
! eckeypair RADSEC-KEY
auto-enroll 30 regenerate
exit
do write memory
An important setting must be configured later (after the initial certificate enrollment) to enable the Certificate Renewal process, keep reading to not miss this!
Some explanations for the commands above:
The "enrollment retry…" parameters set the number of attempts (100) and the time between each attempt (60 minutes).
Password is the SCEP Challenge password available on the SCEP Admin page, it looks something like this "24DD53497FD04B5A" in my case. This password is visible on the URL discussed earlier: http://10.20.20.100/CertSrv/mscep_admin/
If you chose to disable the SCEP Challenge password requirement on your SCEP/NDES server, simply type in only "password" without anything afterward.
Subject Name should match according to your organization’s structure and the Common Name (“CN”) should contain the device's name.
You can also add fields such as "subject-alt-name" and "fqdn" if you see a need for that. In my case, we will skip them.
Specify if you want to use some sort of revocation checks like CRL or OSCP. Make sure ports TCP 80/443 is open from the Cisco device to the server hosting the CRL/OSCP service. In my case, we will skip the revocation check mechanism completely.
Specify which key pair (RSA or ECC) to use for the creation of this CSR/certificate.
The parameter "auto-enroll 30 regenerate" means that after 30% of the validity time of the certificate has passed, the Cisco device will attempt to renew the certificate. The "regenerate" keyword also states that the Cisco device should generate a new key pair to use for the new certificate, which is a good security practice. If you want to spend some time testing the certificate renewal process, set “auto-enroll” to something really low like 5 (meaning 5%) together with a short validity period for your Certificate Template (covered earlier) to force the renewal attempts to start just a few minutes after the initial certificate enrollment is completed.
Another thing to note is that (from my testing) if certificate RENEWAL is unsuccessful, the device will wait for 5 minutes and then try again. I have not found any configuration that changes this specific timeout.
If for some reason you need to re-create the Trustpoint above, use this command to erase the previous Trustpoint first.
no crypto pki trustpoint TP-AD-PKI-SCEP
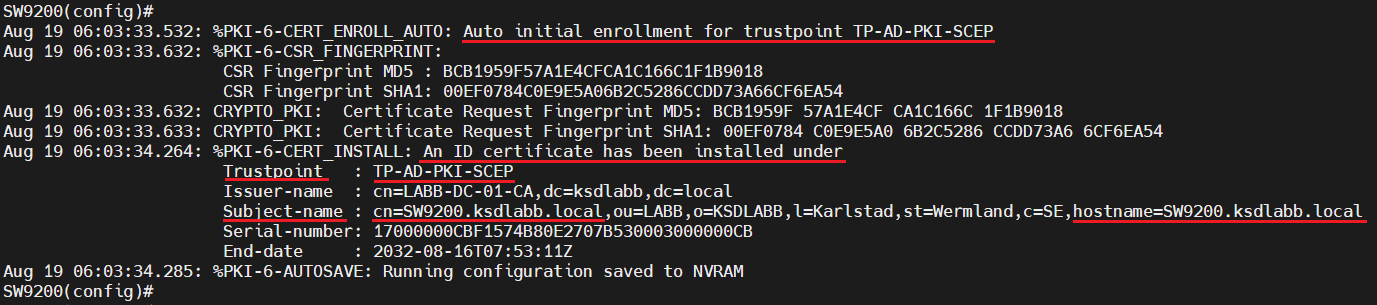
Start Certificate Enrollment process
With the Trustpoint parameters in place, we will now trigger the creation of the CSR and have the Cisco device submit it to the SCEP server. In this process, the Root CA certificate is authenticated and after that, the CSR is created and sent for signing.
crypto pki authenticate TP-AD-PKI-SCEP
Confirm the installation of the Root CA certificate by typing "yes".
After a few seconds, if everything went well, you should see the installation of the device certificate start and complete.
Enable (fix) Certificate Renewal process
One strange caveat when using SCEP Challenge passwords with Cisco devices is that you need to remove the SCEP Challenge password used for the initial certificate enrollment after your device has been issued a certificate for the first time. If you do not do this, certificate renewal enrollment will fail.
I'm not sure if this is by design or if this is an oversight, one could think that the Cisco device would be smart enough to use its current certificate to sign/validate the certificate renewal CSR, even if the old SCEP Challenge password is still available in the configuration.
To "blank" the SCEP Challenge password, simply go back into your Trustpoint’s configuration and enter just "password" without any password following the keyword.
crypto pki trustpoint TP-AD-PKI-SCEP
password
exit
do write memory
Verification
To view the certificate that the Cisco device just installed and its Root CA certificate (which in my case, is also the CA that issued the certificate itself), use the show command below.
show crypto pki certificates verbose TP-AD-PKI-SCEP
Now, the output of this command is very long as it will list both the device's own certificate and its Root CA certificate, down below you can see the first portion of the output which shows some of the interesting parts, like certificate content, validity dates, when renewal attempts will occur and more. Further down in this output you can see associated Trustpoint and key pairs (not in the image).
In the next part of this series of articles, we are going through the configuration of Cisco ISE to accept RadSec connections from our Network Device.
Next part: Cisco RadSec Part 5 - Cisco ISE RadSec Configuration