This article is a part of a series of articles where I go through setting up RadSec (RADIUS over DTLS/TLS) between a Cisco device and Cisco ISE, using Microsoft's Active Directory Certificate Services to issue certificates to both the Cisco device (switch) and Cisco ISE.
You can find links to all of the articles in this series down below.
Cisco RadSec Part 1 - RADIUS over TLS/DTLS Overview
Cisco RadSec Part 2 - RadSec Certificate Template using Microsoft AD Certificate Services
Cisco RadSec Part 3 - Cisco Device Manual Certificate Enrollment
Cisco RadSec Part 4 - Cisco Device SCEP Certificate Enrollment
Cisco RadSec Part 5 - Cisco ISE RadSec Configuration
Cisco RadSec Part 6 - Cisco Device RadSec Configuration
Cisco RadSec Part 7 - Testing, Troubleshooting and Show Commands
Introduction
In this article, we will be going through the process of using the Web Enrollment feature of Certificate Services to manually enroll a Cisco switch to get a certificate issued to it for use with RadSec.
The article assumes you have already completed Part 2, found in the links above.
While certificates on Cisco devices can be used for other things besides RadSec, this article is written with the purpose of using the certificate for RadSec specifically.
In this series of articles, the following hardware and software are being used.
Cisco Catalyst C9200L-48P-4X Switch running IOS-XE 17.3.5
Cisco ISE version 2.7
Microsoft Windows Server 2016
General Switch Configuration
Since we will be working with certificates, it is very important that we configure these general settings first, before getting into the certificate creation.
Adjust the time zone parameters to fit your needs.
hostname SW9200
ip domain-name yourCompany.com
clock timezone CET 1
clock summer-time CEST recurring last Sun Mar 2:00 last Sun Oct 3:00
ip name-server 10.10.10.111 10.10.10.222
ip ntp server 10.10.10.123
Use "show clock" and "show ntp associations" to verify that your clock is correct before moving on, otherwise, you can run into hard-to-find issues with your certificate implementation.
Choose Key pair Algorithm for CSR
Next up, create a new Key pair to be used to generate the Certificate Signing Request ("CSR") that will be used to create the certificate for the Cisco device.
You can use either RSA or ECC algorithms to create this key. RSA is more widely adapted but ECC can create stronger encryption using shorter key sizes.
The Active Directory Certificate Services (Windows Server 2016) in my lab did not have support for ECC installed at the moment of this writing, so I will be using RSA throughout this entire article.
However, I am including the ECC equivalent commands down below (but with "!" in front of them to prevent them from being activated).
Create Key Pair
Create the key pair using a strong key, at a minimum size of 2048 for RSA and a minimum size of 256 if you are using ECC. We will call this key pair “RADSEC-KEY”.
crypto key generate rsa modulus 2048 label RADSEC-KEY
! crypto key generate ec keysize 256 label RADSEC-KEY
If for some reason you need to re-create the key pair above, use these commands to erase the current key pair first and then run the “crypto key generate…” command again.
crypto key zeroize rsa RADSEC-KEY
crypto key zeroize ec RADSEC-KEY
Create a Trustpoint
Next up, we are going to create a Trustpoint, where we will store both the Root CA certificate from the Microsoft Certificate Service Certificate Authority and the Cisco device certificate, which will be created later.
Inside the Trustpoint (which we will call “TP-AD-PKI”), we specify the information that will be used as parameters for the Certificate Signing Request ("CSR").
You can also add fields such as "subject-alt-name" and "fqdn" if you see a need for that. In my case, we will skip them.
Specify if you want to use some sort of revocation checks like CRL or OSCP. Make sure ports TCP 80/443 are open from the Cisco device to the server hosting the CRL/OSCP service. In my case, we will skip the revocation check mechanism completely.
At the bottom, specify which key pair (RSA or ECC) to use for the creation of this CSR/certificate.
crypto pki trustpoint TP-AD-PKI
enrollment terminal pem
subject-name C=SE, ST=Varmland, L=Karlstad, O=KSDLABB, OU=LABB, CN=SW9200.ksdlabb.local
serial-number none
ip-address none
revocation-check none
rsakeypair RADSEC-KEY
! eckeypair RADSEC-KEY
exit
do write memory
If for some reason you need to re-create the Trustpoint above, use this command to erase the previous Trustpoint first.
no crypto pki trustpoint TP-AD-PKI
Display Certificate Signing Request ("CSR")
Next, we need to display the Certificate Signing Request ("CSR"), which we will later paste into the Web Enrollment service of the Certificate Services. Copy the CSR into Notepad or similar to save it for later.
crypto pki enroll TP-AD-PKI
Confirm the contents of the CSR by typing "yes".
When asked "Redisplay enrollment request?" type in "no" to exit and go back to configuration mode.
Import Root CA certificate into Trustpoint
Before submitting our CSR to the issuing CA to get a certificate for our Cisco device, the next step is to install the Root CA certificate into our Trustpoint.
Get a hold of the Root CA certificate in Base64 PEM format, you can often download it from the Certificate Services' Web Enrollment page. This is the same page where we will submit our CSR later.
In my case, the URL for this service is http://10.20.20.100/certsrv. Log in and select “Download a CA certificate” to select your Root CA certificate.
When you have the Root CA certificate, change the certificate’s file extension to .pem instead of .cer then open it up in Notepad or similar software to display the contents of it. The next step is to paste the contents of it into the Trustpoint.
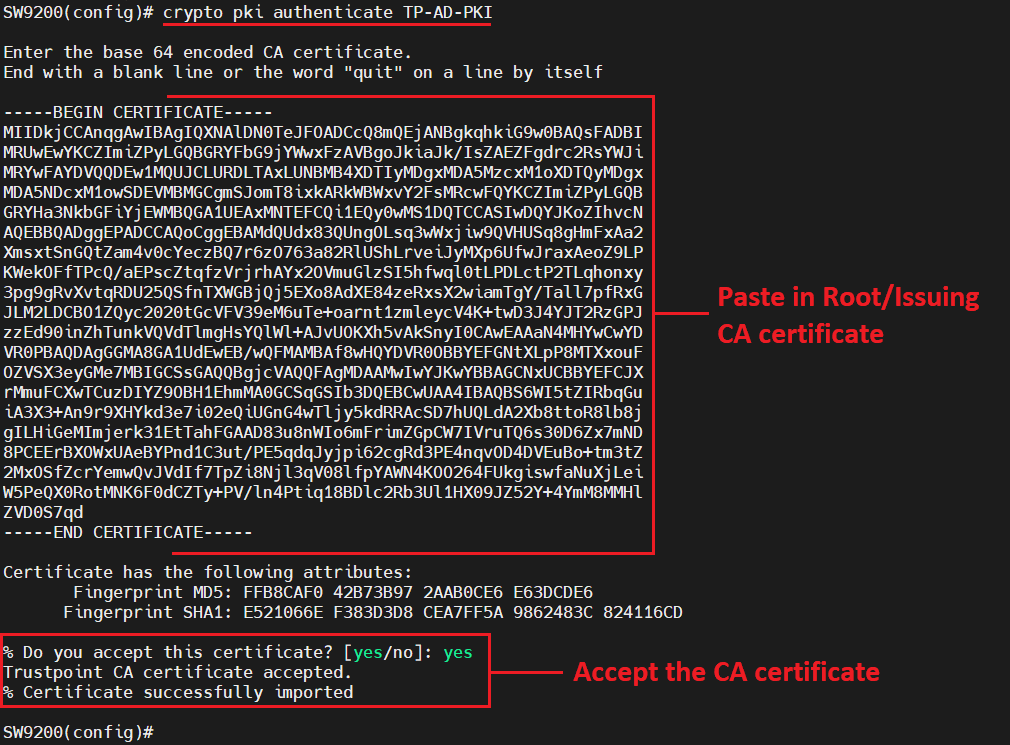
crypto pki authenticate TP-AD-PKI
Following this command, paste in the Root CA certificate like on the image below and type "yes" to accept the certificate.
Submit CSR to issuing CA server
Now, it is time to submit the Cisco device's CSR to the issuing CA that will issue the certificate. We are going to make use of the Certificate Template "RADSEC-CLIENT-CERT" created in Part 2 of this series.
Once again, navigate to the Web Enrollment page for the Certificate Services, which in this case is http://10.20.20.100/certsrv.
Log in and click on "Request a certificate" followed by "advanced certificate request".
Paste in the content of the Certificate Signing Request created earlier in this article. Set the Certificate Template to “RADSEC-CLIENT-CERT” in the dropdown list and click on Submit. Afterward, select to download the certificate as Base64 encoded.
Following this, the certificate for the Cisco device will now be issued (created) by the CA and downloaded to your PC. Change the certificate’s file extension to .pem instead of .cer, then open it up in Notepad or similar software to display the contents of it.
Import Cisco device certificate into Trustpoint
Return to the CLI of the Cisco device and run the command below.
crypto pki import TP-AD-PKI certificate
Paste in the contents of the device’s certificate you just downloaded.
If you did everything correctly, the device certificate should now be installed.
Verification
To view the certificate you just installed and its Root CA certificate (which in my case, is also the CA that issued the certificate itself), use the show command below.
show crypto pki certificates verbose TP-AD-PKI
Now, the output of this command is very long as it will list both the device's certificate and its Root CA certificate, down below you can see the first portion of the output which shows some of the interesting parts, like certificate content, validity dates, associated Trustpoint and key pair.
In the next part of this series of articles, we are going through the process of issuing certificates to Cisco devices using the Simple Certificate Enrollment Protocol ("SCEP"), which automates the process of certificate enrollment without us having to copy and paste the CSR and Root CA certificate content and instead having the Cisco device itself do this for us.
Next part: Cisco RadSec Part 4 - Cisco Device SCEP Certificate Enrollment