
This article is a part of a series of articles where I go through setting up RadSec (RADIUS over DTLS/TLS) between a Cisco device and Cisco ISE, using Microsoft's Active Directory Certificate Services to issue certificates to both the Cisco device (switch) and Cisco ISE.
You can find links to all of the articles in this series down below.
Cisco RadSec Part 1 - RADIUS over TLS/DTLS Overview
Cisco RadSec Part 2 - RadSec Certificate Template using Microsoft AD Certificate Services
Cisco RadSec Part 3 - Cisco Device Manual Certificate Enrollment
Cisco RadSec Part 4 - Cisco Device SCEP Certificate Enrollment
Cisco RadSec Part 5 - Cisco ISE RadSec Configuration
Cisco RadSec Part 6 - Cisco Device RadSec Configuration
Cisco RadSec Part 7 - Testing, Troubleshooting and Show Commands
Introduction
In this article, we take a look at how you can create a Certificate Template for use with RadSec and enroll your Network Devices using the Web Enrollment service of Microsoft’s Active Directory Certificate Services.
Deploying secure RADIUS communication using RadSec between your RADIUS server and RADIUS clients (Network Devices such as switches, routers, and WLAN controllers) requires mutual authentication using certificates.
This article assumes you already have a decent amount of knowledge and experience in working with both Windows Servers and certificates in general.
In this series of articles, the following hardware and software are being used.
Cisco Catalyst C9200L-48P-4X Switch running IOS-XE 17.3.5
Cisco ISE version 2.7
Microsoft Windows Server 2016
In this lab, we are using Windows Server 2016, but I imagine the configuration is very similar or both earlier and later versions of Windows Server, as well. I have not installed any special hotfixes or patches (to my knowledge) to get this running.
Create a new Certificate Template
A good start is simply copying an existing certificate template with most of the things we need already filled in. The one I use to copy in this article is called "Web Server" and should be available on most (if not all) Windows Server Certificate Services installations.
Start the Certification Authority and navigate to Certification Authority (LOCAL), expand the view of your CA server and right-click on Certificate Templates and select Manage. This will open the Certificate Templates Console.
You should now see all of the Certificate Templates available. Scroll down to see the "Web Server" template and right-click it and select Duplicate Template. The duplicated template should open up automatically for you to configure.
Head to the General tab and give the duplicated template a friendly name like “RADSEC-CLIENT-CERT” or similar.
Set the validity period to a pretty long period to avoid having to renew the certificates on your switches too often. This task can be automated using various tools or protocols like SCEP (which I will be looking into going forward). However, for the sake of this lab, I will set the validity period to 10 years.
Click Apply when you are done.
Do note that most issuing CAs probably have a limit on how long the validity period of an issued certificate can be and in Microsoft’s Certificate Authority it’s 2 years by default. In my lab environment, I have set this limit to 10 years. While shorter validity periods are of course considered more secure, for this one Certificate Template we will use the 10-year validity period, probably ensuring that the certificate does not need to be renewed before the network device is replaced.
However, note that you cannot issue certificates with longer validity periods than the issuing CA itself. An issued certificate cannot be valid longer than the time and date stated on the CA that issued the certificate (which makes sense, since when an issuing CAs certificate is no longer valid, all certificates issued by that CA should no longer be valid).
If you are interested in how to change the validity period limit in Microsoft’s Certification Authority, check out this article Increase Certificate Validity Period in Windows Server Certificate Services.
If you are setting up RadSec in a production environment, consider how you are going to manage the certificate renewal process (manually vs. automated using SCEP or similar), especially if you have a lot of network devices that you are deploying RadSec on.
With all that said, let’s move on to the next step.
Go to the Request Handling tab and make sure the Purpose of the certificates created using this template is set to "Signature and encryption".
Uncheck "Allow private key to be exported" if it is not unchecked already.
Go to the Subject Name tab and make sure that "Supply in the request" is selected.
Go to the Extensions tab, select Applications Policies and click on Edit. Click on the "Add..." button and add “Client Authentication” to the list. “Server Authentication” should already be included. I've seen Cisco documentation recommending that you have both Client Authentication and Server Authentication on these certificates, but the reasons for it are not clear.
However…
I have a theory that Server Authentication on the Cisco device’s certificate might be needed in the case of a Change of Authorization (“CoA”) issued from ISE to the Cisco device since the Server and Client roles are reversed in this process (ISE being the side that initiates the RadSec connection, not the Cisco device) and there is no currently active (previous) DTLS session to use. From my limited testing, this seems to be true. If the Certificate Template for the Cisco device certificate only contains Client Authentication, CoA sent from ISE failed, which can be seen both on the front page of ISE (in the “Alarm” section) and in the Live Log.
ISE and Cisco devices might have their own requirements for the certificate in terms of RadSec usage that is different from other manufacturers, therefore, I would recommend having both Server Authentication and Client Authentication on the certificates on both sides of the RadSec connection.
Click on OK when you are done.
Also under the Extensions tab, make sure that Key Usage includes "Digital signature".
Lastly, head to the Security tab to set permissions for the new certificate template. This is where we configure who can use this certificate template to issue certificates.
This is of course dependent on your specific environment, but in my lab, I will give Enroll permissions directly to my Administrator account.
Click on Apply and OK to finish the certificate template configuration.
You can now close the Certificate Templates Console and go back to the Certification Authority window.
Publish Certificate Template to Web Enrollment
Before we can enroll switches using the web enroll feature, we need to publish the certificate template to make it available for use.
In the Certification Authority window, right-click on Certificate Template and go to New and select Certificate Template to Issue.
Find the Certificate Template (“RADSEC-CLIENT-CERT”) in the list and click on OK.
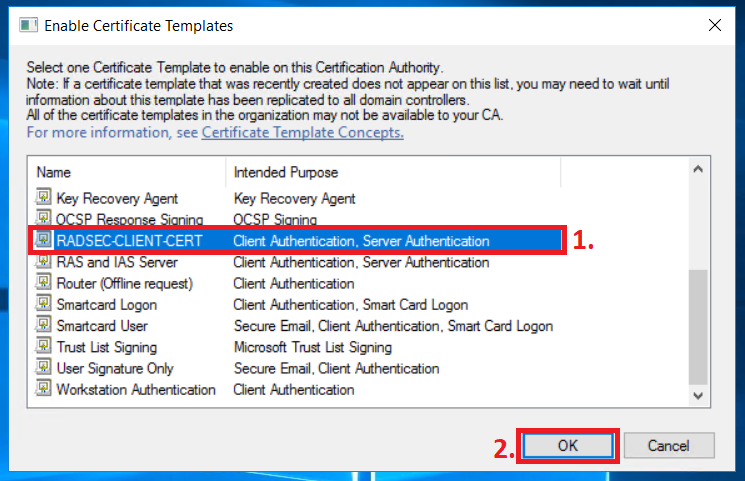
And now you are done!
You should now be able to see the Certificate Template we created available in the web UI of the Certification Authority service ("certsrv").
Navigate to the hostname/IP address of your CA server’s Certification Service. In my lab, this would be the following URL:
Log in using an account with proper permissions (set up earlier) and click on "Request a certificate" followed by "advanced certificate request".
In the Certificate Template dropdown list, you should now find the certificate template “RADSEC-CLIENT-CERT” created earlier and you can now use this to issue certificates for your devices running RadSec.
With the Certificate Template in place, we are now going to go through two different ways of using this template to issue a certificate to our Cisco device.
Next part: Cisco RadSec Part 3 - Cisco Device Manual Certificate Enrollment