In this article, we take a look at how to configure Cisco ISE as a TACACS+ server to handle authentication requests for controlling access to network devices, both for network administrators with full access and for helpdesk personnel with limited access.
If you want to do more simpler device administration control using the RADIUS protocol instead, check out the article below.
Cisco ISE - Configuring RADIUS Authentication for Device Administration
Introduction
Centralizing control over network device access using the TACACS+ protocol has been the golden standard for many years in most bigger networks. By allowing the administrator to configure detailed and granular permissions down at the very command level, TACACS+ can be used to create both very simple and very advanced sets of rules regarding how administrators can interact with network devices.
In this article, we are going to configure two different policies of network device access using TACACS+: one for Administrators, who will be allowed to use any command available, and one for Helpdesk personnel, who will be allowed to use only basic commands such as “show” commands and simpler troubleshooting commands.
The following hardware and software were used in this article:
Cisco ISE version 3.1 patch 5 with Device Administration license active.
Cisco Catalyst C9200L-48P-4X Switch running IOS-XE 17.6.4
ISE TACACS+ Configuration
Let’s start off by diving right into Cisco ISE and checking out the different TACACS+ settings that are available. We are not going to go through every single setting or checkbox that you can use, but we will go through each of the sections below to set up the minimum configuration needed for a solid TACACS+ implementation.
Enable Device Admin persona on PSN nodes
The first step is to enable the Device Admin persona on your Policy Service nodes (PSNs).
Navigate to Work Centers > Administration > System > Deployment and select your PSN node(s). You will need to the service on your PSN nodes one by one.
Check the box for “Enable Device Admin Service” and click on Save.
Configure General TACACS+ Settings
The next step is to check out the general settings for the TACACS + protocol.
Navigate to Work Centers > Device Administration > Settings > Connection Settings. Here you can configure protocol sessions and connection timeouts, but the most interesting thing is the Username and Password prompts. This allows you to send back custom prompts to the network device when the administrator tries to log in.
This is a great way to display that TACACS+ authentication is available since you can tell from just looking at the prompt. In my case, I will set these prompts to “TAC-User” for the Username prompt and “TAC-Pass” for the Password prompt.
Do note that the custom Username prompt configuration only works for Telnet connections, since SSH does not handle usernames the same way. The custom Password prompt configuration will work for both Telnet and SSH, though.
Another interesting setting can be found in the Password Change Control tab, where you can choose to either Enable Telnet Password Change or Disable Telnet Password Change. This can allow you to change your account’s password directly using the login prompt of the network device. Despite the name, this process works for SSH as well as Telnet.
If you enable password changing, trigger the process by simply connecting to a TACACS+-enabled network device, and typing in your username and a “blank” password. This will give you another prompt to enable password change, see example on the image below.
If you have connected ISE to an external identity store like Active Directory, you may need to check some other boxes in the settings for the Active Directory in ISE to enable the new password to update in the Active Directory as well (I did not try this, unfortunately). Depending on your organization’s password integrations, like syncing passwords across multiple systems or services, you may want to disable this feature in ISE.
Add Network Device for TACACS+
To enable TACACS+ authentication for a network device, add it or modify an existing network device under Administration > Network Resources > Network Devices > Network Devices. Fill in a hostname and an IP address and then check the box for TACACS Authentication Settings. Here you need to input the Shared Secret that will also be configured in the network device itself later note. Make a note of what you put in here, we will need it later.
Click on Save when you are done.
Configure A TACACS Profile
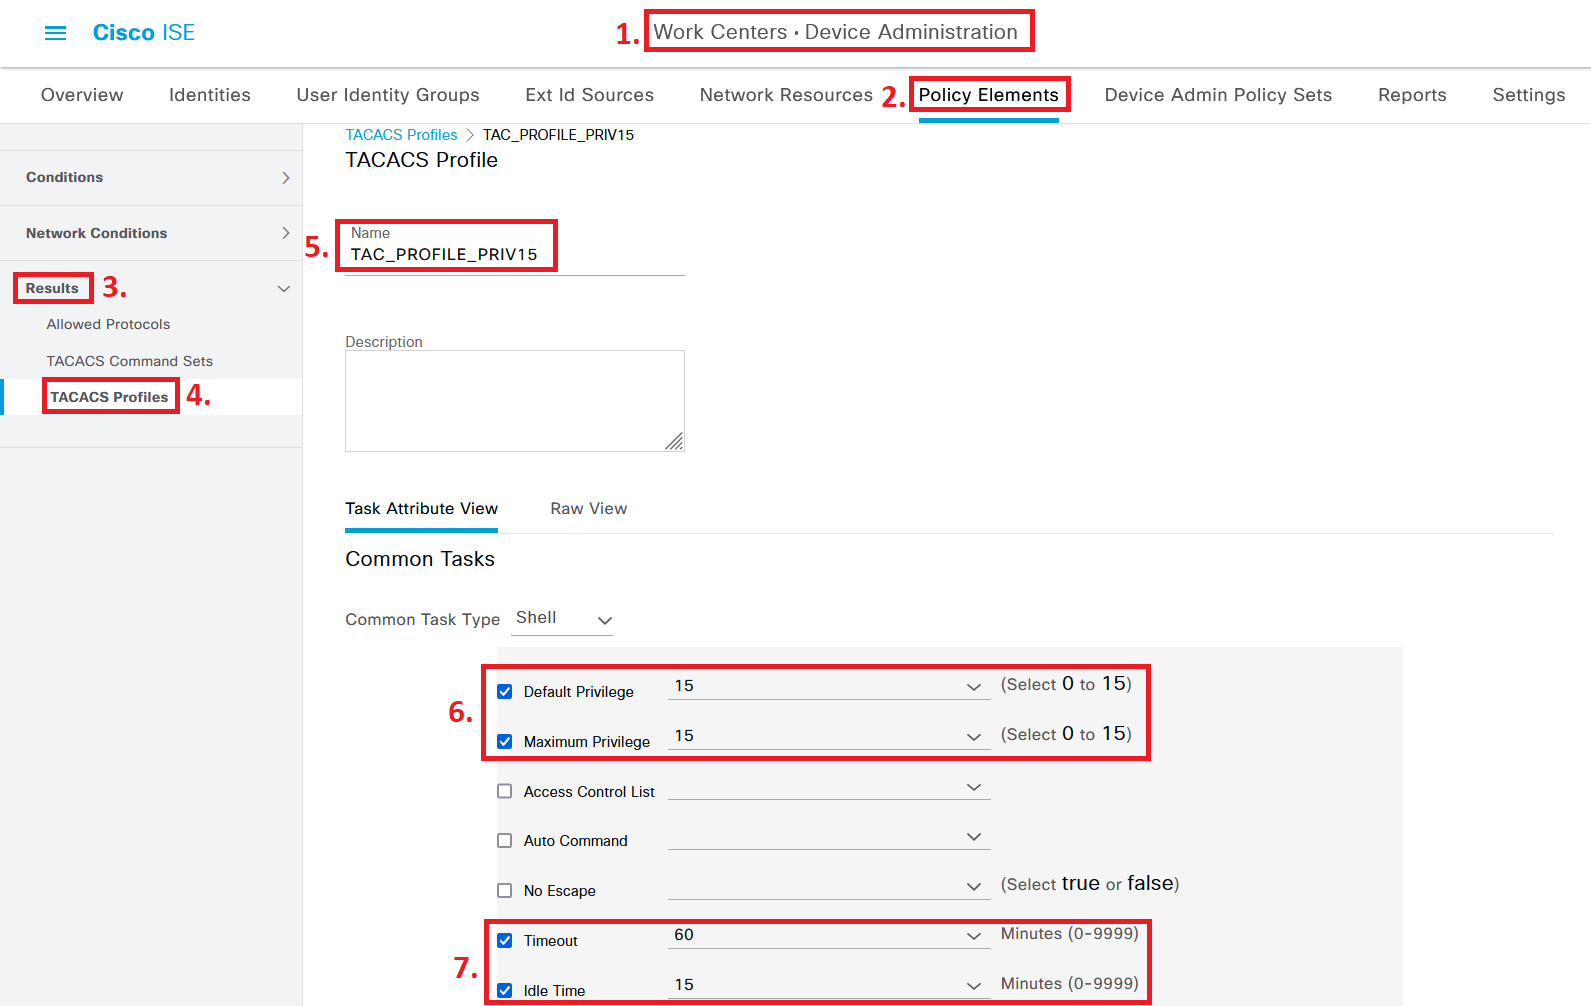
Next up is configuring a TACACS Profile, which is where we can configure settings such as Privilege Level and timeout settings. Navigate to Work Centers > Device Administration > Policy Elements > Results > TACACS Profiles.
Click on Add to create a new TACACS Profile. Give the profile a good name, like “TAC_PROFILE_PRIV15”.
Set both the Default Privilege and Maximum Privilege to “15”. We will use this TACACS Profile both for the Full Administrator access and the Helpdesk access. Some “show” commands, like “show running-config”, actually requires privilege level 15 to be run, so it’s better to use Command Sets (explained in the next section) to control which command can and cannot be used by particular users.
Set Timeout and Idle Time to reasonable values, in my case we will go with 60 minutes for Timeout and 15 minutes for Idle Timeout.
Click on Save when you are done.
Configure TACACS Command Sets
Now, it is time to configure which commands Administrators and Helpdesk personnel will be allowed to use. Since we will grant both of these use cases the Privilege Level 15, which gives access to every command available, we will use TACACS Command Sets to limit which commands can be used (at least for the Helpdesk personnel).
Navigate to Work Centers > Device Administration > Policy Elements >Results > TACACS Command Sets. Click on Add to create a new TACACS Command Set and name it “PermitAllCommands”. We will apply this TACACS Command Set for Administrators.
The only thing we need to configure in this TACACS Command Set is to check the box for “Permit any command that is not listed below”.
Click on Save when you are done.
Go back to TACACS Commands Set and click on Add to create another TACACS Command Set, this time with the name “PermitBasicCommands”. We will apply this TACACS Command Set for Helpdesk personnel.
For this TACACS Command Set, we will configure granular control over which commands will be allowed to be used by these users.
Instead of checking the box that permits any command, use the Add button to add commands/arguments one by one down below. In the example, we will grant Helpdesk users the ability to use any “show” command, together with simple troubleshooting commands like “ping” and “traceroute”. In order for the personnel to be able to quit the session, we will also allow the “logout” and “exit” commands.
Click on Save when you are done.
If you did everything right, your list of TACACS Command Sets should look something like the image below.
Configure Device Admin Policy Set
The last piece of the configuration in terms of ISE is configuring Device Admin Policy Sets. This is where we will bind together all of the components previously configured.
Two user accounts already exist in my ISE deployment: the user “jacob” which is part of the Employee group (which will represent “Administrators” in this case) and the user “helpdesk” which is part of the Helpdesk group. While these user accounts exist as local users in ISE, you can also use users and group found in an Active Directory to perform the authentication and authorization steps.
Navigate to Work Centers > Device Administration > Device Admin Policy Sets and enter the Policy Set called “Default”. Depending on your specific needs, you can create more Policy Sets, for example, if you want to have different Policy Sets for different types of Network Devices, locations, etc.
We will set the Authentication Policy to use all identity stores using the “All_UserID_Stores” options since my deployment has a mix of local user accounts and Active Directory accounts.
It’s probably a good idea to at least have one local user account that is always able to log in to the network devices in case an external identity source like an Active Directory becomes unreachable. If you have a network monitoring system (“NMS”) that runs a lot of commands constantly on your network devices, having it use a local ISE user account instead of an Active Directory account will reduce the load on the Active Directory as well and mitigate “excessive” login/credential alarms, etc.
In the Authorization Policy section, we will create a couple of policies to permit Administrators (contained in the internal ISE Employee group) and Helpdesk personnel (in the internal ISE Helpdesk group) to authenticate and be granted both the “TAC_PROFILE_PRIV15” and their respective Command Sets (“PermitAllCommands” and “PermitBasicCommands”).
In addition to this, I have created another rule for an Active Directory group, granting full command access to users in the “LAN-ACCESS-ADM” Active Directory group. We won’t dig deeper into this policy, but at least you now have seen what it could look like.
Click on Save when you are done.
Switch/Router AAA Configuration
If you currently do not have a good template for AAA TACACS+ configuration for Cisco switches/routers, you can use my previous article below to get a good grip on how to configure all of those “aaa…” commands on your switch.
SOLID CONFIG: Cisco AAA TACACS and Password Best Practices
The configuration found in the article above should work for both IOS and IOS-XE devices. At a minimum, you should go over the configuration found in the “LINE CON and LINE VTY Configuration” and “AAA TACACS Configuration” sections of the article.
Verification
To verify that the switch is able to communicate with the TACACS server, use the “show tacacs | i Server” command to see if the TACACS server is considered reachable (“Alive”):
To verify that the TACACS feature is working as intended, now is the time to log into a network device of your choice and try commands to see what is allowed and what is not.
When commands are denied by ISE, you will see the error message below.
Command authorization failed.To see ISE’s point of view of all the command attempts, navigate to Operations > TACACS > Live Logs to see both TACACS authentications and authorizations processed by ISE. Note that this is a different Live Log than the one displaying all RADIUS authentication attempts.