In this article, we look at how to configure Cisco ISE as a RADIUS server to handle authentication requests for controlling access to network devices, both for network administrators with full access and for helpdesk personnel with limited access.
If you want to do more advanced device administration control using the TACACS+ protocol instead, check out the article below.
Cisco ISE - Configuring TACACS+ Authentication for Device Administration
Introduction
Centralizing control over network device access using the TACACS+ protocol has been the golden standard for many years in most bigger networks because it enables detailed and granular permissions down at the very command level. However, if you are looking for a simpler level of control for administrators you can use the RADIUS protocol as well to grant somewhat different levels of access.
In this article, we are going to configure two different policies of network device access using RADIUS: one for Administrators, who will be allowed to use any command available (Privilege Level 15), and one for Helpdesk personnel, who will be allowed to use only basic show commands (Privilege Level 7).
The following hardware and software were used in this article:
Cisco ISE version 3.1 patch 5.
Cisco Catalyst C9200L-48P-4X Switch running IOS-XE 17.6.4
Login Scenarios
Down below you can see what the ISE and switch AAA configuration in this article will result in terms of different login scenarios depending on the status of ISE and how the administrator tries to access the switch (Console ports or VTY Lines).
WHEN ISE IS UP AND REACHABLE:
VTY Lines = use RADIUS username/password for access (puts you directly into Switch#-prompt, with appropriate privilege level provided by ISE)
Console port = use RADIUS username/password for access (puts you directly into Switch#-prompt, with appropriate privilege level provided by ISE)
WHEN ISE IS DOWN AND UNREACHABLE:
VTY Lines = use Local username/password for full access (puts you directly into Switch#-prompt, with privilege level provided by local account in switch configuration, which will be privilege level 15, in my case).
Console port = use Local username/password for full access (puts you directly into Switch#-prompt, with privilege level provided by local account in switch configuration, which will be privilege level 15, in my case).
With that said, time to move on to the configuration steps, let’s start with ISE.
Add switch to Network Devices in ISE
To allow a switch to send authentication requests to ISE, it must be added as a Network Device with a Radius Shared Secret. Navigate to Administration > Network Resources > Network Devices and click on the Add+ button to add a new network device.
Fill in name, IP address and check the RADIUS Authentication Settings box further down, and enter the Shared Secret. This secret must match with the Radius Key configured later in the switch itself.
Click on Submit when you are done.
Create Authorization Profiles
First, we will configure the Authorization Profiles for both the full Administrator access and the limited Helpdesk access.
Navigate to Policy > Policy Elements > Results > Authorization > Authorization Profiles and click on the Add button. Set a Name (we will use "ADMIN-PRIV-15" in my case) and at the very bottom of the settings, create an Advanced Attributes Setting according to the information below.
Dictionary = Cisco:cisco-av-pairAttribute Value = shell:priv-lvl=15Click on Save when you are done.
Go back and create another Authorization Profile by clicking on the Add button.
Set a Name (we will use "HELPDESK-PRIV-7" in my case) and at the very bottom of the settings, create an Advanced Attributes Setting according to the information below.
Dictionary = Cisco:cisco-av-pairAttribute Value = shell:priv-lvl=7Click on Save when you are done.
Create Policy Set
Next up, we need to create a Policy Set in which we will put the different levels of network device access and bind them to different sets of users/groups.
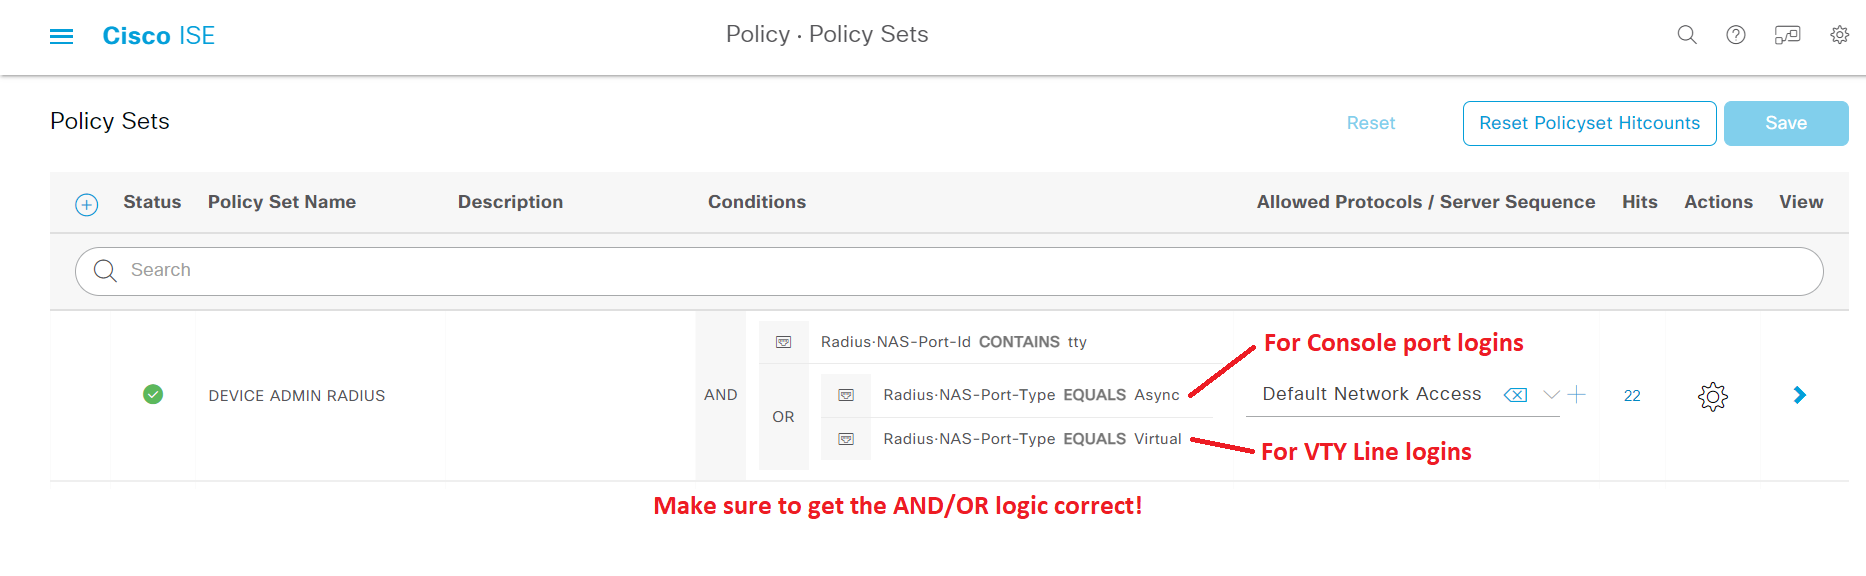
Navigate to Policy > Policy Sets and create a new Policy Set and set a name for it ("DEVICE ADMIN RADIUS" in my case). To not interfere with regular RADIUS requests (for 802.1x/MAB authentication), we will need to create very specific Conditions to only match RADIUS requests for access to Network Devices themselves. This is done by matching certain parameters in the RADIUS requests that are included only in Network Device access requests.
The parameters we are looking to utilize are called Radius:NAS-Port-ID and Radius:NAS-Port-Type. The three parameters/values we are looking for are listed down below.
Radius:NAS-Port-ID CONTAINS ttyRadius:NAS-Port-Type EQUALS AsyncRadius:NAS-Port-Type EQUALS VirtualRadius:NAS-Port-ID needs to contain "tty" which tells ISE that this RADIUS request is for access to the network device itself. In the detailed ISE logs of an authentication attempt, the "tty" can be found and is always followed by a number to tell the ID of the connection (usually 0 for the Console port, then 1 and above for the VTY Lines).
Radius:NAS-Port-Type needs to be able to match two different values. "Async" is the NAS-Port-Type used when the administrator's access request comes in through the Console port and "Virtual" is the NAS-Port-Type used when the administrator's access request comes in through a VTY Line, which is either an SSH or Telnet connection.
Instead of trying to explain how to set up the logic for this Policy Set, take a look at the image below and re-create it.
Make sure to set both the value (including EQUALS and CONTAINS parameters) and AND/OR logic parameters properly!
Set Allowed Protocols / Server Sequence to Default Network Access, unless you have a specific need and want to configure this component on your own.
Click on Save when you are done.
Configure Policy Set
With the Policy Set created, we now need to configure its Authentication Policy and Authorization Policies.
In the Authentication Policy section, select an Identity Store or Identity Source Sequence. If you are planning to use both internal user accounts in ISE and accounts found in something like an Active Directory, make sure to select an Identity Source Sequence that includes both identity stores. It is a good idea to have at least one internal user account as a "backup" in case ISE is no longer able to communicate to Active Directory, for some reason, and you really need to get into your switches right away.
In my case, we will use “All_User_ID_Stores” since this is a lab environment, but you should really spend some time creating a custom Identity Source Sequence with only the Identity Stores that you need.
In the Authorization Policy, create policies to match your needs. In my case, we will create a policy for local users found in ISE and two policies based on Active Directory group memberships to give full access to network administrators and limited access to Helpdesk personnel. Assign the Authorization Profiles created earlier (“ADMIN-PRIV-15” and “HELPDESK-PRIV-7”) similar to the image below.
The last step is to now configure a switch for RADIUS authentication for device administration.
Click on Save when you are done.
Switch AAA Configuration
Use the configuration below as a base to configure your switch and change colored parameters to fit your own environment.
! Local Username/Enable password for fallback scenarios:
enable algorithm-type sha256 secret DISCO123!
username netadmin privilege 15 algorithm-type sha256 secret C15CODISCO123!
! RADIUS Server(s) and RADIUS group configuration:
aaa new-model
ip radius source-interface vlan MGMT
radius server RAD-ISE-PSN-1
address ipv4 10.10.10.101 auth-port 1812 acct-port 1813
automate-tester username SW-RAD-TEST probe-on
key ISEK3Y123!
timeout 2
retransmit 2
radius server RAD-ISE-PSN-2
address ipv4 10.10.10.102 auth-port 1812 acct-port 1813
automate-tester username SW-RAD-TEST probe-on
key ISEK3Y123!
timeout 2
retransmit 2
aaa group server radius ADMIN-RAD-SERVERS
server name RAD-ISE-PSN-1
server name RAD-ISE-PSN-2
deadtime 15
! AAA Configuration
aaa authentication login default group ADMIN-RAD-SERVERS local
aaa authorization exec default group ADMIN-RAD-SERVERS local if-authenticated
aaa authorization config-commands
aaa authorization console
! A short explanation for the "aaa authorization console" command: without this command, you would need to type in the Enable password to get to privileged EXEC mode (Switch# prompt) when using the Console port since Privilege Levels sent from ISE would not apply, which kind of defeats the purpose of granting Privilege Level 7 for Helpdesk users since most of their limited "show" commands wouldn't work via the Console port due to them being stuck at Privilege Level 1 (default). While full-blown network administrators could get past this using the Enable password, Helpdesk personnel probably won't/shouldn't know the Enable password.
! If your switch/router has multiple L3 interfaces and/or VRFs, you may need to use the additional commands below inside "aaa group server radius ADMIN-RAD-SERVERS":
aaa group server radius ADMIN-RAD-SERVERS
ip vrf forwarding MGMT
ip radius source-interface Loopback0
Verification
Try to log in to your switches using different accounts that should match different policies and check the ISE Live Log for more information. If you manage to log in to a switch, see which commands work and which don't, and if it aligns with your goal.
For login attempts on the Console port, you will see the Endpoint ID as “async”.
For login attempts on the VTY Lines, the Endpoint ID will be the source IP address of the endpoint initiating the SSH/Telnet session.
If you view the Detailed Log on some attempts, you can see the RADIUS request parameters and values set up in the Policy Set to confirm that we are matching the correct type of requests.