In this article, we take a look at how to make ISE configure a switch port as a Trunk (using a Macro) when an Access Point in FlexConnect mode is connected to an 802.1x/MAB-enabled switch access port, and reverting the configuration back to an access port if the Access Point is unplugged.
Introduction
The following solution is useful for those cases where you want every single access port connected to an endpoint to have the exact same configuration, with the ability to also plug in FlexConnect Access Points to those access ports and have them converted to Trunk ports in the process. This is achieved using the Auto Smartports (“ASP”) feature of the switch by having ISE tell the switch to run a configuration Macro as part of the authorization result.
While you could simply statically configure Trunk mode on the port that Access Points will be connected to, this solution offers a bit more dynamic approach if you really do not want to manually configure trunk ports.
The following hardware and software were used in this article:
Cisco ISE version 3.1 patch 5
Cisco Catalyst C9200L-48P-4X Switch running IOS-XE 17.6.4
Authentication Process
To give you the complete picture of what we’re trying to achieve, let’s go through the complete authentication process.
The chain of events below assumes you are using Profiling to identify and authenticate Access Points. You could also use 802.1x authentication (some flavor or EAP) or regular MAB (by adding the access points’ MAC address to an Endpoint Identity Group in ISE and matching on that). However, since the goal of this post sort of is to automate the onboarding process as much as possible, the Profiling method will be used as it does not add any extra pre-requisite steps.
All endpoint ports (typically all GigabitEthernet 1/0/X interfaces of a standard 9K Catalyst switch) are configured as secured 802.1x/MAB-enabled access ports.
An Access Point is connected to an 802.1x/MAB-enabled access port.
The switch sees the MAC address of the AP and starts a Radius Session for the endpoint by sending a Radius Request to ISE.
ISE sees the unknown MAC address and assigns it the Authorization Profile for general Profiling Access, allowing the Radius Session in the switch to stay alive and giving the access point limited network access.
The switch will receive CDP/LLDP/DHCP data from the Access Point, and using the Device Sensor feature, will send this information to ISE via Radius Accounting messages.
ISE receives the CDP/LLDP/DHCP data from the switch, enabling it to properly profile the endpoint as an Access Point.
ISE sends out a Change of Authorization (“CoA”) message to the switch, which includes a Cisco Attribute-Value Pair (AVP) of the type auto-smart-port and the value “MACRO-AP-FLEX-TRUNK”.
The auto-smart-port value triggers the switch to run the configured Macro called “MACRO-AP-FLEX-TRUNK”.
The configuration inside the Macro is applied to the port, making it a Trunk port, assigning Native VLAN, allowed VLANs, and more. Thanks to including the “source template…” command which reapplies the 802.1x/MAB configuration, the Radius Session for the Access Point will remain and be tracked/visible to ISE.
Because of the “source template…” command being re-applied (which includes all of the authentication-related commands) by the Macro, 802.1x/MAB authentication will run one more time and then settle down.
Important security note! One thing to note is that the configuration applied on interfaces by this macro will temporarily survive a switch reboot if the configuration is saved to running-config before the reboot happens. Temporarily in this case meaning that for a few seconds after the switch has booted up completely, interfaces that were previously configured with the macro will still have that configuration. This means there will be a very short window of a couple of seconds where network access is "granted" before the authentication process starts. Since this macro’s task is automatic configuration of Trunk ports for Flexconnect APs, this means that a potential rogue endpoint connected to a previous macro-ed interface during the reboot period (stealing the Flexconnect AP’s interface) will be able to get on the Flexconnect VLAN for a few seconds before 802.1x/MAB authentication is initiated on the interface, and the endpoint is properly authenticated (or denied). If you feel bad about this, considering putting a dACL in the Authorization Profile to further lock down the Access Point’s network access to make sure this temporary network access cannot be used to perform attacks.
Switch IBNS 2.0 Configuration
Configure standard IBNS 2.0 on your endpoint ports (access ports). If you do not currently have an IBNS 2.0 configuration on your switches, you can find some examples of how to do this in my previous articles, down below.
SOLID CONFIG: Cisco IBNS 2.0 802.1x and MAB Authentication for IOS Switches
SOLID CONFIG: Cisco IBNS 2.0 802.1x and MAB Authentication for IOS-XE Switches
Important note: make sure your configuration template does NOT include the “no macro auto processing” command on each of the access ports. We will need macro auto processing enabled for this solution to work. My standard templates for IBNS 2.0 do have this command in them, so it needs to be removed.
Switch Global Configuration
If you take a look at some of the references at the end of this article, you’ll see that Cisco switches can run built-in Macros automatically based on what kind of device is connected to a switch port. Using protocols like CDP, the switch can detect different types of endpoints and configure the port accordingly. Examples of these endpoints are access points, VOIP phones, and other switches.
However, we want to use ISE to decide which Macro to run, so we will only configure the minimum Macro commands required for this solution. Leaving all types of built-in Macros enabled could cause you issues, like the switch deciding to configure switch-to-switch trunks on its own, possibly breaking your network.
no macro auto global control device
no macro auto global control trigger
macro auto global processing
Switch Macro Configuration
An important note is to make sure that the configuration that is to be re-applied (restored if you will) to the port if the link to an Access Point goes down matches the original IBNS 2.0 configuration of the port.
This “restoration” configuration can be seen after the “if [[ $LINKUP == NO ]]; then….” part further down.
In the example below, we will use the Access Port configuration similar to the one available in my articles above, but if you are using a different configuration for your secured 802.1x/MAB-enabled interface you will need to edit the script below to match, otherwise, you might “lose” configuration commands when the restoration of the original access port configuration is performed.
Don’t forget to adjust Native VLAN (AP management VLAN, which in my case is VLAN 16) and allowed VLANs (native VLAN plus User VLANs, which is VLAN 10/20/30 in my case) to match your environment.
Note the “access-session host-mode multi-host” command which allows all MAC addresses after the first authentication MAC address to be able to skip authentication. This is needed because we are using FlexConnect access points, so only the FlexConnect AP needs to authenticate to the switch because the clients that will connect to that AP via WLAN afterward will be authenticated by the AP/WLC, not by the switch.
macro auto execute MACRO-FLEX-AP-TRUNK {
if [[ $LINKUP == YES ]]; then
conf t
default interface $INTERFACE
interface $INTERFACE
description Access Point Trunk Macro ISE
macro description $TRIGGER
macro auto processing
switchport mode trunk
switchport trunk native vlan 16
switchport trunk allowed vlan 16,10,20,30
spanning-tree portfast trunk
spanning-tree bpduguard enable
access-session host-mode multi-host
device-tracking attach-policy DISABLE-IP-TRACKING
ip dhcp snooping trust
load-interval 30
source template WIRED_DOT1X_CLOSED
exit
fi
if [[ $LINKUP == NO ]]; then
conf t
default interface $INTERFACE
interface $INTERFACE
description DOT1X-MAB Secured Port
switchport mode access
switchport access vlan 10
switchport voice vlan 666
switchport nonegotiate
no switchport port-security
device-tracking attach-policy IP-TRACKING
ip dhcp snooping limit rate 20
macro auto processing
storm-control broadcast level pps 100 80
storm-control action trap
spanning-tree portfast
spanning-tree bpduguard enable
spanning-tree guard root
load-interval 30
source template WIRED_DOT1X_CLOSED
exit
fi
}
If you need to remove the Macro to re-create it for some reason, use the command “no shell trigger MACRO-FLEX-AP-TRUNK” to delete it. Removing the Macro does not remove the active configuration made by it to interfaces.
This is what the Macro looks like in the running configuration.
ISE Authorization Profile Configuration
To make the Macro trigger when an access point is connected to one of the 802.1x/MAB enables switch ports, we will need to create a new Authorization Profile in ISE that send an AV Pair (or an “instruction”, if you will) to the switch to use the Macro when an AP is authenticated.
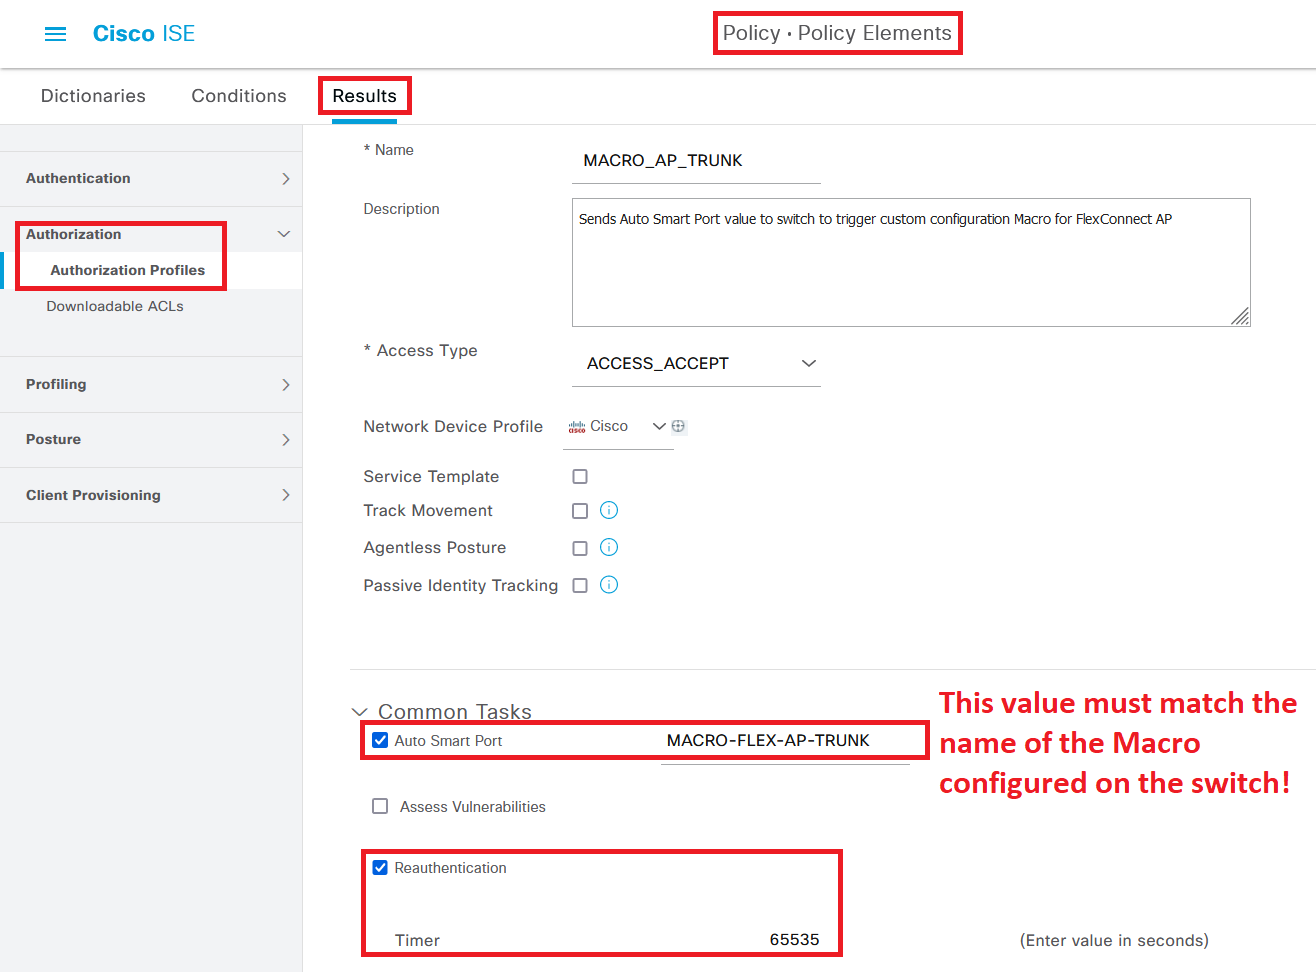
To do this, navigate to Policy > Policy Elements > Results > Authorization > Authorization Profiles and create a new Authorization Policy. Give it a name and check the box for “Auto Smart Port”, and input the name of the Macro on the switch (“MACRO-FLEX-AP-TRUNK”) as the value. Feel free to also add a Reauthentication timer, as that is considered best practice.
The raw result of this configuration can be seen at the bottom of the screen.
Now, add the new Authorization Profile to your Policy Set where access points are authenticated, regardless of if you are using 802.1x, MAB, or Profiling to authenticate your access points.
Verification
To see the Macro be activated as it happens, turn on “terminal monitor” to see this output via SSH (or directly via the console port):
While you could use the “show interface status” or the “show run interface…” commands to see if the port has been converted to Trunk mode…
… you can also use the command “show macro auto interface” to see if a Macro has been applied to an interface.