Introduction
While traffic arriving at a firewall is usually sent there to be inspected, a firewall has a bunch of different jobs of its own it has to take care of to properly function as a next-generation firewall. This includes communicating with user catalogs, sending emails with reports, sending logs to external servers, integrating with RADIUS/TACACS server, and downloading various updates to its components.
For example, for a Palo Alto firewall to receive updates to the subscription services like URL Filtering, Application database, Threat Prevention, and more, it needs to connect to a cloud service on the internet. This feature is called Dynamic Updates in the Palo Alto world.
By default, to connect to the Palo Alto cloud services which offer these updates, the firewall will attempt to reach the internet using the Management Port, and the same is true for a whole other bunch of operational features of the firewall, like those mentioned above.
However, in my last article, I set up a virtual Palo Alto firewall in VMware, which had its Management Port connected only to a management PC, which means the firewall would be unable to properly use and maintain some of its components, for example, downloading updates to many of its features included in Dynamic Updates.
In the General Information section on the main Dashboard of the firewall, you can for example see which version of URL Filtering is currently installed. But because my firewall has never received these updates via its Management Port, the version is 0000.00.00.000, as shown on the image below. Basically, it doesn't have a proper URL Filtering function, yet.
You can also see that the firewall is having trouble establishing a connection to the Palo Alto cloud services.
In a real-world production network, having internet access from a dedicated management network isn't always guaranteed, and in those cases, you will have to configure some extra steps to get Dynamic Updates working, unless you want to manually have to upload updates to the firewall.
There could also be various cases where you want the firewall to communicate to certain services using different source interfaces, depending on your network design, security zone structure, server network structure, etc.
Introducing Service Route Configuration
Fortunately for us, we can make the firewall use a different interface than the Management Port as the source interface for Dynamic Updates, or other features like the ones mentioned earlier.
This is called configuring different Service Routes.
In this lab, we are going to change the source interfaces used to connect to the Palo Alto cloud services and confirm that we are receiving Dynamic Updates via the newly configured source interface.
One could think that using the internet-facing interface to download the Dynamic Updates would be feasible, but from what I have found, Palo Alto's documentation recommends not doing that, for security reasons.
What we should do, is use an internal interface as the source interface to download Dynamic Updates. While you can use any internal interface for this purpose, Palo Alto recommends using a Loopback interface, since that type of interface with never be considered "down" and there is very little risk of the interface being removed or made obsolete by changes in the overall network design.
Let’s get into it!
Network Topology
The topology for this lab is rather simple, but you probably get the idea. As of now, by default, the firewall wants to use the Management Port and its routing table to reach firewall-related services.
Normally, you would probably want your firewall to utilize your internal DNS servers, but in this case, we are going to use the public DNS server hosted by Google and Cloudflare.
Configure Loopback Interface
To create a Loopback interface, navigate to NETWORK > Interfaces > Loopback and click on the +Add button in the bottom left corner. Pick an interface name by typing in a sub-id between 1 to 9999 and give it a fitting comment, like “Dynamic Updates Source Interface”.
Set the Virtual Router to “default” and the Security Zone to either something in the style of INSIDE/TRUST/MANAGEMENT, depending on how you have set up your zones.
Continue to the IPv4 tab, and give the Loopback an IP address. I will use an IP address within the 192.0.2.0/24 network, which is an IP network generally used for similar support features (and most networks don't really route this IP network either).
Depending on your intentions with this Loopback interface, you might need to use something that fits your network’s IP plan and structure, if this Loopback interface needs to be reached by internal systems or services.

Click on OK when you are done.
Configure Service Route source interface
Now, we are going to go through the Service Route configuration.
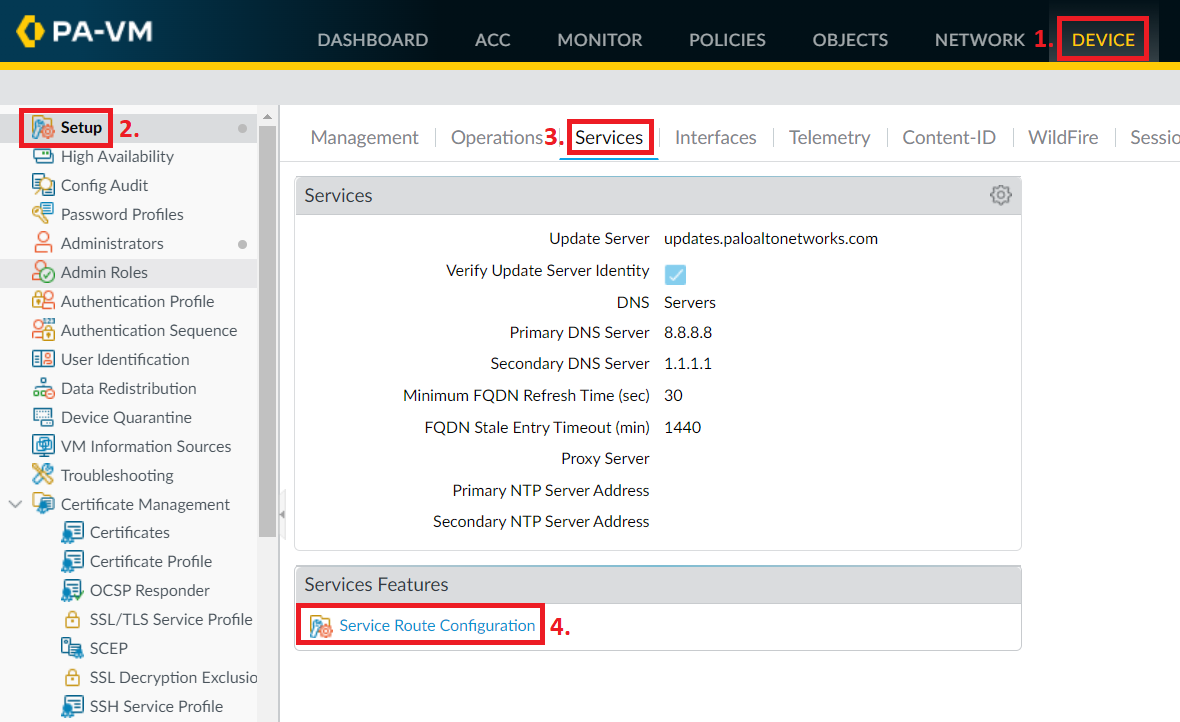
Navigate to DEVICE > Setup > Services and in the Services Features section, click on Service Route Configuration.
Check the box "Customize" to view all the different Service Routes that can be configured.
In my case, I will need to change the source interface for the services DNS (because I am using a public DNS server in my lab), Palo Alto Networks Services, and URL Filtering to achieve my goal.
Click on the Service name to open up the configuration window for it. Change the source interface and pick a source IP address from the list.
Repeat this step for all the Services you want to change, and then click on OK to exit. For my purpose, I will change the source interface of the services Palo Alto Networks Services, URL Filtering, and DNS.
Configure DNS server(s)
Since the Service Route changes that I have configured are dependent on DNS working properly, I will need to make sure the DNS server’s configuration is in order as well.
Configuring the DNS server is usually done during the first time initial setup, but it can also be configured by navigating to DEVICE > Setup > Services and clicking the little gear in the Services section to get to the configuration windows below.
In the Services tab, you can add up to two DNS servers for the firewall to use for DNS lookups.
Click on OK when you have added the DNS server(s).
Configure Policy Rules
Next up, we actually have to make policy rules to allow for the traffic to pass through the firewall, even if the traffic is originating from within the firewall itself.
Depending on which Service Route you have made changes to, you will need to make the firewall allow the needed traffic for those services to work.
If you are unsure of which application to permit, check your logs in Monitor > Traffic to see what’s being blocked and make rules accordingly.
Configure NAT
Since the Loopback interface is considered to be an internal interface, we need to NAT (translate) its traffic when it needs to go out on the internet.
A simple NAT rule will hide the Loopbacks traffic behind the firewall’s outside interface with an IP address of 209.165.201.254.
When you are done, click on OK and then Commit your configuration to activate it.
Verifying Service Route Configuration
Now that we have configured a way for the firewall itself to communicate out to the internet, it is now time to manually trigger a Dynamic Update to confirm that it is working as intended.
Navigate to DEVICE > Dynamic Update and click on Check Now in the bottom left corner. The firewall will now connect to the Palo Alto cloud services to download updates of various types.
A progress bar will show briefly before disappearing if everything went well.
In the System Logs session of the Dashboard, we can see connection attempts being made towards the Palo Alto update service and that various databases in the firewall are being updated.
After a few minutes (took around 10 minutes for me), we can see that the URL Filtering Version has now been updated on the Dashboard (in the General Information section) of the firewall, confirming that the firewall has properly connected to the Palo Alto cloud services.
We can also see the firewall reaching out to the cloud services to download updates by looking in the log in MONITOR > Traffic.
Make a filter for the expected source IP address (192.0.2.10 in my case) to easily see the traffic. Check the detailed log view icon for more information.
In my case, the filter would look like this:
( addr.src in 192.0.2.10 )
Final Notes
According to Palo Alto's documentation, an interface that has an IP address assigned to it via DHCP cannot be used as the source interface for Dynamic Updates.