This article goes through some good-to-know general settings and logic to implement for most 802.1x/MAB deployments on wired infrastructure using Cisco ISE. This article focuses on the different Modes (Monitor/Closed/Low-Impact) you can deploy your switches in.
This article is a continuation of tips and tricks found in the previous article below.
Cisco ISE - General Settings Tips and Tricks for Wired Deployments Part 1
Introduction
The content will be a mix of good-to-know tips and tricks you can go through to ensure your deployment goes smoothly and you are getting the most out of ISE and your switches.
This article will not go through the basic configuration of ISE or switches, the purpose of this article is to collect general tips and tricks that I might need to look up when deploying this technology at customers.
You will not learn to deploy AAA/RADIUS authentication from scratch by reading this article, but you might learn something new if you are already familiar with 802.1x and MAB on switch ports.
The following hardware and software were used in this article:
Cisco ISE version 3.1 patch 4.
Cisco Catalyst C9200L-48P-4X running version 17.3.5.
Cisco Catalyst C3560CX-8PC-S running version 15.2(7)E6.
1. Stage your Deployment (Monitor/Closed/Low-Impact Mode)
Since deploying ISE authentication on switches can cause great disruption, a great way to enable authentication only to investigate what is going to happen is to use Monitor mode, also known as Open mode.
In Monitor mode, the switch will ignore any Access-Reject responses from ISE and instead always allow the connecting endpoint to pass traffic on VLAN already configured on the switch port itself. The only results enforced in Monitor mode are” additional” parameters in Authorization Profiles, such as setting a VLAN/SGT or assigning a dACL. In Monitor mode, you should generally only use Access-Accept without any specific authorization.
To organize your deployments, create a Network Device Group (“root group”) called “Deployment Stages” and inside it, create multiple Network Device sub-groups in ISE, for example, called “OpenMode” and “ClosedMode”.
With this in place, you will be able to “tag” your Network Devices by putting them into one of the Groups under Deployment Stages. Navigate to your Network Device and you’ll now see this setting under the Network Device Group section.
Create two Policy Sets (or four Policy Sets if you want to split 802.1x and MAB authentications) matching RADIUS requests sent from Network Devices belonging to the different Deployment Stages/Modes. This way you can easily migrate switches from one mode to the other (but don’t forget to change the configuration in the switch as well to move between the modes).
For some reason, the custom-created “Deployment Stages” were hard to find to use as “Conditions” in the Policy Sets for me, and I had to find them under the “Unclassified” attributes, as seen in the image below.
Using the Deployment Stages attribute, build several Policy Sets to match the different combinations needed. In the example below, we will use separate Policy Sets for 802.1x and MAB, resulting in a total of four different Policy Sets.
2. Set Authentication to CONTINTUE for unknown endpoints
In your MAB Policy Set(s), you’ll need to make some changes to the Authentication Policy to allow for unknown MAC addresses to go through the Authorization Policies, where they are able to hit profiling rules or allowed profiling access.
Open the Authentication Policy for MAB and click on “Options” under the Identity Store (which should be Internal Endpoints).
Set both “If Auth fail” to “If User not found” to “CONTINUE” to allow for endpoints hitting these policies to still go on to the Authorization Policy phase.
If you are using separate Policy Sets for MAB and 802.1x, remember to make this change both to your Monitor Mode MAB and Closed Mode MAB Policy Sets.
3. Monitor Mode Authorization Profiles
As mentioned above, the resulting Authorization Profiles in your Monitor Mode Policy Set should generally be kept very simple and not include any advanced authorization like VLAN/SGT/dACL assignment.
However, there are some settings that could be useful to include in your Monitor Mode Authorization Profile, like the Re-Authentication Timer. This will make sure your endpoints will go through a proper reauthentication attempt from time to time, meaning the endpoint could match a different Authorization Profile that is more correct for the endpoint in question if you have made configuration changes to ISE after discovering that an endpoint is not hitting the intended Authorization Policy.
With this in mind, your Policy Set for 802.1x Monitor mode could look something like this:
And your Policy Set for MAB Monitor Mode could look something like this:
Another important note is to DO NOT use the “termination-action-modifier=1” advanced option for Monitor Mode Authorization Profiles. This could result in having endpoints that are failing 802.1x get “stuck” using MAB since this modifier setting tells the switch to only use the last successful method to authenticate the endpoint. If an endpoint that is supposed to use 802.1x fails this method for some reason, the switch would authenticate that using MAB instead, and with the modifier setting in place, the switch would never try to use 802.1x authentication again for the endpoint, unless the endpoint decides to initiate 802.1x on its own.
4. Voice Domain Monitor Mode Authorization Profile
If you look at the image above, you can see that the MAB rule for Voice devices differs a bit from the other MAB rules above it in that the resulting Authorization Profile is called “Permit-Voice-ReAuth” instead of just “Permit-ReAuth”. This is because voice devices need to be treated differently, due to how switches view DATA and VOICE VLANs.
Even in Monitor Mode, we must always assign the Voice-Domain result to voice devices to let them properly get onto the network.
5. Device Sensor data requires RADIUS Accounting to work
Using profiling via the Device Sensor built-in into Cisco switches is a great way to collect information about endpoints and can help you profile certain endpoints, which then can be used to build your Policy Set. Device Sensor data is carried inside RADIUS Accounting packets and sent to ISE.
When you have transitioned away from Monitor Mode to Closed Mode, be sure to remember that you will need to grant some sort of (probably limited) network access to unknown devices in order to utilize the Device Sensor data. Endpoints that receive “Access-Reject” will end that session and no endpoint data will be sent in the RADIUS Accounting packets, which will only start to be sent after some sort of session has been established.
Some good discussions on this matter on the Cisco Support forums can be found below.
https://community.cisco.com/t5/network-access-control/gather-devices-information-on-ise/td-p/4572812
https://community.cisco.com/t5/network-access-control/ise-and-cdp-device-sensor/td-p/2134573
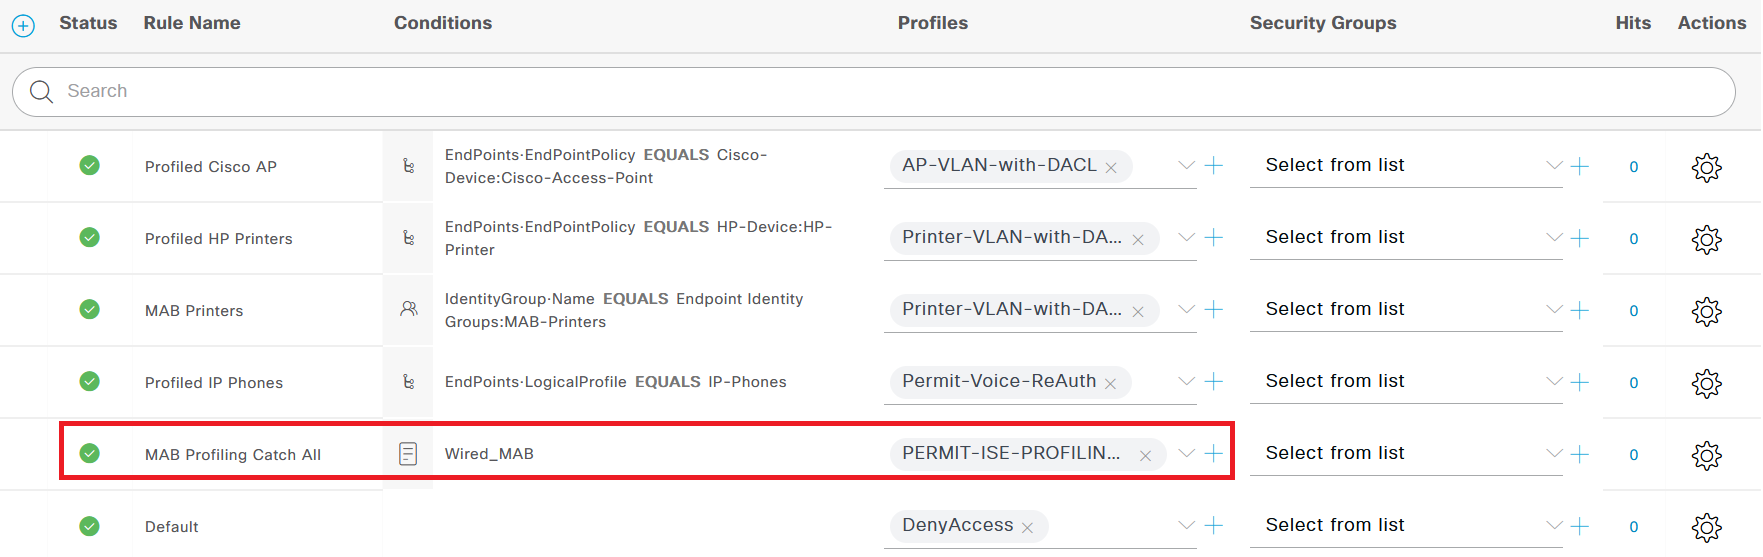
6. Closed Mode Authorization Profile for Profiling Access
Related to the section above, depending on if you are planning to use Profiling or not, the last rule(s) in your Authorization Policies will look different. If you have chosen NOT to use Profiling at all in your deployment for company policy reasons, your Closed Mode Policy Set will probably end with a DenyAccess result.
If you do decide to use Profiling, you will need to give unknown endpoints some sort of network access in order for them to be Profiled via active probes such as SNMP parameters or NMAP. To give this (limited) network access, create an Authorization Profile before the last Default one where the end result is some sort of VLAN together with a dACL to lock it down.
The dACL should allow only minimal network access like DHCP, ICMP, etc., and allow for communication with the IP addresses belonging to the ISE Policy nodes (“PSNs”).
DACL Permit-ISE-Profiling-Access example:
permit icmp any anypermit udp any any eq bootpcpermit udp any any eq bootpspermit ip any host 10.10.10.101permit ip any host 10.10.10.102For example, the last (actual) rule in the Closed Mode MAB Policy Set could look something like this, where the result for an unknown endpoint using MAB is to be put into a specific Profiling VLAN in addition to the dACL above put on the port where the endpoint is connected.
Don’t forget to add a Reauthentication Timeout period to this Authorization Profile!
7. Transitioning between different Wired Modes
During your implementation phase, you will be going through the different deployment modes (or stages) of secure wired access in multiple steps.
If you are using a configuration similar to the one found in my articles on IBNS 2.0 for IOS and IOS-XE, you will be applying different “source templates” to the ports connecting to your endpoint to put them into the different wired modes (Monitor/Low-Impact mode/Closed). My templates can be found on the links below:
SOLID CONFIG: Cisco IBNS 2.0 802.1x and MAB for IOS Switches
SOLID CONFIG: Cisco IBNS 2.0 802.1x and MAB for IOS-XE Switches
Down below, I have put together some information on what happens at the moment of configuration change, which is when a port transitions from the “no-mode” to Open Mode, and finally, to Closed Mode or Low-Impact Mode.
The following switch models and IOS/IOS-XE versions were used for this testing:
Cisco Catalyst C9200L-48P-4X running IOS-XE versions 17.3.5 and 17.3.6
Cisco Catalyst WS-C3560CX-8PC-S running IOS version 15.2(7)E6.
No Mode to Monitor Mode (SEE IOS/IOS-XE DIFFERENCES)
Go from “no-mode” to Monitor Mode by applying the Monitor Mode source template on the switch ports.
For IOS switches: this will immediately trigger an authentication attempt on the port, and at the same time, the endpoint is immediately granted access according to the static configuration of the port - no traffic should be disrupted.
For IOS-XE switches: this will immediately trigger a “failed authentication” state on the port from the switch’s point of view, ISE will not be seeing this initial “attempt”. The endpoint is immediately granted access according to the static configuration of the port - no traffic should be disrupted.
After a certain timeout period (specified under the “class always do-until-failure” in my template, where it is set to 60 seconds), a proper authentication attempt will be triggered and sent to ISE.
Since this seems to be the case for multiple IOS/IOS-XE versions, I guess it might be some sort of “unintended logic” (a bug, if you will) that hasn’t been discovered widely since it doesn’t really cause an issue.
Monitor MODE TO CLOSED MODE
Go from Monitor Mode to Closed Mode by applying the Closed Mode source template on the switch ports. You should not need to remove the previous (Monitor Mode) source template as it will be overwritten by the Closed Mode source template.
This will immediately cut the network access for the currently connected endpoints and trigger a proper authentication attempt on the ports. In most deployments, this means that 802.1x authentication will take place, followed by MAB authentication. Until a successful authentication takes place, your endpoints will have no network access.
No Mode to CLOSED Mode
If you are choosing to skip Monitor Mode in some scenarios and go directly to Closed Mode, the same things will happen as going from Monitor Mode to Closed Mode, which is:
Go from “no-mode” to Closed Mode by applying the Closed Mode source template on the switch ports.
This will immediately cut the network access for the currently connected endpoints and trigger a proper authentication attempt on the ports. In most deployments, this means that 802.1x authentication will take place, followed by MAB authentication. Until a successful authentication takes place, your endpoints will have no network access.
8. RADIUS Sessions always remain in Monitor Mode
One thing to consider when using Monitor Mode is that even if 802.1x and MAB authentication fail, the RADIUS Sessions ID will remain in the switch and ISE. Unlike Closed Mode, where failed authentication means no access (unless you have a general Profiling access result at the very end of the Authorization Policy), Monitor Mode will allow the endpoint to pass traffic on the switch port anyway.
Since the RADIUS Session ID is kept up and running, this will allow the switch to, for example, send Device Sensor data with CDP/LLDP/DHCP information to ISE using RADIUS Accounting packets, which in turn can help out with giving the endpoint proper network access if the profiling is successful and correctly processed. Since both types of authentication have failed, the authentication process will restart after 60 seconds (which is the configured parameter in my IBNS 2.0 templates).
Do keep this in mind as you are going through your implementation phase, that you might have some endpoint being able to connect to the network correctly in Closed Mode only because you had a period of time where Monitor Mode was used, allowing the switch to collect certain endpoint information and sending it to ISE, which profiled the endpoint correctly because of that which is crucial when moving on to Closed Mode.
However, heading straight into Closed Mode without any kind of Profiling access result could mean your endpoints never get the chance to get profiled correctly, meaning they’ll never be given the appropriate network access. What I’m trying to say is that the authentication flow, in a way, is different between Monitor Mode and Closed Mode, and you need to be aware of that since the troubleshooting steps could vary between them.
9. Keep deploying new switches in Monitor Mode
After you have successfully rolled ISE authentication for all endpoints connected to all of your current switches and completed the initial journey from Monitor Mode to either Closed mode or Low-impact mode, remember that switches that are put in production use after this point should still probably be deployed in Monitor Mode first, before moving on to one of the other modes.
This can, of course, depend on your organization’s security policy, and if it accepts non-secure ports for a period of time, which is the case with Monitor Mode. If your goal is to have a completely locked-down network that does not use any kind of Profiling, Monitor Mode could make less sense in that case, and you could head straight into Closed Mode if only 802.1x and MAB based on only MAC address “whitelisting” will be used for authentication.
Maintaining a secure wired network is a never-ending process for networks that are always expanding, and the time to properly go through endpoints and correct their authentication process is always going to be needed.
10. Consider skipping Monitor Mode completely
This step is mostly useful for smaller environments and if your goal is to transition very fast from having no authentication at all on the switch ports to having proper ISE authentication.
For this approach, deploy switches in Closed Mode right from the start and have the last rule in your Policy Set configured as a simple “ACCESS-ACCEPT” (with only Reauthentication Timers configured, no advanced Authorization results or modifiers).
This means that the “true” Closed Mode will be activated at the same time on all switches when the last rule is changed from “ACCESS-ACCEPT” to a hard simply “Deny Access” or a limited network access result if you are using Profiling. You really need to have done your homework in this approach and gone through every authenticating endpoint to ensure they match the correct rules.
Another good point that comes up from this Cisco employee is that a network in Monitor Mode is different from a network in Closed Mode seen from the endpoint’s point of view since the switch’s behavior is different, similar to what I was stating earlier in Tip #8.
Regarding different behavior, for example, in Monitor Mode, an endpoint can issue a DHCP discovery message instantaneously when connected to the switch, while in Closed Mode it would most likely have to wait for 802.1x to timeout first (since this is the most common authentication order).
This could give you a false impression that the authentication process for certain devices is different (working better) than it actually is, and once you activate Closed Mode, you might run into trouble because endpoints are ending up in a bad spot due to DHCP only running for a certain period before the endpoint gives up.
I believe this approach of configuring this pseudo “Closed Mode” immediately on the switches to be very interesting even though I have not done it myself in a production environment.
Another good thing about this approach is that you only need to configure your switches once (for Closed Mode) and not needing to re-configure every switch to move from Monitor Mode to Closed Mode.
Comments from a Cisco employee regarding this are on the link below.
If you found this article interesting, check out Part 1 of the series which includes a lot of good pointers and ideas regarding general configuration and strategy when deploying secured wired ports.
Cisco ISE - General Settings Tips and Tricks for Wired Deployments Part 1