This article goes through some good-to-know general settings and logic to implement for most 802.1x/MAB deployments on wired infrastructure using Cisco ISE. This article focuses on general things to consider when going through your wired deployment.
For more tips and tricks, check out Part 2 of this article, which includes a lot of good pointers and ideas for the different wired deployment stages (Monitor/Closed Mode, etc.).
Cisco ISE - General Settings Tips and Tricks for Wired Deployments Part 2
Introduction
The content will be a mix of good-to-know tips and tricks you can go through to ensure your deployment goes smoothly and you are getting the most out of ISE and your switches.
This article will not go through the basic configuration of ISE or switches, the purpose of this article is to collect general tips and tricks that I myself might need to look up when deploying this technology at customers.
You will not learn to deploy AAA/RADIUS authentication from scratch by reading this article, but you might learn something new if you are already familiar with deploying 802.1x and MAB authentication on switch ports.
The following hardware and software were used in this article:
Cisco ISE version 3.1 patch 4.
Cisco Catalyst C9200L-48P-4X running version 17.3.5.
Cisco Catalyst C3560CX-8PC-S running version 15.2(7)E6.
1. Assign VLAN Names, not VLAN IDs
Depending on your specific implementation, if you are implementing dynamic VLAN assignment in your deployment, consider assigning the dynamic VLANs as “Names” rather than “IDs” (numbers). This could simplify your Authorization Policies significantly if you have a lot of different sites with different VLAN IDs that are similar in usage and could be summarized as one rule if the VLAN name on all of the switches is the same.
Do note that VLAN names are case-sensitive in ISE, so make sure you type them correctly both in the switch and in ISE.
For example, if you have ten different sites with a VLAN named “Admin” but the VLAN ID is different on each site (VLAN 10 at site A, VLAN 11 at site B, etc.). you could simply use the VLAN Name as the dynamically assigned parameter instead.
You can also use this method to assign a VLAN Group (which includes certain VLANs) already configured on a switch.
2. Always use Reauthentication
This tip might seem a bit odd at first since most people would probably consider reauthentication a good thing. The only reason this tip is here is that Cisco has some older documentation (see Wired 802.1X Deployment Guide) from over 10 years ago that has a bad take on reauthentication (in my opinion) and recommends that it should not be used. However, the different problems related to reauthentication mentioned in this guide are no longer as bad as they seem, and there are ways to fix them.
You should always be using Reauthentication!
Performing reauthentication is a great way to confirm that a previously connected (authenticated) device is still active and it is a great way to automatically re-enforce changes in Authorization Policies as access sessions go through the process. For example, the process of reauthentication will trigger a refresh of downloadable Access Control Lists (“dACL”) to be applied to the port going through reauthentication. If you do not use reauthentication, you would have to trigger a manual reauthentication either by messing with the port (shutdown/no shutdown), reseating the network cable, or sending a RADIUS Reauth manually from ISE.
3. Use Reauthentication Timeout assigned from ISE
The Reauthentication Timeout timer can be assigned either directly on the switch port manually or sent from ISE when authentication occurs. Using ISE to set this timeout is the preferred way for the sake of consistency, so make sure to always do this when possible.
For your switch to allow ISE to set this timeout value, the two commands below must be configured on the switch port.
authentication periodicauthentication timer reauthenticate serverUnless your company’s security policy states otherwise (like you are required to have reauthentication take place every X hours), set the Reauthentication Timeout to the maximum value of 65535 seconds (which is just over 18 hours).
There are of course some security reasons to have a shorter timeout, like kicking out endpoints whose certificates are revoked/expired during an active session and getting them off the network faster by having reauthentication take place and kick them out.
Depending on the size of your environment, setting the Reauthentication Timeout period to a very low number will cause an unnecessary load on your ISE servers.
Related to the Reauthentication Timeout period is to set the action to RADIUS-Request. This means you keep the same session ID and do a reauthentication when the timeout reaches its end. If you set this value to Default, the session will completely terminate and the endpoint will be thrown out, causing it to lose network access until it authenticates again.
4. Use Last Successful Method for Reauthentication
In most deployments, 802.1x authentication takes place first before falling back to MAB after a few authentication attempts.
However, there could be some cases where running MAB before 802.1x is required, for example in cases where the connected devices are unable to connect properly after authenticating with MAB after 802.1x has failed, due to the device’s DHCP request process stops before MAB authentication takes place, meaning the endpoint will authenticate just fine but fail to get an IP address. In these cases, you can configure the switch to perform MAB authentication first and only use 802.1x authentication if the endpoint sends an EAPoL Start message to the switch, signaling that it wants to use 802.1x authentication.
The reauthentication process is also affected by the authentication order (MAB before 802.1x), which can cause endpoints running 802.1x to get stuck authenticating using MAB (by hitting a default “Profiling” Authorization Policy, for example) since they might not send an EAPoL Start message when reauthentication is supposed to take place.
To counter this error, there is a custom Cisco Attribute Value (“AV-pair”) you can add to your Authorization Profiles to have ISE tell the switch to use the last successful method when performing reauthentication. This makes sure reauthentication attempts go smooth, regardless of which order for authentication methods you are using. This attribute is also useful if you are running 802.1x before MAB (like most deployments) since your MAB authenticated endpoints won’t waste time waiting for 802.1x to timeout before falling back to MAB during reauthentication.
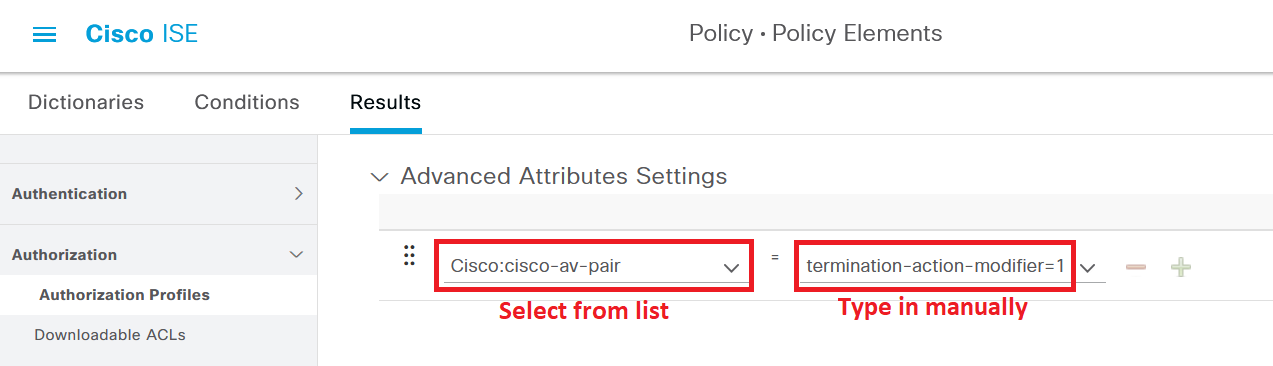
On your Authorization Profiles, add an Advanced Attribute Setting according to the settings below.
Do not use this setting for Monitor Mode as it could cause devices that are failing 802.1x (but should really use that method) to get stuck in some general MAB result instead.
Cisco:cisco-av-pair = termination-action-modifier=1No matter which authentication order you deploy, using this AV pair is a great practice because it reduces the reauthentication process and the load on ISE since the correct authentication method is used right away for reauthentications.
If you use Concurrent Authentication, this attribute value also provides a lot of value. 802.1x does not take place even though it starts running at the same time as MAB.
Since the purpose of Concurrent Authentication is to run 802.1x and MAB at the same time, you usually end up with double entries in the ISE Live Log (one for 802.1x and one for MAB) but using this attribute you can avoid the double entries when reauthentication occurs. Even if the switch is configured to run Concurrent Authentication for new authentications, only the last successful authentication method will be used for reauthentications (see more at this thread on the Cisco support forums) when this attribute is configured.
For new authentications though, the ISE Live Log will always show double log entries for the very first authentication.
5. Watch out for default Access Control Lists on interfaces
On IOS switches (but not IOS-XE switches) you can view the final dACLs applied to an interface where authentication has taken place. However, you may quickly notice that there are parts of the ACL on the interface that does not come from the dACL downloaded to the switch from ISE. In fact, there is a whole other normal ACL applied to the interface in addition to the ISE dACL.
This ACL is called “Auth-Default-ACL” and permits UDP/TCP DNS traffic and DHCP traffic. Using the command “show ip access-list interface Gi0/1” you can see this ACL being applied after the dACL that was sent from ISE. This ACL is not just some cosmetic bug or similar, it actually works (as in, it is permitting traffic through the port) and seems to be working the same for all IOS 15.2(7)EX releases I’ve tested on all kinds of different switch models. You won’t see this ACL using the “show access-sessions interface <Gi0/1> details” command, because this command only shows actual dACLs, not normal ACLs.
This ACL does not exist in newer switches running IOS-XE. I recommend not relying on this ACL to exist and if you want to permit DNS/DHCP traffic for your clients, make sure to add it manually to your dACLs to make sure it works on every sort of switch you plan to deploy secure port authentication on.
On IOS-XE switches, an “implicit deny” ACL is added by the switch itself after the applied dACL downloaded from ISE. To confirm all the ACLs applied to an endpoint connected to the switch, use the command “show platform software fed switch 1 acl interface | begin <MAC-address>“. You may need to modify the command to fit your specific switch environment (like the switch number if your switches are stacked).
As seen above, you can see that a dACL and the “implicit deny” ACL are applied to the switch. The “implicit deny” ACL exists on IOS-XE switches by default and can be viewed via the command “show ip access-lists”.
6. Watch out for Suppressed Endpoints/Requests
These events are not logged in the ISE Live Log, making you scratch your head for a long while until you find out what is going on.
Check out Suppressed Endpoint in Dashboard > Summary dashboard > Rejected Endpoints. Find your Endpoint, check the box next to it, and click on “Release Rejected” to let it try to authenticate again.
To configure Suppression settings, head to Administration > System > Settings > Protocols > RADIUS > Suppression & Reports.
Suppression only changes the way logs are presented in ISE. You can use suppression to limit the amount of failed authentication shown for a client in the Live Log. Authentication attempts are still made when suppression is active, but you will only see the attempts in the Live Log according to your configuration.
Rejection on the other hand will stop ISE from processing authentication attempts for certain endpoints completely for the configured time.
The image below uses ISE 3.1 default settings. As far as Suppression goes, if there are two failed authentications within 5 minutes, suppress the logs going forward and only show an updated log entry every 15 minutes. As for Rejection, if there are 5 authentication failures within the time specified above for Suppression (5 minutes), reject authentication attempts for the failing endpoint for the next 60 minutes.
Uncheck “Reject RADIUS requests from clients with repeated failures” to make sure all attempts go through during your deployment stage. Enable these settings once again when you have gone through a lot of the "onboarding" process for different endpoints to keep your ISE logs clean.
Be vary when unchecking this box, as it can cause a lot of load on your ISE deployments logs if you are already using ISE for other purposes, like WLAN authentication.
It may also be of interest to disable suppression of repeated successful authentication attempts to give you the full picture of your (successful) testing. You can do this just below the options in the previous picture by unchecking this box.
7. Device Sensor data requires RADIUS Accounting to work
Using profiling via the Device Sensor built-in into Cisco switches is a great way to collect information about endpoints and can help you profile certain endpoints, which then can be used to build your Policy Set. Device Sensor data is carried inside RADIUS Accounting packets and sent to ISE.
When you have transitioned away from Monitor Mode to Closed Mode, be sure to remember that you will need to grant some sort of (probably limited) network access to unknown devices in order to utilize the Device Sensor data. Endpoints that receive “Access-Reject” will end that session and no endpoint data will be sent in the RADIUS Accounting packets, which will only start to be sent after some sort of session (a session ID if you will) has been established.
Even if you are planning to use just CDP or LLDP data for profiling purposes, you still must grant some sort of network access to create a session ID, and then the Device Sensor to pick up on the CDP/LLDP data and send it to ISE in RADIUS Accounting packets.
8. Be wary of Endpoint’s Power Settings and Docking Stations
If some cases, the endpoints that connect to your network may have certain power settings to save battery low, which can impact their network authentication behavior.
One recommendation, if possible, is to configure endpoints, like computers, to always have the network adapter active, even when the computer is put into hibernate/sleep mode or similar. This is to avoid running into scenarios where a properly connected computer gets disconnected during hibernation and put into some other VLAN via MAB/Guest Access because 802.1x re-authentication could not be completed.
Configuration to set the computers’ network adapters to always be powered on might vary from device to device, but in general, you should look for the “Allow the computer to turn this device off to save power.” checkbox for the network adapter and uncheck it. Talk to the people managing the company’s computer and tell them to make this setting part of their standard image/roll-out to save everyone a lot of trouble and time!
Since most computers today are laptops connecting to docking stations to be provided multiple monitors and accessories, you can find yourself in some strange results where the computer is considered “dead” to the network, but the switch will still try to perform an authentication since the link to the docking station is still up.
Depending on your type of docking station, there could be issues in regards to which MAC address is being presented to the switch and ISE. Some docking stations will have their own MAC address burnt into their Ethernet port, so you can run into cases where this MAC address is being seen by the switch and not the real MAC address that belongs to the laptop.
9. Watch out for Windows Interface Quarantine Behavior
This issue is one I have not seen myself, but I ran into a thread on the Cisco forums where this problem was discussed. According to Cisco TAC, this problem was introduced in Windows 10 version 1809.
In this scenario, a Windows computer lost connection to the network for 8 seconds after going through network access reauthentication. This issue happens when Windows goes through a change of state for the network (including 802.1x reauthentication apparently) which puts the network interface in a “quarantine state”, blocking new TCP sessions, any UDP session (both old and new) and possibly ICMP traffic for these 8 seconds while Windows is trying to classify what kind of network the computer is connected to (even if nothing really has changed access-wise), so it can apply appropriate firewall settings. After Windows has come to a decision, the network interface will be “unquarantined” and network traffic will start to work properly again.
If you have a very short reauthentication timer on your switch ports, your users could have a high risk of experiencing network issues while reauthentication takes place, if they are unlucky.
This behavior can be turned off using by creating the Registry value below and setting it to “0” (meaning off). The reason for this behavior being activated by default is security-related, as it protects the computer from certain attacks while the “decision process” is being run.
You’ll simply have to talk to the workstation administrators of your company to reach an understanding and finally an agreement if you are going to make this change or not.
HKLM\SYSTEM\CurrentControlSet\services\SharedAccess\Parameters\FirewallPolicyIntfQuarantineEnabledDWORD Value data: 0Reboot the computer after the value has been created to activate the setting!
Below you can find the references I have gone through on this matter.
Cisco Support Forums Thread - ISE 802.1X Reauthentication and client dropped packets
10. Use the Reporting Tool to go through Failed Authentication
Since the ISE Live Logs are only kept for 24 hours, you can use the Report tool under Operations > Reports > Endpoint and Users > RADIUS Authentications to get a great view of which endpoints (MAC addresses) are hitting your various Authentication and Authorization templates.
This is very helpful for us to get a hold of endpoints that are failing the authentication process, either due to failed 802.1x authentication or failed MAB authentication (for example, a failed profiling process or if the MAC address hasn’t been assigned to an Identity Group manually).
You can create custom Advanced filters here to show only the most interesting results. For example, you can filter to show only failed authentication on certain Network Devices where you have just deployed your secure wires access configuration.
If you’re happy with a custom Report, use the “Add to my Reports” to save the filter settings to the “My Reports” section above the “Reports” menu.
If you found this article interesting, check out Part 2 of the series which includes a lot of good pointers and ideas for the different wired deployment stages (Monitor/Closed Mode, etc.).
Cisco ISE - General Settings Tips and Tricks for Wired Deployments Part 2