Introduction
This article deals with HTTPS Inspection using a Self-Signed (by the firewall itself) CA Certificate. To see how to accomplish HTTPS Inspection using an internal PKI Root-Signed CA Certificate, please see this article instead.
In today’s networks, the majority (around 90 %) of traffic heading to, and from, the internet is encrypted. Due to the widespread adoption of encryption in most common software and applications, like web browsers, identifying threats has become increasingly difficult for appliances such as firewalls.
Web browsers mostly rely on the HTTPS protocol to make sure that the traffic between a client device and a server is encrypted, and while encryption is generally viewed as something positive in most cases, it also makes it possible for attackers to hide malware, viruses, and other bad data as it’s being transported across the network, to its target.
In this article, we are going to go through the basic concepts of HTTPS Inspection, an advanced technique used by firewalls, web proxies, and similar devices, to “break up” (decrypt) encrypted connections to be able to see the actual content of the data, and take action on it in case it seems to contain something that we’d want to keep out of our network.
There are two types of HTTPS Inspection:
Outbound = decrypt + inspect traffic from an internal client OUT to a server on the internet.
Inbound = decrypt + inspect traffic from an external client IN to a server on your network.
HTTPS Inspection has many names (HTTPS Inspection, SSL/TLS Inspection, SSL Interception, and more) depending on who you ask, but in the Palo Alto world Outbound HTTPS Inspection is called SSL Forward Proxy, and Inbound HTTPS Inspection is called SSL Inbound Inspection.
The Basics of HTTPS Inspection
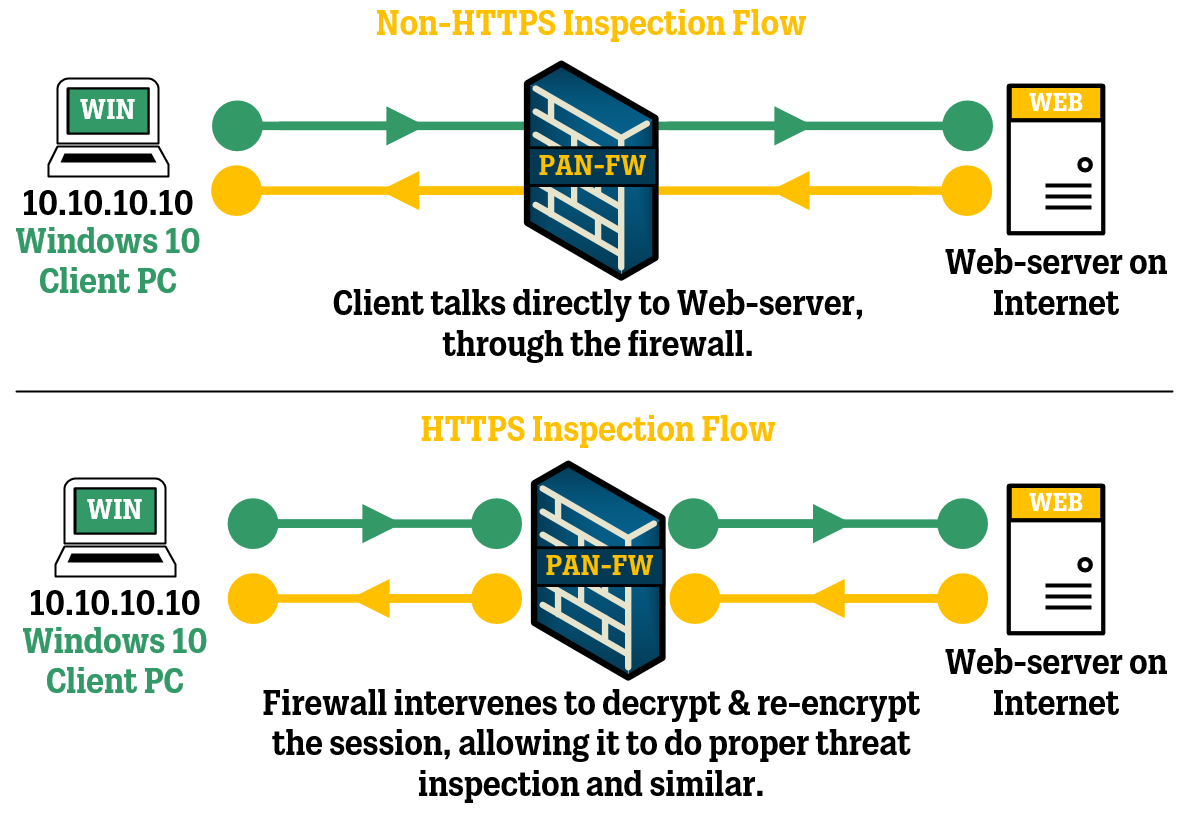
HTTPS Inspection works by having the inspecting device (like a firewall) act as a middle-man between the client and the server that is trying to communicate. This means that the firewall essentially will perform a Man-in-the-Middle (“MitM”) attack by taking on both the role as the server and as the client.
Instead of the client communicating directly to the server (which is normally the case), the firewall will intervene and pretend to the client that it (the firewall) is the server, and then to the server the firewall will pretend to be the client.
The way this works is that instead of there being a single connection between the client and the server, there will be two separate connections: one between the client and the firewall and one between the firewall and the server.
For the firewall to act as the server when the client tries to connect to it, the firewall will imitate the server by generating the server’s digital certificate on the fly and presenting it to the client, who will think this is the real certificate of the server. On the other side of the firewall, the firewall will establish a connection to the server as if it was just another client.
All of these connections are encrypted, but the firewall gets a glimpse of the content being sent between the client and the server as the traffic is decrypted while it’s inside the firewall, before being encrypted again and sent out on the other side.
To be able to generate certificates on the fly for websites that the clients are trying to access, the firewall needs to be able to act as a Certificate Authority (CA, for short). This means that the firewall has ownership of a CA certificate that is used to generate (or issue) new certificates and that the clients have this CA certificate in their web browser’s trusted certificate store. Because the clients trust this CA certificate, they will also trust every other certificate that is issued from this CA certificate.
Topology
The general network topology to demonstrate HTTPS Inspection is rather simple. On the left side, we have a Windows 10 client PC that will act as our test PC. In the middle, we have a Palo Alto Networks Firewall running PAN-OS 10.0.4, and this firewall is in turn connected to the Internet so that we can try accessing some different websites and see HTTPS Inspection in action.
Now that the basics are out of the way, it is time to start the configuration steps.
Create a Forward Trust Certificate
For the Palo Alto firewall to be able to generate certificates for visited websites on the fly, it will need to be able to act as a Certificate Authority, having the ability to issue these certificates.
The CA certificate used to issue these other certificates is called a Forward Trust Certificate, and there are three ways (alternatives) of getting your hands on one:
A Forward Trust Certificate can be generated directly on the Palo Alto firewall (self-signed).
A Certificate Signing Request (CSR) can be generated on the Palo Alto firewall and signed by an internal root server as a Subordinate Certificate Authority, like a Microsoft Active Directory Certificate Root, which will issue Forward Trust Certificate.
Exporting the CA certificate from an already existing CA in your infrastructure, and importing it into the Palo Alto firewall.
There are pros and cons regarding these three ways to get a CA certificate onto your Palo Alto firewall, personally I would go with alternative 1 or 2.
Alternative #1 could be acceptable for smaller environments or a lab, where distributing the CA certificate (which is unique to the firewall that generated it) is not a big hassle.
Alternative #2 would be better in terms of scale if your network is very big, especially if you have multiple firewalls at multiple points in the networks, and all of your clients need to have their traffic decrypted and inspected regardless of which firewall they are passing through.
Alternative #3 is somewhat odd, as it makes the Palo Alto firewall take the CA identity of an already existing CA. While this is technically possible, I would think that whoever is in charge of the original CA would have something to say about it.
In this article, we will go through Alternative #1 - using a Self-Signed Forward Trust Certificate.
Navigate to DEVICE > Certificate Management > Certificates > Device Certificates and click on the Generate button at the bottom.
Set Certificate Type to Local, fill in a good Certificate Name and CommonName, and check the box for Certificate Authority.
What you use for CommonName is not entirely important, but I would recommend picking names that you would recognize when you run into the certificate later down the road.
To make the certificate look a bit more professional, use the +Add button further down to add the Certificate Attributes for Country (C), State (S), Locality (L), Organization (O), and Department (OU).
Click on Generate when you are done.
When the certificate has been generated, click on it in the list and make sure the boxes for Certificate Authority, Forward Trust Certificate and Trusted Root CA are checked.
Click OK when you are done and then Commit to activate your changes.
Create a Forward Untrust Certificate
In addition to the Forward Trust Certificate, we will also need a Forward Untrust Certificate. The purpose of the Forward Untrust Certificate may seem odd at first, but it is actually very important.
This CA certificate is only used to create certificates on the fly when the user is trying to access a website that has an expired or otherwise invalid certificate. Since the Palo Alto firewall will see that the website is suffering from this issue, it will inform the user of this by using its Forward Untrust Certificate.
Similar to the Forward Trust Certificate, the firewall will generate a certificate for the website and present it to the end-user, but since the issuing CA for this certificate will be the Forward Untrust Certificate (which the end-user’s device has no idea about), a certificate error message will be presented to the user, signaling that there is something wrong with the security of the visited website.
Without this feature, the Palo Alto firewall would always use the Forward Trust Certificate to generate certificates for the user to see, which would mean that every website, ever, would seem to be safe and in order, no matter the status of the website’s actual certificate.
Do note that the Forward Untrust Certificate should NOT be distributed to any clients, ever. The very purpose of this CA certificate is to remain unknown to every device on your networks so that actual certificate errors can be exposed.
Once again, navigate to DEVICE > Certificate Management > Certificates > Device Certificates and click on the Generate button at the bottom.
Set the Certificate Type to Local, fill in a good Certificate Name and CommonName, and check the box for Certificate Authority.
What you use for CommonName is not entirely important, but I would recommend picking names that you would recognize when you run into the certificate later down the road.
To make the certificate look a bit more professional, use the +Add button further down to add the Certificate Attributes for Country (C), State (S), Locality (L), Organization (O), and Department (OU).
Click on Generate when you are done.
When the certificate has been generated, click on it in the list and make sure the boxes for Certificate Authority and Forward Untrust Certificate are checked.
Click OK when you are done and then Commit to activate your changes.
Distribute the Forward Trust Certificate to clients
To not cause any certificate errors or warnings for connections, the Forward Trust Certificate must be distributed to the clients. While a lot of software in modern operating systems depends on utilizing the built-in trusted certificate store that belongs to the operating systems itself, some applications have their own trusted certificate store that might be needed to be modified for the application to function properly.
One of these cases is today’s typical web-browsers, which throughout the years have had different views on security and certificate in general. The bigger third-party trusted root certificates (like the ones from GeoTrust, GlobalSign, Sectigo) are usually trusted in all modern web-browsers, while lesser-known root certificates may vary from web-browser to web-browser.
This is relevant to us because we need to make sure that the end-user’s device(be it a computer, tablet, or smartphone) has the Forward Trust Certificate installed in the correct place.
To test which web browser utilizes the built-in certificate store of Windows, one can simply import a certificate into the Trusted Root Certification Authorities “bank”, no matter what certificate it is, and then see if that same certificate is shown as trusted inside your web browser certificate store. Typically, this can be done in the Settings if you search for Certificates.
Using this approach on the test-PC in my lab, I can draw the following conclusions for the web-browsers I have installed, in their current versions.
Google Chrome - uses Windows built-in certificate store (as seen in mmc.exe).
Microsoft Edge - uses Windows built-in certificate store (as seen in mmc.exe).
Mozilla Firefox - web-browser-unique trusted certificate store.
The actual distribution of the Forward Trust Certificate should be done by using your management platform for each type of client (device) and is outside the scope of this article.
For example, company-managed Windows devices usually use some combination of Group Policy Object (GPO), or similar, within the SCCM or Intunes platforms.
For the sake of this lab, we are going to export the Forward Trust Certificate from the firewall and import it into my test PC.
Navigate to DEVICE > Certificate Management > Certificates > Device Certificates, select the Forward Trust Certificate and click on the Export Certificate button at the bottom of the screen.
Set File Format to Binary Encoded Certificate (DER) and click on OK.
DO NOT select to Export Private Key !!
A certificate file will now be downloaded to your computer, and you need to put this certificate onto the device(s) that are going to have their traffic go through HTTPS Inspection.
The CA certificate created is a Root Certificate, which means that it goes into the Trusted Root Certification Authorities store of the device. Preferably in the Local Computer’s store, which is inherited by every user that logs in on that computer.
When you have moved the certificate to the test PC, double-click on it to install it, make sure to select the correct certificate store manually.
Configure an HTTPS Inspection Policy
With everything else in place, we can now configure an HTTPS Inspection Policy that will instruct the firewall in which cases it should, and not should, apply HTTPS Inspection to traffic flows going through it.
Enabling HTTPS Inspection can be a hard hit on both your users and your firewall, so start small by only including a small scope of clients och IP-networks to perform HTTPS Inspection on.
Navigate to POLICIES > Decryption and click on the +Add button at the bottom to create a new Decryption Policy Rule.
Give the policy a fitting name and description.
Move on to the Source section. Here I will select the INSIDE zone, and more specifically the test PC in my lab.
Continue to the Destination section. In my case, I am going to only choose the Destination zone OUTSIDE, to trigger HTTPS Inspection for all my test PC’s traffic that is heading towards the internet.
Move on to the Options section, set Action to Decrypt, and Type to SSL Forward Proxy (Palo Alto Network’s term for HTTPS Inspection).
Click on OK when you are done and do a Commit to activate your changes.
Exclude certain URL Categories/Domains from inspection
There will always be cases where HTTP Inspection could cause serious problems with certain applications, and finding a proper solution can be really tough.
You will most likely run into applications that will work really poorly with HTTPS Inspection enabled, and in those cases, you may have to exclude them from the HTTPS Inspection process.
There are also some cases where you should NOT use HTTPS Inspection for legal reasons, as you probably could be violating the rights of your users.
Common types of traffic that should be excluded from HTTPS Inspection are:
Banking category websites
Health category websites
Software updates (Windows Updates and similar are already excluded, by default, in Palo Alto firewalls, at least in version 10.X running in my lab). This is because Software Updates can be massive in terms of size, and running HTTPS Inspection on all of it could be really hard on your firewall’s hardware, to the point where it might stop passing traffic all at.
Traffic can be excluded from HTTPS Inspection in two ways, detailed down below.
Exclude Specific Domain Names
If you want to exclude only a single hostname or a single domain and its sub-domains from being processed by HTTPS Inspection, you can add these by navigating to DEVICE > Certificate Management > Certificate Management > SSL Decryption Exclusion.
Here you can see all the different domains that are excluded from decryption, by default.
Click on the +Add button at the bottom and add a domain name to exclude. Give it a description and check the box for Excluded. In this example, we will add the wildcard domain of *.netflix.com.
Click on OK when you are done and do a Commit to activate your changes.
Exclude Specific URL Categories
If you want to exclude certain URL categories from being inspected, you can add these using additional rules in your Decryption Policy Rules.
Similar to the first decryption policy rule we created, navigate to POLICIES > Decryption and click on the +Add button at the bottom to add another rule to the policy.
Choose your source/destination zone and IP-address(es) and network(s), set the URL Category to “health-and-medicine” and Action to No Decrypt.
Make sure to order your Decryptions Policy Rules properly, so the previously configured “catch-all”-rule doesn’t hide your more specific rules.
Click on OK when you are done and do a Commit to activate your changes.
Verification HTTPS Inspection
To see HTTPS Inspection in action, I will visit this very website from my test PC client.
The website loads as expected and there is a “secure lock” next to the URL in the web browser.
If we click on the certificate icon to dig a little deeper, we can see that the certificate for “www.wiresandwi.fi” has been issued from the firewall’s Forward Trust Certificate, called PAN-FW-TRUST.
Clicking on the Certification Path tab will show us the complete certificate chain. Since the CA certificate “PAN-FW-TRUST” was created (“self-signed”) by our firewall itself, as a root certificate, there is no other certificate involved in this certificate chain.
This confirms that the firewall is performing HTTPS Inspection and pretending to act as both the client and the server in this flow of traffic, since the certificate of my website, at least as of this writing, is actually issued by LetsEncrypt, but there is no sign of it here.
Verification Excluded Domains
To verify that the firewall is NOT performing HTTPS Inspection on the custom domain name we entered earlier (*.netflix.com) simply visit https://netflix.com and confirm that the certificate for that website has NOT been issued from the PAN-FW-TRUST certificate (which means that HTTPS Inspection has NOT been performed on this session).
Verification Excluded URL Categories
To verify that the firewall is NOT performing HTTPS Inspection on the URL category “health-and-medicine”, simply visit any typical health/medicine website and confirm that the certificate for that website has NOT been issued from the PAN-FW-TRUST certificate (which means that HTTPS Inspection has NOT been performed on this session).
In my example below, the test PC visits the remote healthcare website Teledoc.
Verification Forward Untrust Certificate
To see that the Forward Untrust Certificate is doing its task, we need to visit a website that will generate a certificate warning.
A great resource for testing various certificate errors and warning is https://badssl.com/
One of their example webpages is https://self-signed.badssl.com/ which will always present a self-signed certificate, which should trigger our Forward Untrust Certificate to issue the website certificate for this page, which causes a warning for the user since the issuer of this certificate is not trusted.
That’s it, for now!