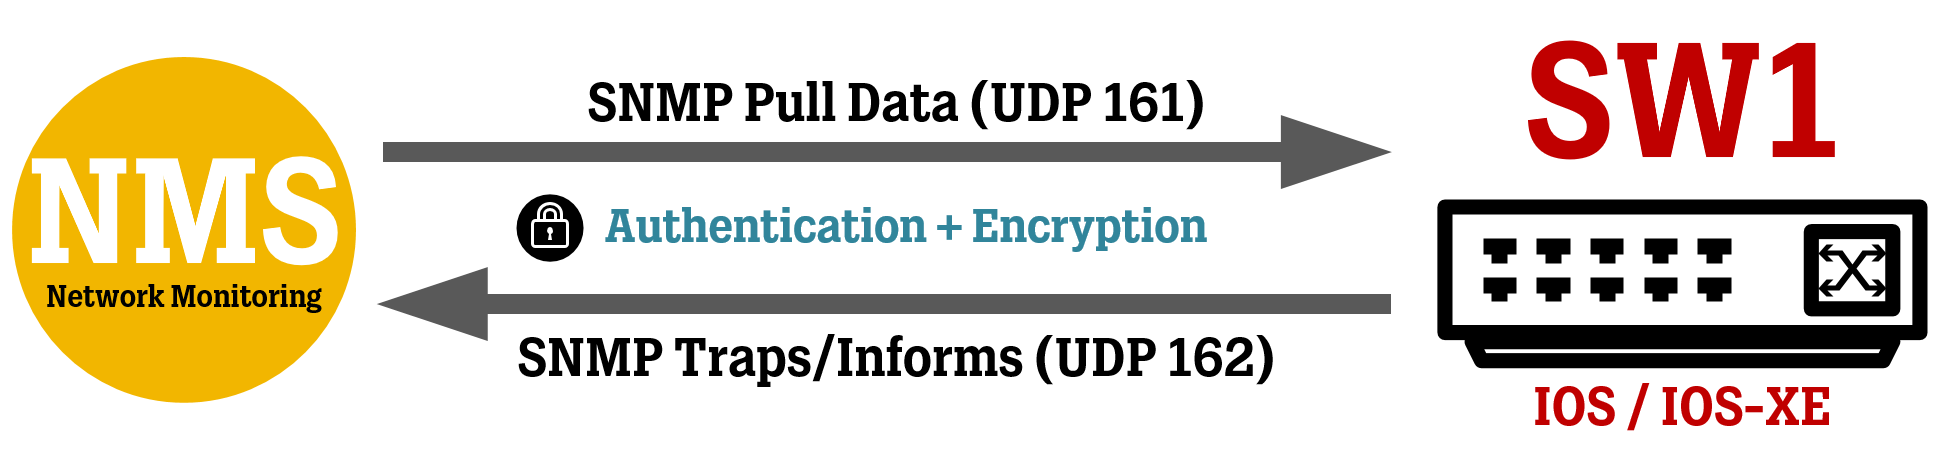
In this article, we take a look at a basic SNMPv3 configuration for Cisco routers and switches, which allows Network Management/Monitoring Systems/Software (“NMS”) to pull data for interface status and traffic, and allow network devices to send SNMP traps (events) to the NMS.
Introduction
As more “proper” APIs make their way into the networking world, the Simple Network Management Protocol (“SNMP”) is still the most widely adopted way to gather information from your network devices.
Today, many networks still use the old SNMP v2c standard, which doesn’t implement either authentication or encryption, meaning the data is sent in cleartext. In this article, we go through the steps of configuring SNMP v3, which has support for both authentication and encryption.
If you are using Cisco Prime Infrastructure or Cisco DNA/Catalyst Center to manage your network, you should definitely be looking at using SNMPv3 with proper authentication and privacy settings to secure your network.
Depending on your requirements, you might be just fine with only using the SNMP polling feature to monitor interfaces’ status and traffic amounts. SNMP Traps can be used to notify the NMS of specific events, like events related to protocols such as OSPF, BGP, HSRP, IPSec, and more. You can also use SNMP Traps to monitor the state of the network device itself, like high CPU and RAM usage, or a failed fan.
In SNMPv3, there are three different modes of operation, each one having different settings for Authentication and Encryption.
authPriv = uses both Authentication and Encryption.
authNoPriv = uses Authentication but no Encryption.
noAuthNoPriv = doesn’t use either Authentication or Encryption (everything in cleartext).
We are going to go through the configuration for the "authPriv” mode since it is the most secure. You should only resort to using any of the other modes if there are limitations to your NMS system(s).
General SNMP Configuration
Regardless of if you want to configure SNMPv3 for ReadOnly or ReadWrite access, there are some basic SNMP commands below that you should always configure.
Most of the commands are self-explanatory, but the feature of the first command “snmp ifmib ifindex persist” is to have your network device lock the interface index ID of each interface, so that they don’t change when you are adding new network modules to a network device already in production.
This is useful because, by default, the index of an interface is dynamically assigned at bootup, which means that an NMS system monitoring a specific interface could end up looking at the wrong interface if the interface index ID has moved to another interface since the last time.
NMS systems do not look for the interface names (like GigabitEthernet1/0/1) when scanning the network device, they only look for the interface index ID (which is just a number like 1,2,3,10,20, and so on).
snmp ifmib ifindex persist
snmp-server location Datacenter Road 1337
snmp-server contact Admin@yourCompany.com IT DEPARTMENT
SNMPv3 ReadOnly Configuration
Most NMS systems will most like only need ReadOnly access to the network devices unless you are expecting your NMS system to make configurational changes to the device. Use the commands below to configure SNMP ReadOnly access.
Depending on what type of monitoring system is going to communicate via SNMP to the router/switch, you might need to tune the encryption algorithm (AES 128/192/256) to match what is available on your monitoring system.
In general, these are the steps needed to configure SNMPv3 and you can see the corresponding commands below.
Create a View to specify which SNMP MIB/values to see. Use “iso included” for all values.
Create a User Group and assign it to a View (optional: apply ACL using the “access…” command).
Configure the User Group to access all VLANs using the “context” parameters (long story short, you need this if your NMS is going to read MAC addresses on different VLANs). Optional: apply ACL using the “access…” command.
Create a User with auth./encryption passwords and assign them to the User Group.
Avoid using "@" in your authentication and encryption passwords below, as that can cause errors in the SNMP communication process.
The encryption algorithms used in SNMPv3 span from DES/3DES (don't use this) to AES 128/192/256. Most modern NMS systems support at least AES 128, which I believe is mandatory in the SNMPv3 standard. Check what is supported on your specific NMS system and try to use a higher version of AES if possible.
If you have multiple NMS systems (backup/inventory/monitoring, for example) that need to run SNMPv3 towards the same network device, you can use different credentials for each one of them with different algorithms, or use one set of credentials with algorithms that are compatible with all the NMS systems.
snmp-server view ALL_ACCESS iso included
snmp-server group GROUP_RO_ACCESS v3 priv read ALL_ACCESS access NMS_NETS_ACL
snmp-server group GROUP_RO_ACCESS v3 priv context vlan- match prefix read ALL_ACCESS access NMS_NETS_ACL
snmp-server user RO_USER GROUP_RO_ACCESS v3 auth sha AUTHP4SS priv aes 128 PR1VP4SS
ip access-list standard NMS_NETS_ACL
remark SNMP ACCESS ACL
permit 10.10.10.0 0.0.0.255
deny any
!! Do note that SNMPv3 users are not shown in running or startup configuration! In the event of restoring a failed network device, don’t forget to manually input the command to create the SNMPv3 user and assign it to the “snmp-server host…” !!
Use the command “show snmp user” to see the configured users.
SNMPv3 ReadWrite Configuration
If your NMS system needs to make configurational changes to the network devices in your network, you will need to configure SNMP ReadWrite access.
Depending on what type of monitoring system is going to communicate via SNMP to the router/switch, you might need to tune the encryption algorithm (AES 128/192/256) to match what is available on your monitoring system.
In general, these are the steps needed to configure SNMPv3 and you can see the corresponding commands below.
Create a View to specify which SNMP MIB/values to see. Use “iso included” for all values.
Create a User Group and assign it to a View (optional: apply ACL using the “access…” command).
Create a User with auth./encryption passwords and assign them to the User Group.
Configure the User Group to access all VLANs using the “context” parameters (long story short, you need this if your NMS is going to read MAC addresses on different VLANs). Optional: apply ACL using the “access…” command.
Disable the ability to reload/shutdown the device via SNMP commands, which could be seen as an operational risk.
Avoid using "@" in your authentication and encryption passwords below, as that can cause errors in the SNMP communication process.
The encryption algorithms used in SNMPv3 span from DES/3DES (don't use this) to AES 128/192/256. Most modern NMS systems support at least AES 128, which I believe is mandatory in the SNMPv3 standard. Check what is supported on your specific NMS system and try to use a higher version of AES if possible.
If you have multiple NMS systems (backup/inventory/monitoring, for example) that need to run SNMPv3 towards the same network device, you can use different credentials for each one of them with different algorithms, or use one set of credentials with algorithms that are compatible with all the NMS systems.
snmp-server view ALL_ACCESS iso included
snmp-server group GROUP_RW_ACCESS v3 priv read ALL_ACCESS write ALL_ACCESS access NMS_NETS_ACL
snmp-server group GROUP_RW_ACCESS v3 priv context vlan- match prefix read ALL_ACCESS write ALL_ACCESS access NMS_NETS_ACL
snmp-server user RW_USER GROUP_RW_ACCESS v3 auth sha AUTHP4SS priv aes 128 PR1VP4SS
no snmp-server system-shutdown
ip access-list standard NMS_NETS_ACL
remark SNMP ACCESS ACL
permit 10.10.10.0 0.0.0.255
deny any
!! Do note that SNMPv3 users are not shown in running or startup configuration! In the event of restoring a failed network device, don’t forget to manually input the command to create the SNMPv3 user and assign it to the “snmp-server host…” !!
Use the command “show snmp user” to see the configured users.
About SNMP Notifications (Traps and Informs)
SNMP Notifications come in two forms called Traps and Informs. The difference between the two is that Informs has an acknowledged mechanism (meaning the NMS will send an acknowledgment to the network device to confirm it received the SNMP message), while Traps are just sent “as-is” without any acknowledge mechanism.
Before you deploy SNMP Notifications, make sure to check if your NMS supports Traps, Informs, or both. In my testing, I found that the Kiwi Syslog Server (which also has SNMP services) only could collect SNMP Traps, but not Informs (even though I could see them arriving at the server using Wireshark).
There is a whole bunch of Traps/Informs that can be activated to send notifications of specific events and you can see all supported events on your network device using the “snmp-server enable traps ?” command.
For initial testing of either Traps or Informs, I would suggest using the notification for “Interface Down/Up” which can be enabled using the command “snmp-server enable traps snmp linkdown linkup”.
Also as a side note, you do not need to attach an ACL to the Notification configuration, I tried this in my lab to see if I could block the switch from sending Traps/Informs to specific hosts, but even a “deny any” statement doesn’t seem to do anything, even if the “access” command is actually available in the CLI.
Enable SNMP Traps
snmp-server group GROUP_NOTICES v3 priv
snmp-server user NOTICE_USER GROUP_NOTICES v3 auth sha NOTEAUTH priv aes 256 NOTEPR1V
snmp-server enable traps cpu…
snmp-server enable traps port-security…
snmp-server enable traps ospf…
snmp-server trap-source MGMT-interface
snmp-server host 10.10.10.100 traps version 3 priv NOTICE_USER
! If your network device is running VRFs, include the "vrf" parameter, as seen below.
snmp-server host 10.10.10.100 vrf MGMT traps version 3 priv NOTICE_USER
! If you make changes to the GROUP you might need to remove/re-apply the "snmp-server host..." command to activate sending Traps to that NMS again !
To enable all traps (informs) possible, use the “snmp-server enable traps” command. This macro command will automatically enter the command for every possible trap. After using this command, you can see the complete result in the running configuration.
Enable SNMP Informs
Although the keyword "traps" is used in some of the commands below, they also apply when configuring SNMP Informs.
Before you continue, you will need to find out the SNMP EngineID of your network device. The SNMP EngineID is a value that identifies each and every SNMP agent or manager in a network.
Cisco devices automatically create an SNMP EngineID based Cisco’s IANA enterprise number and the device’s MAC address.
To see the SNMP EngineID of a network device, use the command “show snmp engineID”:
snmp-server group GROUP_NOTICES v3 priv
snmp-server user NOTICE_USER GROUP_NOTICES v3 auth sha NOTEAUTH priv aes 256 NOTEPR1V
snmp-server enable traps cpu…
snmp-server enable traps port-security…
snmp-server enable traps ospf…
snmp-server source-interface informs MGMT-interface
snmp-server inform retries 3 timeout 15 pending 25
snmp-server engineID remote 10.10.10.100 8000000903002C01B5048901
snmp-server host 10.10.10.100 informs version 3 priv NOTICE_USER
! If your network device is running VRFs, include the "vrf" parameter, as seen below.
snmp-server host 10.10.10.100 vrf MGMT informs version 3 priv NOTICE_USER
! If you make changes to the GROUP you might need to remove/re-apply the "snmp-server host..." command to activate sending Informs to that NMS again !
To enable all traps (informs) possible, use the “snmp-server enable traps” command. This macro command will automatically enter the command for every possible trap. After using this command, you can see the complete result in the running configuration.
Verification / Show commands
Verifying both SNMP Polling and SNMP Notifications working is not something we will go through in detail here, since the testing/verification process can vary greatly between different NMS systems.
In my testing, I used Cisco Prime and Kiwi Syslog (SNMP Trap function) to verify the configuration. However, down below I will detail some great show commands to help you with your implementation.
Use “show snmp view” to see all configured VIEWS and what they are allowed to access. We did not delve too deep into very custom views (like ReadOnly access to some values and ReadWrite access to some other values), but this is the command to see how they are structured.
Use “show snmp group” to see all configured GROUPS, their security level, and attached Views.
Use “show snmp user” to see all SNMPv3 Users (which is great since you can’t see these Users in the running configuration), which Group they belong to and their security settings.
Use “show snmp hosts” to see all hosts (NMSs) configured to receive SNMP Traps or Informs. Here you can see which IP addresses are configured to send these notifications to, which type of notification it is, which User they are sent from, and which security level is being used.