If you are looking to set up MACSec between two IOS-XE devices, please see this article instead: Cisco MACSec Switch-to-Switch Configuration using Pre-Shared Key on IOS-XE
Introduction
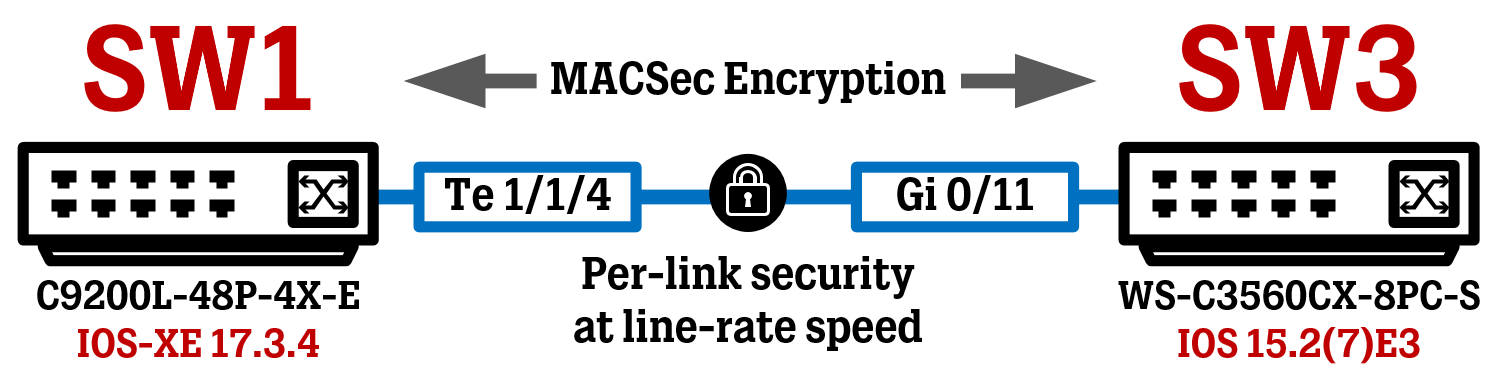
In this article, we are going to take a look at configuring per-link encryption using the MACSec technology between a Cisco IOS-XE switch and a Cisco IOS switch using a Pre-Shared Key (“PSK”).
MACSec provides encryption at a layer 2 level, by having two directly connected devices (can be switches, routers, and even end-points) negotiate a secure link between each other before normal traffic can be passed.
About MACSec technology in general
While protocols such as TLS or IPSec are often used to encrypt traffic traveling between two different network “domains” (like site-to-site VPN tunnels), MACSec only works locally between two directly connected devices. While MACSec isn’t implemented to the same extent as IPSec today, MACSec has its place for those seeking to add an extra layer of protection on a network where they already have full control.
A lot of today’s traffic in networks is encrypted by default due to the protocols used by the applications (like HTTPS), MACSec is still relevant for traffic that is still unencrypted today or if you just want to add another layer of security for your data traffic.
In addition to offering the same security benefits as all other encryption does (data integrity/authenticity/confidentiality), MACSec also offers high scalability and encryption at line rate due to being run completely “in hardware”.
MACSec Authentication methods
To set up a secure link between two devices, some sort of authentication must take place between the participating devices to confirm the other side’s identity. In MACSec, there are three different methods to do this, detailed below.
Pre-Shared Key Authentication = the simplest implementation method, which we will go through in this article. A common Pre-Shared Key is used for authentication purposes.
Local Authentication (Certificates) = this method uses digital certificates installed on the devices to authenticate each other and essentially performs a standard 802.1x authentication (EAP-TLS) on the port running MACSec. Yep, this means running 802.1x authentication between two switches/routers.
Remote Authentication (Certificates) = works similar to Local Authentication, except that authentication is performed by an external RADIUS server (like Cisco ISE) and not by the network device itself. This method is useful if your devices are already connected to an Out-of-Band management network, where they can reach the needed RADIUS server since the device probably doesn’t have any other network connectivity if your whole network requires MACSec.
Configure Authentication
The following configuration has been tested on:
Cisco Catalyst C9200L-48P-4X-E running IOS-XE 17.3.4
Cisco Catalyst WS-C3560CX-8PC-S running IOS 15.2(7)E3
For the two switches to authenticate each other before establishing a data link between the two, a Connectivity Key Name (“CKN”) and a Connectivity Association Key (“CAK”) must be configured on each side. These components together are used by the device assigned the Key Server role to create the Secure Association Key (“SAK”) using an algorithm. The SAK is then used to perform the actual encryption on the data plane, while the CKN only secures the control plane.
The SAK is renewed/updated every now and then, how often this happens can be configured in different ways (after X amount of packets/time).
The Connectivity Key Name (CKN) is simply the Key ID, which in my example below is set to “4321”. However, when you are configuring MACSec between an IOS and an IOS-XE switch, you cannot simply set the Key ID to “4321” on both sides.
IOS switches (and IOS-XE switches pre 16.6 code) will extend their true Key ID using zeroes (0) after the entered Key ID until the total number of digits reaches 64. When configuring the Key ID on IOS/IOS-XE pre 16.6 you only need to enter the shortened version of the Key ID (like “4321”) but the software will extend this Key ID automatically with zeroes.
To set up MACSec from an IOS-XE switch to an IOS switch, we must perform this action manually on the IOS-XE by configuring the Key ID and then manually adding zeroes to the Key ID until the total number of digits reaches 64.
The Key ID parameter is sent in cleartext during the MACSec negotiation process, to indicate to both sides’ devices which key should be used on this particular link. The Key ID must be an even number of digits.
The Connectivity Association Key (“CAK”) is a Pre-Shared Key in the shape of a 32 or 64 hex digit long string, meaning you can use all numbers 0-9 and letters A-F in your key string.
A 64 hex digit long string is preferred, because it enables us to use the “cryptographic-algorithm aes-256-cmac” instead of the “cryptographic-algorithm aes-128-cmac” command, making the MACSec authentication process use stronger encryption since it uses the AES256 algorithm instead of AES128 algorithm , which is weaker.
How you come up with these numbers/letters is up to you, as long as the string is exactly 32 (for AES128 encryption) or 64 (for AES256 encryption) hex digits long.
Do note, that both the CKN and the CAK must match on both sides, when you consider the end result of the manually extended Key ID on the IOS-XE switch and the automatically extended Key ID on the IOS switch!
First, we configure these settings on SW1 (IOS-XE switch). Here we must extend the Key ID using zeroes until the total number of digits hit 64.
! SW1 Configuration (IOS-XE switch)
key chain MKA-KC macsec
key 4321000000000000000000000000000000000000000000000000000000000000
cryptographic-algorithm aes-256-cmac
key-string 8729ABC86219351094759823798739487123027598239487238947.......
lifetime local 00:00:00 Jan 1 1993 infinite
Now, we do a similar configuration on SW3 (IOS switch). We can enter the Key ID without adding extending it with zeroes since the IOS will do that automatically.
! SW3 Configuration (IOS switch)
key chain MKA-KC macsec
key 4321
cryptographic-algorithm aes-256-cmac
key-string 8729ABC86219351094759823798739487123027598239487238947.......
lifetime local 00:00:00 Jan 1 1993 infinite
Configure Encryption Policy
Next up, we will configure a MACSec Key Agreement (“MKA”) policy, in which we will specify which encryption cipher suite to use to secure the traffic between the two switches.
Depending on your switch model and software running, different encryption cipher-suites may be available. In my case, the Cisco Catalyst 9200L model only has “gcm-aes-128” encryption available, while more high-end switches like the Catalyst 9300 have both “gcm-aes-128” and “gcm-aes-256” encryption available.
If you want to decide which switch will assume the Key Server role, you can use the “key-server priority <number>” command to influence this election. The lower the value, the higher the priority and the better the chance at becoming the Key Server. Setting the priority to “255” tells the switch to never be the Key Server.
If two switches have the same priority, the switch with the lowest MAC address will assume the Key Server role.
In the case where an IOS-XE and an IOS switch want to run MACSec between each other, I strongly recommend that you let the IOS-XE switch be the Key Server. I ran into some weird problems in my lab after trying to have the IOS switch be the Key Server, where the IOS switch considered the datalink “SECURED” while the IOS-XE didn’t.
Earlier in this article, we discussed the use of the SAK key, which is the key used for the encryption of the data plane. In IOS-XE switches, the “sak-rekey interval” command defines how often the SAK (encryption key) should be renewed/updated. The switch assuming the Key Server role will decide the SAK rekey interval.
However, in my testing, after configuring the SAK rekey interval command in the IOS-XE switch, this caused some problems in my lab. If I set the SAK rekey interval to 30 seconds, every 30 seconds the communication between the two switches would be lost for around a second (enough to lose one ping between endpoint connected on each side of the switches) while SAK rekeying was taking place. So it seems the SAK rekeying process was not a smooth rollover to the new SAK key. If this is expected behavior or a flaw, I cannot tell.
To counter this behavior, make sure the IOS-XE switch is Key Server and set the SAK rekey interval to the maximum of 65535 seconds (which is just over 18 hours).
! SW1 Configuation (Key Server)
mka policy MKA-POLICY
macsec-cipher-suite gcm-aes-128
key-server priority 10
sak-rekey interval 65535
! SW3 Configuation (not Key Server)
mka policy MKA-POLICY
macsec-cipher-suite gcm-aes-128
key-server priority 30
Activate MACSec on a physical Interface
The last step is to activate MACSec on the participating interfaces.
Be careful how you are implementing MACSec in an already active network, as the interface that you activate MACSec on first will go into a DOWN state until you activate MACSec on the switch on the other side of the link, after which it will go into the UP state (if you have configured everything correctly, that is)
Pay extra attention if you are implementing MACSec in an already active network!
First, we configure these settings on SW1. This will bring down the link between SW1 and SW3.
interface Te1/1/4
switchport mode trunk
macsec network-link
mka policy MKA-POLICY
mka pre-shared-key key-chain MKA-KC
Now, we do the same configuration on SW3, which will bring UP the link between SW1 and SW3 as soon as the MACSec negotiation finishes:
interface Gi 0/11
switchport mode trunk
macsec network-link
mka policy MKA-POLICY
mka pre-shared-key key-chain MKA-KC
After a few seconds, MACSec should be activated on the link between the two switches. In the console output of either switch, you should be seeing something like the image below a few seconds after finishing the configuration on both switches.
Verification
To verify that MACSec is running between the two switches, there are a few show commands that are useful to remember.
The command “show mka sessions” gives us a quick overview of current active MACSec links, who the peer device is, who has the Key Server role and which Key ID (CKN) is being used for this particular link.
Just to make sure the Key ID was automatically extended with zeroes on SW3 (running IOS), we will run the command “show mka sessions” on that switch too.
Looks good!
The command “show macsec interface <interface>” can be used to verify that MACSec is configured to run on an interface, and you can also see which encryption cipher is being used on this particular link (and also other supported encryption ciphers, if you switch supports more than one).
The command “show mka sessions interface <interface> detail” sort of combines the information from the previous show commands into a detailed view of the MKA policy and its parameters. Here, we can see that the SAK Rekey Time is pretty high, counting down from the configured value of 65535 seconds.
To see general statistics related to the MKA process, use the command “show mka statistics”. Here you can see, among other things, the number of times the SAK key has been rekeyed (renewed/updated).