With the rise of powerful network monitoring and automation systems, like Cisco DNA Center, network devices are constantly crawled for status updates. In this article, we look at how this could affect TACACS+ services running on Cisco ISE and what you can do to optimize your deployment.
Introduction
Using TACACS+ and per-command authorization has for years been the golden standard for auditing which system or administrator logs in network devices and executes which commands. While logging every command that is executed by administrators is usually manageable, keeping track of your monitoring and automation systems can quickly overwhelm you and your TACACS+ servers with tons of logs of all the actions performed.
In this article, we are going to take a look at how Cisco DNA Center interacts with network devices on a daily bases, what kind of TACACS+ events this leads to, and go through some tips and tricks to optimize this process.
Many of the tips and tricks detailed in this article can also be applied to other network monitoring systems as well, not just Cisco’s DNA Center solution.
The Case of Cisco DNA Center Network Device Monitoring
To easily capture, in real-time, which commands are executed on a network device by DNA Center, add this piece of configuration (for an EEM applet) below to your network device (like a switch in this example) and put on “terminal monitor” while you are connected to the switch via SSH/Telnet.
event manager applet catchallevent cli pattern ".*" sync no skip noaction 1 syslog msg "$_cli_msg"With this configuration in place, you will now be able to see every command that is entered into the switch. Within a couple of minutes, you should see DNA Center log into the switch and perform a number of “show” commands, similar to the image below.
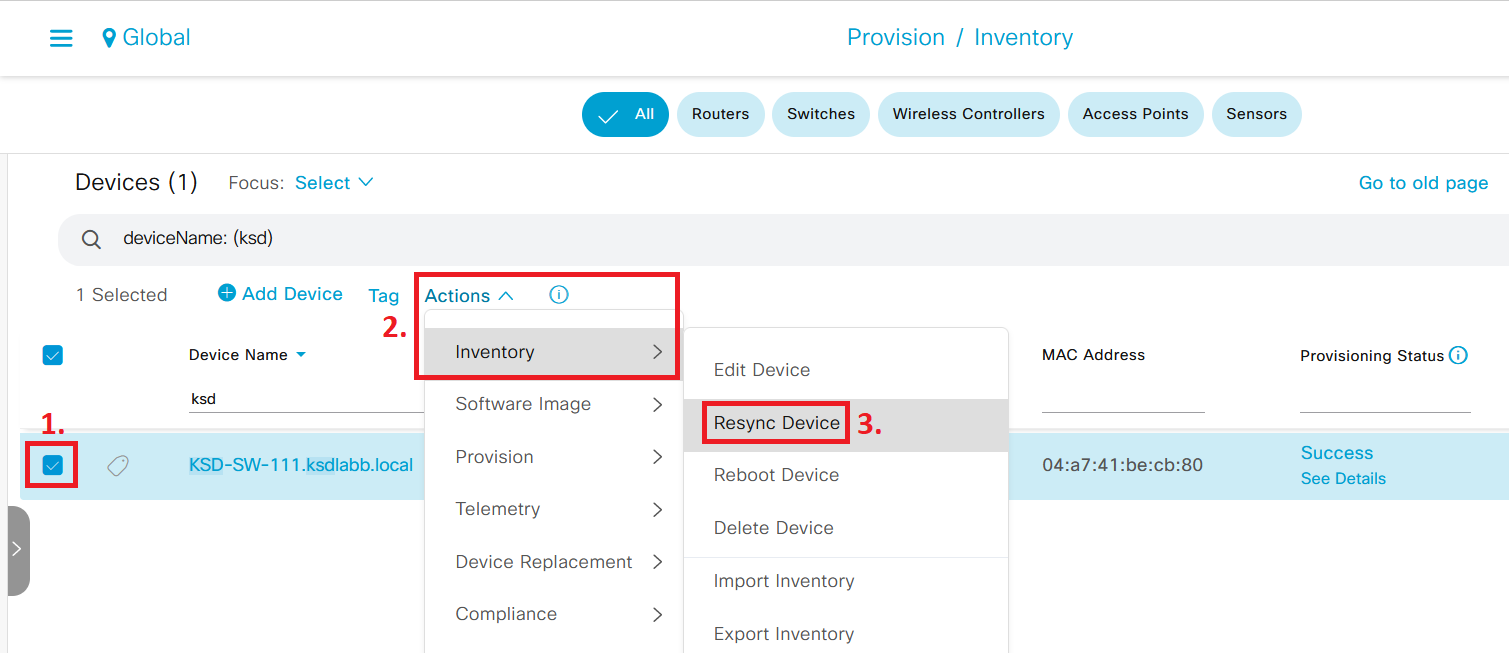
This image shows just a snippet of all commands executed by DNA Center. Every 10 minutes, DNA Center updates the monitoring status of every network device by logging into them via SSH and collecting information by executing over 120 commands, most of which are “show” commands. This process of collecting information is the same as when you click on “Resync Device” in DNA Center, which you can do under Provision > Inventory > select network device > Actions > Inventory > Resync Device.
Executing 120 commands in one go is a lot for administrators, but for monitoring and automation tools like DNA Center, this is simply part of their daily operations. To put this number in a different context, just look at the number of hits on this TACACS Policy Set in Cisco ISE below.
In this image, the hit counter was reset to zero 24 hours ago, with only a single Catalyst 9200L switch connected to the network and managed by DNA Center.
As you can see, 24 hours of monitoring resulted in a whopping 37262 hits for Authentication and Authorization request for TACACS, for just this one switch. Multiply this number with the number of network devices in your network and you’ll start to get the picture of what needs to be dealt with here.
How many TACACS+ transactions would that be in a single day?
How many TACACS+ transactions would that be per second, on average?
Take a look at this table from Cisco and see if the TACACS+ Transactions Per Second (TPS) shown are close or far from your own calculation.
Challenges of Large-scale TACACS deployments
If you did some math with the number above, you’ll quickly see that several issues can arise from having much “device crawling” going on constantly in your network. Not only do you need a solid TACACS+ design to handle the TACACS+ requests themselves, but you also need to plan for how to store all the log entries that will be created as a result.
At Cisco Live in Amsterdam this year, I attended a session called “Walking on solid ISE - Advanced Use Cases and Deployment Best Practices (TECSEC-3781)” where the presenters talked about how the big increase in TACACS+ transactions due to more sophisticated monitoring and automation tools are putting a much bigger strain than before on Policy Services Nodes (“PSNs”) that are running the TACACS+ service.
I think it’s safe to say that the number of TACACS+ events on a switch will easily beat the number of RADIUS events on the same switch when a solution like DNA Center is monitoring that switch.
Even with a super short timeout period for 802.1x/MAB reauthentication etc., it would be very hard for a single switch (even if it’s a stack of multiple 48 port switches) to generate over 37000 log entries in the RADIUS log of ISE in 24 hours, unless something was very, very, wrong.
What To Do?
Depending on your specific environment and security policies, there are some actions you can take look at to mitigate potential TACACS+ issues. There is no silver bullet for these kinds of problems, so you probably need a combination of these actions to properly scale your TACACS+ solution.
Some actions require you to stretch your budget, and some actions require you to (possibly) stretch your company’s security policy.
Down below, we will go through some alternatives to help you return the load on your PSN nodes running the TACACS+ service.
Use Local User Account in ISE for DNA Center
The account used by DNA Center to log into network devices should preferably be a local user account that is stored in the local user database in ISE.
While most ISE deployments that run TACACS+ are connected to something like an Active Directory to perform authentication of network administrators and control that the account in question belongs to a certain Group to be granted access to the switch, the account used by DNA Center to log into switches should probably not be an Active Directory account, for multiple reasons.
The first reason is that you don’t want your DNA Center's functionality to be dependent on something like its account not being able to be authenticated properly, like if ISE loses connection to the Active Directory or if the Active Directory goes down for some reason.
The second reason is that having the DNA Center’s account be an Active Directory account would cause a very high number of excessive login and group/attribute lookups for that particular account, something that a hardened Active Directory might flag as an anomaly and disable the account or notify the domain administrators, which in turn could jeopardize the status of the account.
Remember that per-command authorization in TACACS+ would trigger ISE to look up the user and its groups/attributes in Active Directory every time a command is executed… which would result in a lot of lookups in Active Directory in our case.
But before we create a local ISE user account in ISE for DNA Center to use, there are some general settings to configure first, continue reading below!
Configure User Authentication Settings in ISE
As a pre-requisite to the step above, if you decide to put your DNA Center’s user account in the local user database in ISE, make sure to first take a look at the general settings for local user accounts in ISE, so you don’t end up with an outage down the line. I say this because ISE has some default settings that could disable your newly created local user account after a set amount of time, which would cause issues.
To avoid these kinds of issues, make sure to properly configure the general User Authentication Settings so that the account doesn’t expire all of a sudden due to default settings in ISE.
Navigate to Administration > Identity Management > Settings > User Authentication Settings > Password Policy (tab).
In the Password Lifetime section, there is an option called “Change password every <blank> days”. The default value of this option is 60 days and will affect local user accounts in ISE (which is a different thing from local administrator accounts, bear that in mind) even if you are careful not to check any boxes that could disable the account during the creation of the local user account itself.
Consider if you should increase this value from 60 days to some higher number or straight up just disable this feature completely. Depending on your ISE use case, you may not like having local user accounts with (almost) never expiring accounts if you’re using local user accounts for something else, but if you don’t change anything about this setting it will probably come back to bite you later.
Create Local User Account in ISE for DNA Center
After you have configured this setting, move on to creating the local user account.
Navigate to Administration > Identity Management > Identities > Users > click on Add. Create a new local user account to be used by DNA Center. You should probably create a new User Group as well for this and similar network services accounts and use that User Group in your Device Admin Policy Sets to grant proper access to network devices.
Once again, the User Authentication Settings mentioned in the previous section must set up properly for this User Account to not get disabled later on!
Remove Authorization for Low Privilege Level Show Commands
The “show” commands executed by DNA Center for monitoring purposes are a mix of commands that require Privilege Level 1 and Privilege Level 15. While most common “show“ commands require only Privilege Level 1 to run, some “show” commands result in outputs that display sensitive information, like “show running-config”, “show device-tracking…”, and “show license…”, and therefore require Privilege Level 15 to run.
One could argue that simpler “show” commands which only require Privilege Level 1 to run might not be worth performing per-command authorization for, and instead let anyone who can log into the network device (which means they authenticated successfully) execute these commands without the TACACS+ server being involved. With this design, TACACS+ would still perform the authentication of the administrator who wants to log into the switch, but authorization for low-level “show” commands would be disabled.
Before configuring this step, make sure to double-check your company’s security policy if this step is even allowed to be performed!
To disable authorization for low-level “show” commands, simply change the switches AAA Authorization configuration (based on my AAA TACACS template in the article “SOLID CONFIG: Cisco AAA TACACS and Password Best Practices” from this:
aaa authorization exec default group TAC-SERVERS local if-authenticated
aaa authorization commands 0 default group TAC-SERVERS local if-authenticated
aaa authorization commands 1 default group TAC-SERVERS local if-authenticated
aaa authorization commands 15 default group TAC-SERVERS local if-authenticated
To this:
aaa authorization exec default group TAC-SERVERS local if-authenticated
aaa authorization commands 0 default if-authenticated
aaa authorization commands 1 default if-authenticated
aaa authorization commands 15 default group TAC-SERVERS local if-authenticated
After the configuration change above, your network device will no longer check with TACACS+ servers for the execution of Privilege Level 0 and 1 commands, where Privilege Level 1 is where most “show” commands belong.
If you are experimenting with these AAA commands live, remember that you have to start a new SSH/Telnet session for the new settings to apply, the old (current) session that you used to configure the actual commands will not be affected, in some cases.
To give you some hard numbers to work with, this step removes about 2 out of 3 TACACS+ authorization requests when DNA Center logs into a switch to do its round of monitoring “show” commands. By exporting Live Logs out from ISE and into Excel to count the number of transactions, I could see that commands authorized went from about 120 to just 42.
Deploy Dedicated PSN nodes for TACACS+ Services
One of the major points from the Cisco Live session mentioned earlier, is to dedicate PSNs to certain services and avoid bulking all services together in the same PSN node, if possible.
While this obviously comes at a cost, literally, since you’d need to invest money in more SNS servers or virtual appliances for your ISE deployment, it is also way more scalable.
Use Collection Filters to Limit Logs Saved for TACACS+
Use collection filters to remove authentication and authorization logs for DNA Centers network service admin account to significantly save on disk space. Authentication and Authorization requests will still be processed by the PSN node that receives the requests, but the requests won’t be logged and take up storage space.
To configure a Collection Filter, navigate to Administration > System > Logging > Collection Filters > click on Add. Set Status to “Enabled” and select an Attribute to filter out certain events, for example, use the Username attribute and set it to the username of the account used by DNA Center to log into switches.
As for filtering options, there are a few to choose from, but “Filter Passed” or “Filter All” would probably make the most sense. If you use “Filter Passed”, it will be easier to discover account/password errors in case there is a problem with the account used by DNA Center that would make it unable to log into network devices.
One thing to think about is that this would also mean that you would lose the logs of anyone using the Command Runner feature in DNA Center to connect to a network device via SSH to run commands, which might be a no-no for your security policy.
About Single-Connect Mode
This section is more of a reminder about the single-connect mode for TACACS+.
Long story short, single-connect mode is NOT fit for big environments and is not a solution to fix all problems with the big amount of TACACS+ requests, as the feature can exhaust TCP sockets on PSN nodes running TACACS+. Only use this mode on network devices that are logged into A LOT for monitoring/status purposes other than just DNA Center keeping track of it.
Do note, if you are using an AD account for DNA Center to log into network devices using the single-connect mode, ISE will still need to check the account/groups, etc. in AD every time to authorize commands, this step is not removed just because the single-connect mode is used for the TACACS+ requests themselves.
Cisco still recommends only using single-connect mode on a very limited set of super chatty network devices that are constantly bombarded with SSH sessions, in which lots of commands are executed and need to be authorized.
Another thing to note is that if you provision your network devices using Network Settings in DNA Center, where you can add TACACS+ servers to be automatically pushed to network devices during the provisioning phase, single-connect mode is not configured. To me, this adds some merit to the fact that Cisco does not want you to use this feature on just any network device, since it is not done by default.
References
Performance and Scalability Guide for Cisco Identity Services Engine - TACACS+