In this article, we take a look at the general steps and processes for upgrading an ISE deployment using the Backup and Restore method, where each ISE node is re-imaged to the new version instead of upgrading existing nodes.
Introduction
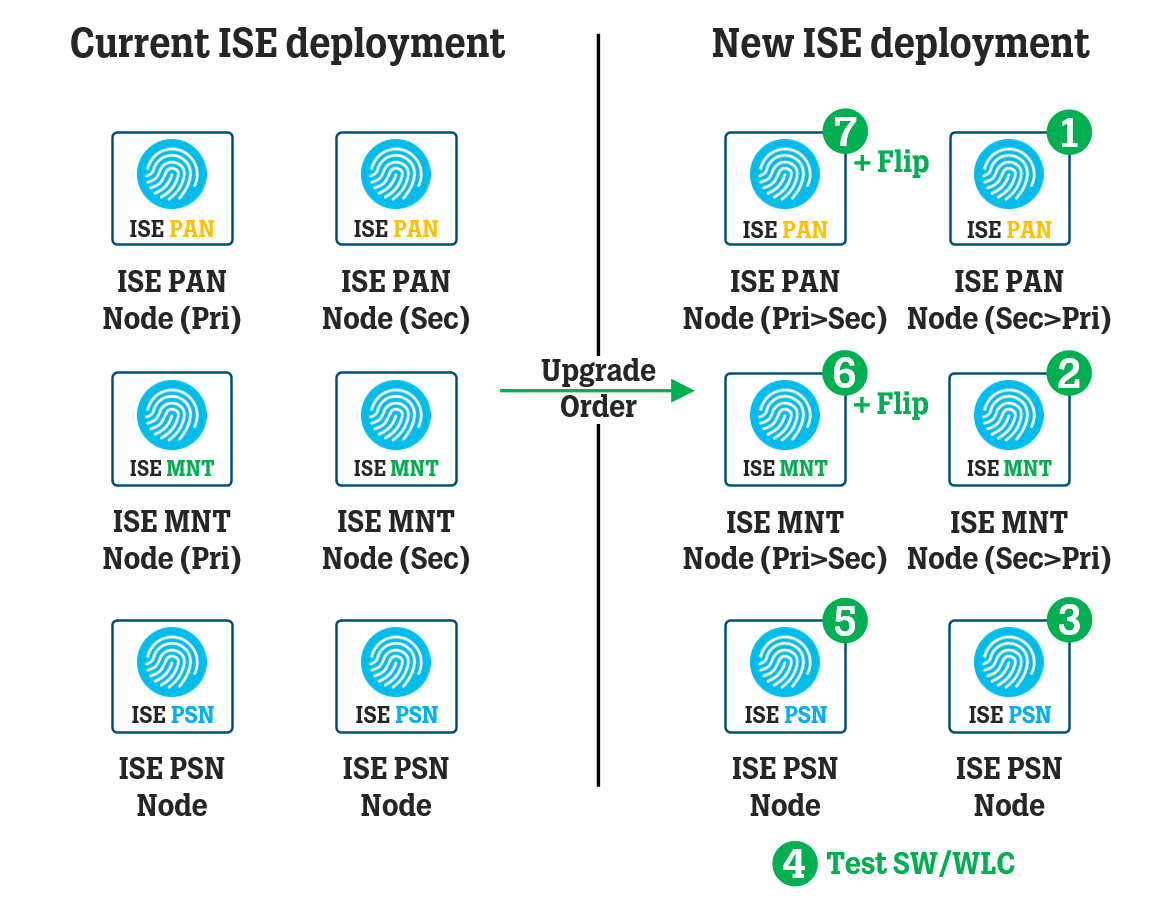
Assuming an ISE deployment with at least 4, 6, or more ISE nodes: two Policy Administration (PAN), two Monitoring (MNT) nodes (possibly combined with PAN nodes if only using 4 nodes in total), and two or more Policy Service (PSN) nodes, you will need to upgrade the ISE nodes in a specific order to not disrupt the network.
Prerequisite
Make sure the upgrade path you want to take is supported, you can find this information in the Cisco ISE Release Notes for each version.
Make sure you have an active support contract for your ISE nodes, in case you need TAC assistance should the upgrade process go wrong at some point and you are not able to recover from this by yourself.
Make sure you have a fresh Configurational Backup of your old ISE deployment and its encryption password.
Take a backup of Root and Intermediate CA certificates that you have added yourself to the current ISE deployment. These CA certificates will be added manually to newly re-imaged nodes before they are joined to the new deployment, mainly to make sure the Admin certificates are set up correctly and that all re-imaged ISE node trust each other when the time to join them together, one by one, comes.
Download the latest patch for the new ISE deployment and put it somewhere it can be easily and fast uploaded to the new ISE deployment’s nodes, as you re-image them one by one.
If using physical ISE servers (SNS servers), prepare the ISO file on a USB stick with LiveUSB (fastest install) or make the ISO-file mountable via KVM Console (slow install, if it completes at all).
Make sure you have access to the ISE GUI using a local administrator account. If you are normally using your user account in Active Directory to log into ISE, you need to confirm that you have access to the local administrator account of the ISE GUI before the upgrade since Active Directory integration will not work immediately after the backup configuration file has been restored to the new Primary Administration Node. Active Directory integration can only be activated after you’ve restored the backup configuration file and logged into the ISE GUI using the local administrator account.
Make a list or a document containing all of the ISE nodes’ hostnames, IP addresses, domain, NTP server(s), Timezone and DNS server(s). You can find all of these parameters by using the “show running-config” command in the ISE CLI.
Make a list or a document containing all of the ISE nodes’ Personas (Administration / Monitoring / Policy Service / pxGrid etc.) and Roles (Primary/Secondary) to make sure you rebuild the new deployment in a similar structure as the old (current) deployment.
Read up on the licensing management of the old ISE deployment and see if you can use the same licenses on the new ISE deployment or if you have to convert/re-host them. Check out the Cisco ISE Licensing Guide for more information.
If you are planning to use new IP addresses for the new ISE deployment (for example, if you are moving the ISE servers to a new VLAN/server zone as part of the upgrade), remember to update potential firewall rules along the way to permit the new ISE deployment to communicate to Active Directory, SQL / ODBC servers, on-prem RSA servers, network devices like SW/WLC. Also, don’t forget to make sure the new ISE deployment has access to the internet for updates Profiling/Posture, and SmartLicensing.
Re-image First ISE Node (current Secondary PAN node)
De-register the Secondary PAN node from the current ISE deployment.
Re-image Secondary PAN to new ISE version using KVM/USB for physical servers or by remaking/creating a new Virtual machine using OVA-file.
If you ONLY have 2 nodes in your deployment and both nodes have ALL of the roles (PAN/MNT/PSN), you will need to block RADIUS/TACACS traffic to this node by using ACL/FW, to not cause it to receive authentication requests until it is ready. The article Cisco ISE - Mid-Upgrade ACL (IOS/IOS-XE) for Testing New ISE Deployment might give you some pointers on how to do this.
Complete First Time Setup Wizard.
Install the latest patch (automatic reboot after).
Add a Repository (FTP/SFTP etc.) for the location of your Configurational Backup file and Restore Configurational Backup from old ISE deployment (automatic reboot after). You will need to enter the encryption password of the backup file to complete this step. Do NOT check the box to “Restore ADE-OS”.
Restore System Certificates (without assigning Usage roles).
Assign System Certificates to correct Usages - Admin/EAP Auth./Portals etc. (automatic reboot triggered when new Admin certificate is assigned).
Regenerate/Replace ISE Root CA certificate (create new CSR and set the Usage to ISE Root CA)
Join the ISE node to Active Directory.
Change role from Standalone to Primary (which enables Distributed Deployment) and assign the correct ISE node role(s) - you must assign both the Administration and Monitoring persona for this very first node since there must always be nodes with these personas active in an ISE deployment at any time (automatic reboot after). If you only have two ISE nodes total in your deployment, you do not need to assign any personas as both your ISE nodes should probably have all three personas.
Update Profiling Policies via the Profiling Feed Service and OS Support (Posture Update) according to the steps in this article. If you do not use Profiling or Posture in your policies, it is still good to keep these things up to date.
Re-image First MNT Node (old Secondary MNT node)
De-register the Secondary MNT node from the old ISE deployment.
Re-image the old Secondary MNT node to the new ISE version using KVM/USB for physical servers or by remaking/creating a new Virtual machine using OVA-file.
Complete First Time Setup Wizard.
Install the latest patch (automatic reboot after).
Restore Trusted Certificates (all custom Root/Intermediate CA certificates).
Restore System Certificates (without assigning Usage roles).
Assign System Certificates to correct Usages - Admin/EAP Auth./Portals etc. (automatic reboot triggered when new Admin certificate is assigned).
Register node to new ISE deployment, assign only the Primary Monitoring persona. For optimal performance, also check the box “Dedicated MnT” which turns off certain additional non-Monitoring features, which reduces the workload on the node. However, there have been some issues in certain ISE versions and patches throughout the years when this box is checked, mainly related to pxGrid breaking, so make sure to read through Field Notice (FN) 72348 first (automatic reboot after).
Join the Primary MNT node to Active Directory.
If you are working with an ISE deployment where the PAN persona is separated from the MNT persona, you can now remove the Secondary MNT persona from the new Primary PAN node, leaving the newly re-imaged MNT node to be the only MNT node.
Re-image First PSN Node
Block RADIUS/TACACS traffic to the PSN node that will be re-imaged using ACL/FW. The article Cisco ISE - Mid-Upgrade ACL (IOS/IOS-XE) for Testing New ISE Deployment might give you some pointers on how to do this.
De-register the PSN node from the old ISE deployment.
Re-image the PSN node to the new ISE version using KVM/USB for physical servers or by remaking/creating a new Virtual machine using the OVA file.
Complete First Time Setup Wizard.
Install the latest patch (automatic reboot after).
Restore Trusted Certificates (all custom Root/Intermediate CA certificates).
Restore System Certificates (without assigning Usage roles).
Assign System Certificates to correct Usages - Admin/EAP Auth./Portals etc. (automatic reboot triggered when new Admin certificate is assigned).
Register node to new ISE deployment, assign only the Policy Service persona (automatic reboot after).
Join this PSN node to Active Directory.
Unblock RADIUS/TACACS traffic to the newly re-imaged PSN node for testing purposes using the ACL/FW. Limit access to only a few Network Devices (switches and/or WLCs). If your deployment has integrations to external services such as SQL databases or similar using the ODBC protocol, don’t forget to permit this traffic in the ACL too.
Add the PSN node to a Node Group, if you had one set up in the old ISE deployment.
Re-image Other/Rest of PSN Node(s)
Perform this step as many times as you need, until all PSN nodes have been re-imaged and joined to the new ISE deployment.
Block RADIUS/TACACS traffic to the PSN node that will be re-imaged using ACL/FW. The article Cisco ISE - Mid-Upgrade ACL (IOS/IOS-XE) for Testing New Deployment might give you some pointers on how to do this.
De-register the PSN node from the old ISE deployment.
Re-image the PSN node to the new ISE version using KVM/USB for physical servers or by remaking/creating a new Virtual machine using the OVA file.
Complete First Time Setup Wizard.
Install the latest patch (automatic reboot after).
Restore Trusted Certificates (all custom Root/Intermediate CA certificates).
Restore System Certificates (without assigning Usage roles).
Assign System Certificates to correct Usages - Admin/EAP Auth./Portals etc. (automatic reboot triggered when new Admin certificate is assigned).
Register node to new ISE deployment, assign only the Policy Service persona (automatic reboot after).
Join this PSN node to Active Directory.
Unblock RADIUS/TACACS traffic to the newly re-imaged PSN node for testing purposes using the ACL/FW. Limit access to only a few Network Devices (switches and/or WLCs). If your deployment has integrations to external services such as SQL databases or similar using the ODBC protocol, don’t forget to permit this traffic in the ACL too. However, if you had success with the tests performed with the first PSN node that was re-imaged, you can be pretty confident that the next PSN node (this one) will probably be fine as well.
Add the PSN node to a Node Group, if you had one set up in the old ISE deployment.
When all PSN nodes have been re-imaged and joined to the new ISE deployment, there is no longer a need to keep an FW-rule/ACL in place to block RADIUS/TACACS traffic, so remove these FW-rules or the ACL altogether.
Re-image other MNT Node (old Primary MNT node)
De-register the Primary MNT node from the old ISE deployment.
Re-image the old Primary MNT node to the new ISE version using KVM/USB for physical servers or by remaking/creating a new Virtual machine using OVA-file.
Complete First Time Setup Wizard.
Install the latest patch (automatic reboot after).
Restore Trusted Certificates (all custom Root/Intermediate CA certificates).
Restore System Certificates (without assigning Usage roles).
Assign System Certificates to correct Usages - Admin/EAP Auth./Portals etc. (automatic reboot triggered when new Admin certificate is assigned).
Register node to new ISE deployment, assign only the Monitoring persona. For optimal performance, also check the box “Dedicated MnT” which turns off certain additional non-Monitoring features, which reduces the workload on the node. However, there have been some issues in certain ISE versions and patches throughout the years when this box is checked, mainly related to pxGrid breaking, so make sure to read through Field Notice (FN) 72348 first (automatic reboot after).
Join this MNT node to Active Directory.
Flip the roles (Primary/Secondary) of the Monitoring Nodes by promoting the newly re-imaged MNT node (which is currently Secondary MNT) to Primary MNT node, to get back to the way things were in the old ISE deployment. If you have a smaller deployment where PAN/MNT roles run on the same nodes, you can leave the Primary MNT role/persona on the current Primary MNT node (the MNT node that was re-imaged first) to distribute the workload a bit (automatic reboot after).
Re-image old Primary PAN node
Re-image old Primary PAN to new ISE version using KVM/USB for physical servers or by remaking/creating a new Virtual machine using OVA-file.
Complete First Time Setup Wizard.
Install the latest patch (automatic reboot after).
Restore Trusted Certificates (all custom Root/Intermediate CA certificates).
Restore System Certificates (without assigning Usage roles).
Assign System Certificates to correct Usages - Admin/EAP Auth./Portals etc. (automatic reboot triggered when new Admin certificate is assigned).
Register node to new ISE deployment and assign correct ISE node persona(s) - either only Secondary Administration or both Secondary Administration and Secondary Monitoring roles depending on your setup (automatic reboot after). If you only have two ISE nodes total in your deployment, you do not need to assign any roles as both your ISE nodes should probably have all three roles.
Join the ISE node to Active Directory.
Flip the roles (Primary/Secondary) of the PAN nodes by promoting the newly re-imaged PAN node (which is currently Secondary PAN) to Primary PAN node. If you have a smaller deployment where PAN/MNT roles run on the same nodes, you can leave the Primary MNT role/persona on the current Primary PAN node to distribute the workload a bit (automatic reboot of BOTH nodes after, make sure to do this during a maintenance window if you only have 2 nodes in total in your deployment!).
Regenerate/Replace the ISE Root CA certificate (create a new CSR and set the Usage to ISE Root CA) when the newly promoted Primary PAN node is up and running again after its reboot.
Licensing management - depending on if your old ISE deployment used version 2.X and your new ISE deployment uses version 3.X, you will need to open a Licensing TAC case to convert your licenses from the old model (Base/Plus/Apex) to the new model (Essentials/Advantage/Premier). If you are upgrading from ISE 2.X to another ISE 2.X version, you will need to rehost your licenses unless you are using SmartLicensing, in which case you should only need to register your new ISE deployment to the SmartAccount to download the appropriate licenses.
Configure and test manual and scheduled backups.
References
While a lot of steps found in this article can also be found in Cisco’s official documentation below, some of the steps are done in a different order in my case, because I think it works out better that way.
For example, I’ve seen certificate management become a bit “wonky” when you are counting on ISE to automatically distribute wildcard certificates to newly joined nodes, so I think it is better to add them to the node before joining it to the new ISE deployment.
Cisco ISE 3.1 Upgrade Guide: Upgrade Method