Introduction
The following settings are a collection of daily discoveries and tips from various Cisco Live presentations in regards to optimizing your Cisco ISE deployment. Always double-check these settings if you are configuring them in a live production environment, as to not cause an outage of some kind.
Most of these “good practices” can be applied to ISE 2.4 and above. I will keep adding to this list as time goes by if I find something that I think would be considered general good practice.
Apply these configurations at your own risk - only you know your environment !!
Disable Administrator Password Expiration
During the installation of an ISE node, you are asked to configure an Administrator account during the initial setup. The default name for this account is “admin” unless you pick something else manually. This account is used for accessing the CLI of the node (via SSH, console, or VMware console, for example) and the account name and password are copied over to the ISE application itself as an Administrator account for the ISE application as well. This means that the account can be used to log into the ISE GUI, which you reach via a web browser and do pretty much all of the actual configuration in.
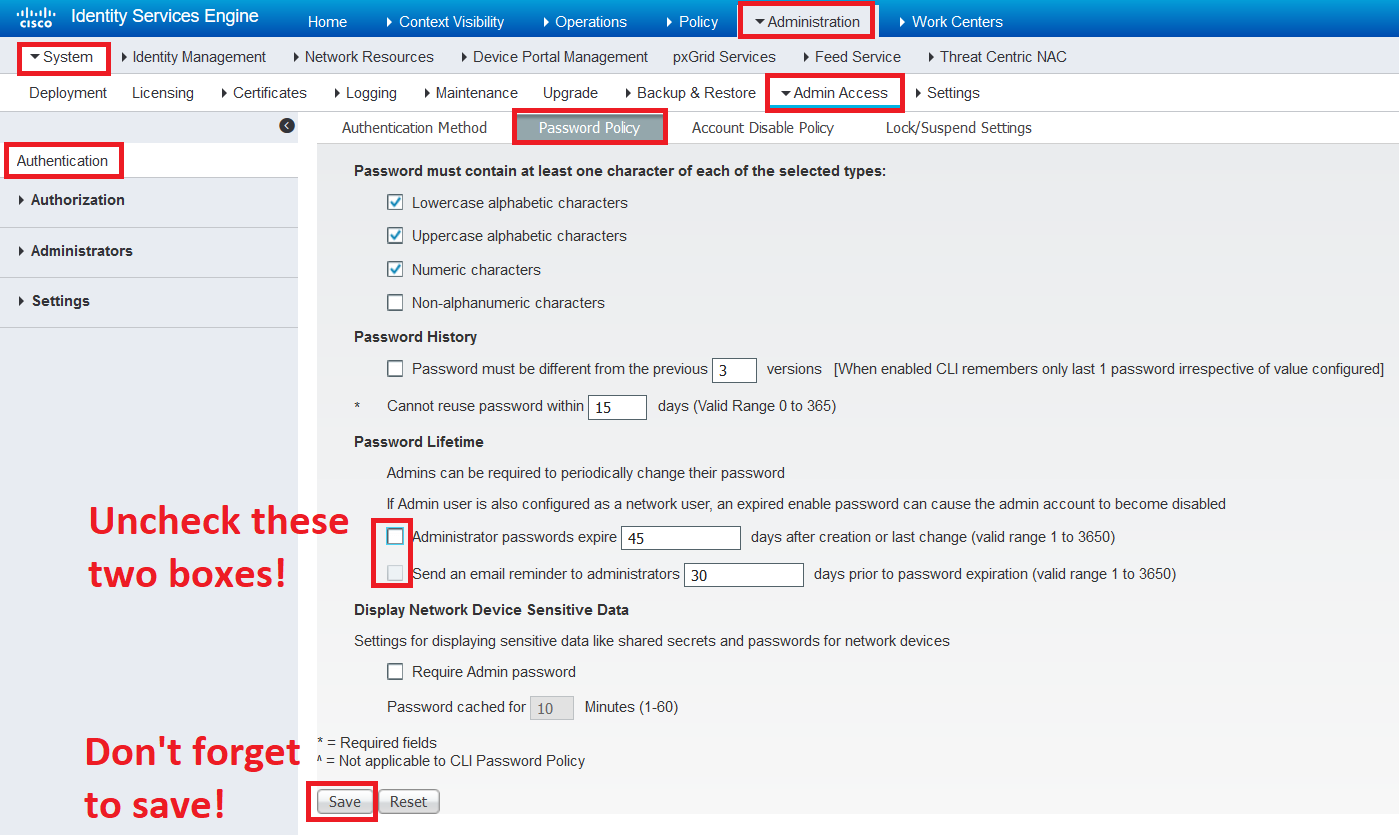
By default, this Administrator account expires after 45 days, which can leave you locked out of your ISE-node, if you are not careful. You can change this behavior from the GUI of ISE by editing the Password Policy. While you should change your local Administrator password from time to time, this setting has definitely done more bad than good, in my experience.
Navigate to Administration > System > Admin Access > Authentication > Password Policy. Scroll down until you see the section Password Lifetime and uncheck the checkboxes here.
Another important note here is the changes made to the Password Policy inside the GUI are also replicated to the password policy of the ISE-nodes CLI. If you try to edit the Password Policy inside the CLI, you will be met with this error message and told to configure the Password Policy inside the ISE application instead, which I think is a very neat feature.
Editing the Password Policy inside ISE-node CLI is not allowed, proceed to use ISE GUI settings instead.
Configure a second ISE server CLI Admin account
This might seem like an odd step but I’ve run into scenarios where I’ve been unable to log in via SSH to an ISE server due to the regular CLI Admin being locked, caused by multiple failed login attempts.
In my case, it was not me who failed all these login attempts, it was a vulnerability scanning system scanning various server networks for weak admin account credentials. Using a strong password for the ISE server CLI Admin account didn’t matter in this case, ISE was configured to lock any account after a number of failed attempts. If your CLI Admin account gets locked, you would need to restart the ISE server with the system ISO attached to perform a password reset. In some cases, the account lock is released after some time.
To prevent ending up in these situations, there are two solutions you can go through and I recommend doing both of them.
The first solution is to simply create another ISE server CLI Admin account that is different from the default “admin” account but also assigned the “admin role”.
Log into CLI and create the new admin user using the command below.
username <admin-account-2> password plain <password> role adminThe second solution is to make sure that locked admin accounts are automatically unlocked after a certain period of time.
This settings is configured inside the web UI of ISE by navigating to Administration > System > Admin Access > Authentication and in the Lock/Suspend Settings tab, make sure to check the box for “Suspend account for X minutes.” and NOT “Lock Account”. This should be the default configuration in most (perhaps all?) ISE deployments, but make sure to check it in case someone has been tampering with the settings.
Disclose “INVALID” Usernames in ISE Live Log
Since a few years back, ISE introduced a feature that hides the username of an authentication attempt if the username is not found in any of the Identity Stores that ISE has been configured to look in.
Instead of showing the username of the authentication attempts, the ISE Live Log will in this case simply display “INVALID” as the username. Displaying INVALID instead of the actual username is enabled by default, so you will need to change this setting if you want to see the actual username for these types of failed authentications. In some versions of ISE, the usernames can also be masked as just “USERNAME” or “USERNAME\USERNAME” in all big letters, instead of showing who is really trying to connect to the network.
I have not seen any crystal clear arguments as to why the masking of the username is enabled by default, but I am not a fan of hiding the username for authentication attempts, especially during the configuration and implementation phases of an ISE deployment. Seems like an extra headache with little gain, at least to me.
Unfortunately, in ISE version 2.4 (and maybe earlier releases) you can only disclose (unmask) these usernames for 30 minutes at a time.
In later versions of ISE (2.6 and later), you can permanently choose to disclose usernames.
To enable ISE version 2.4 to show the actual usernames in these scenarios, log into the GUI of ISE and navigate to Administration > System > Settings > RADIUS and check the box for Disclose invalid usernames.
To enable ISE version 2.6+ to show the actual usernames in these scenarios, log into the GUI of ISE and navigate to Administration > System > Settings > Security Settings and check the box for Disclose invalid usernames. You can also choose to only apply the configuration for a limited time if you wish to.
Update Profiling Policies using the Profiler Feed Service
ISE is able to automatically profile (classify) devices connected to your network by looking at certain key attributes that it can collect using several methods like RADIUS Accounting, DHCP, SNMP, CDP/LLDP, and much more.
There are hundreds of Profiling Policies that contain certain conditions to be met, and if a device all or some of those conditions, the device will be profiled (classified) as that type of device. Some examples of Profiling Policies are Apple-iPads, Windows 10 Workstations, HP Printers, Avaya-Phones, and so on.
Cisco regularly publishes updates to these Profiling Policies since new devices appear on the market every now and then and MAC-addresses’ “OUI” (the first half of the MAC-addresses which tells you who manufactured the devices) also changes from time to time as blocks of MAC-address series are distributed and sold.
There are two ways to update your Profiling Policies and that is either online by letting ISE download the updates itself, or offline by letting you as the administrator download an update file from Cisco and then upload it to the ISE deployment.
Updating Profiling Policies only affect the policies created by Cisco and not those that you have created yourself. Profiling Policies created by Cisco are marked as Cisco Provided, as seen in the image below.
If you modify a Cisco Provided policy its type changes to Administrator Modified, and according to Cisco’s documentation, these may be affected by updates. The image below is from the previous link and it doesn’t seem to make things crystal clear, does it?
Anyway, I DO NOT RECOMMEND modifying Cisco Provided policies, instead make a copy of them so they are not potentially affected by Profiling Updates or Cisco ISE upgrades/patches.
Online update - let ISE download update
Navigate to Administration > Feed Service > Profiler > Online Subscription Update
Here you can enable ISE to automatically run updates to download new Profiling Profiles and MAC-address OUI database updates. You can run a test to see if your ISE deployment is able to connect to Cisco over the internet by clicking on the Test Feed Service Connection button. You are also able to configure this updating process to happen automatically every day by checking the check box Enable Online Subscription Update.
If you just installed a fresh ISE deployment, I recommend using the Update Now button to get up to speed on your Profiling Policies. Running this update can take up to 20 minutes, so be patient! You can do other tasks in ISE while the update is running and go back to this screen to see if it’s still updating or if the update is finished.
Offline update - download update file and upload IT to ISE
A Cisco CCO account required is required to perform an offline update!
There is a technical difference between running the online update and the offline update, and that is if you are using the offline update method, you can choose only to update the MAC-address OUI database in ISE if you are not interested in updating the Profiling Policies at all.
Navigate to Administration > Feed Service > Profiler > Offline Manual Update
Click on the link Download Updated Profile Policies to be redirected to Cisco’s website for downloading the update directly from them.
For some reason, the offline update file is not hosted on the regular Cisco website, it is instead hosted on a sub-domain called ise.cisco.com. Login with your Cisco CCO account to apply to be able to download the update files. After applying I got a confirmation email and it then took me about 1 day until I was able to access the update files on the website.
Choose what kind of package you want to download, generally, I don’t see a reason to not update both the Profiling Policies and the MAC OUI database. When you have downloaded the update file, head back to ISE to upload it to the ISE deployment and click on Apply Update to install it.
Update ISE support for newer device operating systems
While the Profiler Feed feature above adds support for profiling (mainly) endpoint devices on your network, there is also a similar feature that updates the support for different types of operating systems like Windows, macOS, and more. On more than one occasion have I had the profiler services profile an endpoints incorrectly until I updated the device OS support of ISE.
For example, if you are using the profiling service to profile Macbooks, you may need to run this kind of update when Apple releases a new version of their macOS.
This is called a Posture Update, mainly because this feature is related to when you are using posturing to performed detailed inspection of clients/endpoints for certain criteria before they are allowed onto the network. However, it seems this update also helps with getting the profiling process correct, so I recommend running this update as well as the Profiling Feed update.
Navigate to Administration > System > Settings > Posture > Updates and simply click on Update Now if your ISE-deployment has access to the internet.
!! Check the Update Information before and after running the update to make sure you actually did get an update !!
The process can also be automated by checking the box Automatically check for updates starting from initial delay, I’ve had some issues with this feature actually not working in several versions of ISE, so your mileage may vary.
If your ISE deployment does NOT have access to the internet, you can download the update from Cisco and upload it to ISE yourself.
The URL to the update file (.zip file) changes from time to time, so I suggest using Google to find it (search for “ISE posture update offline” or something similar), usually, you will end up finding the update file URL on the Cisco Support Forums.
Automatically delete inactive “random” MAC-addresses
Starting with Android 10/11 and iOS 14, devices running these operating systems will randomly generate their MAC addresses that are used to connect to different wireless networks (SSIDs). How and when the MAC address is “randomized” happens in different scenarios for different operating systems and OS versions. Android version 10/11 does it in one way, Apple’s iOS 14 does it in another way.
This can lead to all sorts of problems in regards to guest networks and Bring-Your-Own-Device solutions, but another bad consequence of this is that ISE will store these random MAC addresses as clients in its endpoint database, which will keep growing as time goes by and become very large.
Fortunately, there is a function inside of ISE to automatically delete (or “Purge”) Endpoints (devices) from the database, if certain criteria are fulfilled. Cisco has published a Field Notice (FN 70610) to address the issue of ever-growing device databases in ISE and if you are not interested in the background story or problem symptom of this issue, you can look at the solution directly below here.
Start by navigating to Administration > Identity Management > Settings > Endpoint Purge. Create a new rule in the Purge section by clicking on the “dropdown arrow” of an already existing rule and choosing Insert New Rule Above/Below.
!! Make sure that the Conditions are combined using AND-logic !!
Give the rule a fitting name and select the following Conditions to trigger the purge:
Radius Calling-Station-ID MATCHES ^.[26AEae].*
ENDPOINTPURGE InactiveDays GREATERTHAN 14
Click on Done on the new rule and then hit the Save button.
When you are done, you should have a Purge rule similar to the one below:
The first Condition of this rule consists of matching the regex-string of ^.[26AEae].* of the Calling-Station-ID (which is the device MAC-address) which will match all randomly generated MAC-addresses, because the “random” MAC-addresses actually follow a certain pattern, which is matched using this particular string.
The second Condition of this rule makes sure we only delete (purge) Endpoints (MAC-addresses) that have been inactive for at least 14 days. You can change this value to whatever works for your deployment/organization.
EAP Session Resume / Stateless Session Resume
EAP Session Resume is a feature to speed up authentication attempts for a device that has already gone through a successful authentication earlier. By handing out a session ticket to a device and keeping track of that session-ID within ISE, a device can go through authentication without going through all the actual authentication steps.
These settings are major performance boosts according to Cisco (Cisco Live BRK-3699 Reference version, page 114) to lessen the load on the ISE Policy nodes and decreases authentication latency (great for wifi-roaming, especially if you are not using 802.11r Fast Transition Roaming), however, you do lose some of the security aspects as you are essentially using cached information to perform the reauthentication of previously authenticated endpoints.
That means, if you for example are using Active Directory to authenticate users and computers, even if you disable the user/computer in Active Directory, ISE might still allow the device onto the network for the duration of the timeout period, because ISE is acting on cached information from a previous successful authentication.
Both ISE and the connecting device need to support these features to utilize them.
1) Enable EAP Session Resume for EAP-TLS
Navigate to Administration > System > Settings > Protocols > EAP-TLS. Check the box to Enable EAP TLS Session Resume and fill in a value for EAP TLS Session Timeout. By default, this value is 7200 seconds, which is 2 hours. I have yet to find any documentation regarding best practices of this value, but every piece of documentation from Cisco I can find (including the slides from Cisco Live in the link above) keeps using the value 7200 seconds, so I assume it is somewhat chosen with care. At the very least, it’s the value I keep using in my ISE deployments.
2) Enable Stateless Session Resume for EAP-TLS
The Session Resume for EAP-TLS configuration above only applies when authentication attempts are going through the same ISE PSN-node, but starting with ISE 2.2 and forward, you can Enable Stateless Session Resume which means that any of your ISE PSN-nodes will be able to perform the Session Resume, regardless of which ISE PSN-node the initial authentication took place.
If you are using a Load Balancer between your Network Access Devices (your WLC, for example), this feature is very much needed together with Session Resume to stay out of trouble since the authentication attempts will be hitting different ISE PSN-nodes very often.
This feature is configured inside the “Allowed Protocols” section. Navigate to Policy > Policy Elements > Results > Authentication > Allowed Protocols and select the Service Name that is used in your Policy Sets.
If you are using the default Service Name called Default Network Access, I suggest using the duplicate button to create a new Service Name, as you never know what changes in the default settings of a system after upgrades/patches and so on.
Under the Allowed Protocols section, open up the Allow EAP-TLS section and check the box Enable Stateless Session Resume. Once again, we are going to stick to using the 2-hour timeout (or 7200 seconds as in the configuration above).
3) Enable EAP Session Resume and FAST Reconnect for PEAP
You can also enable Session Resume if you are using PEAP for authentication. Navigate to Administration > System > Settings > Protocols > PEAP and check the boxes for Enable PEAP Session Resume and Enable Fast Reconnect.
Scroll down to the bottom to Save.
4) Check your Windows clients’ configuration
If you are using PEAP as (outer) authentication with either MSCHAPv2 or EAP-TLS inside the PEAP-tunnel for your wireless network access, make sure to check the box Enable Fast Reconnect under inside the EAP settings.
Configure a Pre- and Post Login Banner for CLI and GUI
By configuring a message to be displayed to administrators both pre-and post-login, you get somewhat of a legal advantage in case an unauthorized individual, for some reason, gets access to your ISE deployment.
Navigate to Administration > System > Admin Access > Settings > Access and check both boxes in the GUI and CLI sections below to enable these two types of banners and write something scary and legally binding/accurate to make people think twice before making changes in the ISE application.
Restrict access to ISE Administrator GUI based on IP-address
Similar to putting access lists on LINE VTY on switches, you can configure which IP addresses or networks are allowed to connect to the ISE deployments administrative GUI.
Navigate to Administration > System > Admin Access > Settings > IP Access and check the box Allow only listed IP addresses to connect then use the Add-button to put in your IP addresses/networks. Click on Save when you are done. Think through all of the networks that might need administrative access to ISE, both on your LAN and WLAN as well as via VPN.
Disable VMware Snapshots (if your ISE-servers are virtual)
See my previous article regarding this matter, as VMware snapshots are NOT supported with a virtual ISE-server, and taking a snapshot will cause the server to shut down.
Click here to go to the article.
Patch your ISE Deployment (yes, really) but not too early
Due to ISE being a pretty sensitive system because of its ever-growing important role in secure networks, a lot of people put off keeping the system up-to-date.
Only install patches that have been available for AT LEAST one month. There have been quite a few destructive patches throughout the years that have rendered ISE deployment completely dead and the only way to get back to business was to reinstall the whole deployment and restore a backup configuration.
There is no guarantee that the latest patch is the best one.
That’s all for now, check back later for (possibly) more good practices!