Introduction
Proxy ARP is a feature often used together with Network Address Translation (NAT) on an internet-facing firewall to enable access to services residing in your networks DMZ from the internet, especially if your firewall is only connected to a single Internet Service Provider (ISP) and you only have a single, small public IP-address space assigned to your network.
In this scenario, you will also need Proxy ARP if you are hiding/publishing internal servers or networks behind a public IP address that is on the SAME network as the IP address of the firewall's internet-facing interface.
While Proxy ARP is most often used when it comes to connecting your network to the internet, the feature can also be used inside your network (although I'd argue that a properly designed network really shouldn't need to use Proxy ARP internally).
Bigger enterprise networks usually have a dedicated transit network (often referred to as a "linknet") between the ISP's router and the customer's firewall’s outside interface, with public IP addresses configured on both sides. Thanks to the dedicated transit network, Proxy ARP is not needed here at all. However, in smaller networks, you sometimes can't afford to "waste" public IP addresses by carving out a small IP network and assigning it the connection between the ISP and your firewall, and this is where Proxy ARP comes in.
Using Proxy ARP, you can instruct your firewall to act as a proxy for all traffic that is sent to IP-addresses other than the one that is configured on the actual outside interface of the firewall, and then NAT is used to make sure that the traffic ends up at the correct server on your Inside network or your DMZ network.
I am not going to go into the details of Proxy ARP, if you are unsure what this feature does I suggest reading up on it first before continuing forward with this article.
I have worked with other firewall brands than Check Point and the Proxy ARP feature has never been a big deal to set up, and it's often done automatically; once you set up the NAT-rule that translates the public IP address to the internal IP address on the server on your inside network or in your DMZ you are usually done, but on Check Point Security Gateways the setup is a bit different as there are multiple ways to configure Proxy ARP.
Proxy ARP settings also differ depending on if you are running your gateways in "normal" mode or VSX-mode. This article only covers how to configure Proxy ARP in normal mode, not in VSX-mode.
Basic topology
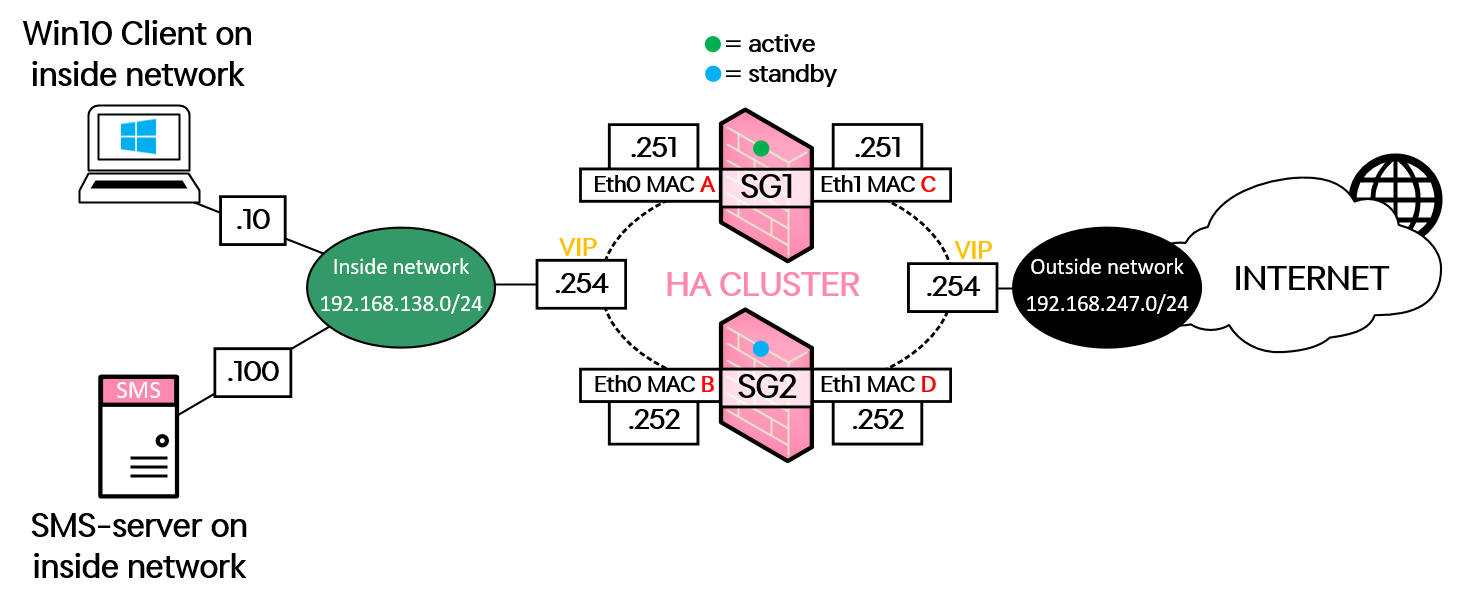
Let's take a look at how it works. We are going to test some settings based on this simple network topology:
The Inside network is 192.168.138.0/24, where the Security Management Server (“SMS”) and a Windows 10 test-PC resides.
The Outside network is 192.168.247.0/24, while this is typically not IP addresses used on the "outside" interface, it is this way because my lab environment is in VMware and not in a real, production network.
We have two gateways (SG1 and SG2) running in High Availability-mode and the virtual IP-address ("VIP") used on both the Inside and the Outside network ends with .254.
At the end of this article, we will have configured the Proxy ARP/NAT below:
We will start by configuring a wider Proxy ARP/NAT-rule that all traffic from the Inside network (192.168.138.0/24) will use to be translated to outside IP-address 192.168.247.100, and after that, we will review two different ways of configuring other, more specific Proxy ARP-entries/NAT-rules for the Windows 10 test-PC and another one for the Security Management Server itself.
Automatic Proxy ARP using Object NAT
Before we start testing out different NAT configurations on the Gateway itself, head to the Global Properties inside the Security Management Server (click on the icon in the very top left of SmartConsole-application and then on Global Properties) and go to the Firewall > NAT - Network Address Translation session as per the image below.
For this first test, check the box for Automatic ARP Configuration.
Create an Object with included NAT
When you create a Network or Host Object on your gateways, you can directly add NAT by clicking the NAT tab on the left side of the Object's window.
By checking the box for Add automatic address translation rules, a NAT rule will automatically be created in the NAT section of your Security Policy.
While the outside IP address of the gateway is .254 in this lab topology, we might want to use some other IP address to NAT traffic when clients in the Inside network want to connect to the internet.
As an example, we are going to use Object NAT to “Hide NAT” our whole Inside network behind IP-address .100, as the image below shows.
Click OK to apply the settings to the Object and now a NAT rule will automatically be created in the NAT section of the Security Policy.
One small caveat with using NAT directly inside Objects is that we cannot see the actual IP address that the traffic is translated to in the NAT section of the Security Policy, we can only see that "Hiding Address" is active. However, double-clicking on the Object will bring us back to the Object's settings, where we can view the NAT IP address.
We can confirm that NAT and Proxy ARP is working by first looking in the SmartLog for traffic that is matching and using the NAT rule. Down below you can see that the source IP changed (Xlate (NAT) Source IP) as the traffic passed through the firewall.
And if you head into the Clish command line using either SSH or the console port of your gateway, you can run the command fw ctl arp to see that the Gateway has automatically created a Proxy ARP entry for us to proxy traffic for the NAT-IP-address to the Gateways physical interface.
In my lab I am using a cluster of Gateways and running the command on both of them shows that they have inserted their own interface's physical MAC-address and IP-address into the Proxy ARP entry, so the outputs below are expected to be different in this way.
Running fw ctl arp on gateway SG1 displays:
Running fw ctl arp on gateway SG2 displays:
Starting in R80.40, there is a Gaia CLI command called show security-gateway arp-table that shows the same output as fw ctl arp does, because fw ctl arp has actually been moved to only work in Expert-mode going forward.
And that’s it for Object NAT! The inside network is now able to connect to the internet through the gateway.
!!!! Keep in mind that Object NAT is not bound by a source- and destination interface, so if you have more than one internal interface on your gateway, traffic between these two interfaces will be translated as well, which makes packet flows hard to follow and can mess up connections that might need to go to other gateways/firewall further down that interface/zone.
In this case, you would need a manually configured so-called No-NAT rule higher up in the NAT section that disables NAT for traffic from all internal networks, to all internal networks.
Manually Configuring Proxy ARP (without Object NAT)
Personally, I am not a fan of configuring NAT directly inside Objects as it can make packet processing unclear and hard to read as you’re scrolling through your NAT rules. I must say though, configuring Proxy ARP manually is also a real hassle, unfortunately.
Luckily, if we don't want to use NAT inside Object to do Proxy ARP, we can configure it manually in Gaia using either Clish or the web-GUI. I will leave the Object NAT-rule configured previously as it is, and now instead create Proxy ARP and NAT-settings to assign "public" IP-address to resources on the Inside network, which is my Windows 10 test-PC at IP-address 192.168.138.10 and my Security Management Server at IP-address 192.168.138.100.
To allow for the creation of manual Proxy ARP-entries, we first need to enable that type of configuration in the settings of the Security Management Server and Publish + Install Policy on the Gateways to enable the configuration on them.
head to the Global Properties inside the Security Management Server (click on the icon in the very top left of SmartConsole-application and then on Global Properties) and go to the Firewall > NAT - Network Address Translation session as per the image below.
Make sure to check the boxes for both Automatic ARP configuration and Merge manual proxy ARP configuration.
Click on OK and then Publish/Install Policy on your gateways.
We are now ready to manually create Proxy ARP-entries using either Clish or the web-GUI.
Alt.1) Manual Proxy ARP-entries using Gaia Clish
For this example, we are going to configure Proxy ARP + NAT to translate the IP address of the Windows 10 test-PC on the inside network to IP-address 192.168.247.50 as it passes through the gateway towards the internet.
In Clish there are also two ways of configuring Proxy ARP-entries: you can either configure the MAC-address used for Proxy ARP manually by typing it in (the MAC-address of your internet-facing interface) or you can simply configure the name of the interface to use for Proxy ARP and the gateway will figure out which MAC-address it has automatically. We are going to use the latter here and use the interface name simply to avoid potential errors from typing in the MAC address manually.
We will use the command add arp proxy ipv4-address <IP to Proxy ARP> interface <ethX> real-ipv4-address <real-outside-interface-IP> to add the manual Proxy ARP configuration to the Gateways.
If you are using gateways in a High Availability-mode, do note that the parameter real-ipv4-address here should be the actual IP address configured on the physical internet-facing interface, not the cluster's virtual IP!
With that said, the commands to use in our case are:
For SG1: add arp proxy ipv4-address 192.168.247.50 interface eth1 real-ipv4-address 192.168.247.251
For SG2: add arp proxy ipv4-address 192.168.247.50 interface eth1 real-ipv4-address 192.168.247.252
After the commands have been run on both Gateways, make sure to Install Policy on your gateways once again, or the configuration won’t be activated.
When the policy has been installed, you should be able to see the Proxy ARP-entry using the command fw ctl arp from earlier. You will also still see the Proxy ARP-entry we created earlier using the Object NAT (which used IP .100)
The output of the following commands will look similar if you run it on gateway SG2 as well, except with different MAC addresses and IP addresses in the end.
You can also see manual Proxy ARP-entries using the command show arp proxy all...
...and you can see your Proxy ARP-entries in show configuration as well:
Create the NAT-rule in your Security Policy
After the manual Proxy ARP configuration is done, you need to configure the actual NAT rule in your Security Policy. In my case, I made a simple Hide-NAT rule that translates the IP-address of the Windows 10 test-PC (192.168.138.10) on my Inside network to IP-address 192.168.247.50 when it passes through the gateway and onto the internet.
We will place this rule above the wider Object NAT rule (that matches the whole Inside network 192.168.138.0/24) that we configured previously since we want the Windows 10 test PC’s traffic to hit the new rule and not the old rule.
Install Policy to activate the new NAT rule.
If I now try to browse some websites on the internet on the Windows 10 test-PC, I can see in the SmartLog that the IP address of the Windows 10 test-PC is now being translated to 192.168.247.50 instead of 192.168.247.100 which was the wider NAT rule that caught this traffic before:
Alt. 2) Manual Proxy ARP-entries using Gaia web-GUI
For this example, we are going to configure Proxy ARP + NAT to translate the IP address of the Security Management Server on the inside network to IP-address 192.168.247.70 as it passes through the gateway towards the internet.
Login to the Gaia web-portal and head to Network Management > ARP and scroll down to the Proxy ARP section:
Notice here that you can see the Proxy ARP-entry for the outside IP-address .50 that we created earlier in Clish. However, we cannot see the Proxy ARP-entry (.100) that was automatically configured using Object NAT at the very beginning of this article. To see the Proxy ARP-entry created from the Object NAT, we still need to use the command fw ctl arp to display it.
Click on the Add button and fill in the parameters for which IP-address for Proxy ARP for, which interface this will take place, and what the real IP address of that interface is.
First, we do these steps on SG1:
Click on Save to save your settings.
And then we do similar steps on SG2, only changing out the real IP address to the one configured on SG2:
Next, we need to Install Policy on the Gateways, and after that, you can see that the new Proxy ARP-entries are active by once again running the command fw ctl arp:
Create the NAT-rule in your Security Policy
After the Proxy ARP configuration is done, you can configure the actual NAT rule in your Security Policy. In my case, I made a simple Hide-NAT-rule that translates the IP-address of the Security Management Server (192.168.138.10) on my Inside network to IP-address 192.168.247.70 when it passes through the gateway and onto the internet.
Once again, we will place this rule above the wider Object NAT rule (that matches the whole Inside network 192.168.138.0/24) that we configured previously since we want the Windows 10 test PC’s traffic to hit the new rule and not the old rule.
Install Policy to activate the new NAT rule.
If I now try to ping something out on the internet on the Security Management Server, I can see in the SmartLog that the IP address of the Security Management Server is now being translated to 192.168.247.70 instead of 192.168.247.100 which was the wider NAT rule that caught this traffic before:
Configuring Proxy ARP in local.arp file
The examples above have shown us how to configure Proxy ARP using either Gaia's command line Clish or using the web-GUI, but there is also a third way to configure Proxy ARP, although it's not the recommended way to do it in a non-VSX gateway.
If you head into command line Expert-mode and locate a file called local.arp, you can see the finished result of our previous Proxy ARP configurations.
Locate the file using the find command in Linux:
This file can be manually edited using VIM (a built-in text editor in Gaia Linux).
To open the file in VIM, use the command:
vi /var/opt/CPsuite-R80.30/fw1/conf/local.arp
… and you will see the content of the file.
As you can see below, you are encouraged NOT to edit this file as indicated by the comments inside the file, but here you can see the configuration that resulted from both alternatives of our manual Proxy ARP configurations.
To get out of the VIM editor, simply type :q and press Enter to quit.
On gateways running in VSX-mode (at least in R80.30), it is more common to edit the local.arp-file to configure Proxy ARP (unless you are using Object NAT) since there is no Gaia web-GUI for individual virtual firewalls (VS) within the VSX-enabled gateways, but that's an article for a different time.
Final thoughts
All in all, there are multiple ways to configure Proxy ARP and they all come with their pros and cons. While you can mix the two different methods covered in this article (automatic Proxy ARP via Object NAT or manual Proxy ARP via Gaia's Clish/web-GUI), you should probably pick one method and stick to it to avoid confusion.