This article goes through manual Smart Account registration for devices running IOS-XE 17.3 or later. To add devices running earlier versions of IOS-XE (like version 16.X), check out this article instead Cisco Catalyst 9K DNA License registration for non-DNA Center networks.
Introduction
When you purchase a Cisco Catalyst 9K series switch (which includes 9200/L, 9300/L, 9400, and 9500 models) you must purchase a so-called DNA License for a minimum of 3 years regardless of whether you intend to use it or not. A weird decision by Cisco since a lot of organizations are not ready to move on to the DNA Center solution but it is what it is.
If you are running DNA Center then these instructions are not for you since DNA Center will help you register your switches to your SmartAccount in order for them to claim their license.
However, if you are not using DNA Center, you must manually add your devices to your SmartAccount where all your DNA licenses are stored so that the device can properly report that it is utilizing its licenses.
Starting with IOS-XE version 17.3, Cisco has added more options to properly register your devices to your Smart Account, with the major one being called “Smart Licensing Using Policy” which you can read more about on this link. Devices coming out of the factory running 17.3 from the start will have their licenses properly added to them from the start, but Cisco still wants you to report which licenses you are using. While the idea of Smart Licensing and Smart Account is good in theory, Cisco’s implementation of the whole thing has been pretty bad, unfortunately.
This article, however, is going to go through how to configure the “old” way of registering your devices to your Smart Account (by letting your device to out to the internet and register itself), even though their are new ways or doing this procedure. If your organization allows your network devices to reach out to the internet, follow the steps below to register them to your Smart Account.
The steps below assume that you/your customer already has a SmartAccount setup. When you purchase a 9200, 9200L, 9300, 9400, or 9500 switches, the ordered license (a Network Advantage switch must be ordered with a DNA Network Advantage license for example) will automatically appear in your SmartAccount. In my experience the license shows up around the switch is considered delivered from Cisco and not when the actual order is made.
See which licenses are available in your SmartAccount
Navigate to Cisco Licensing and to the SmartAccount. The URL changes from time to time so I’m not gonna link it here but if you can find Smart Software Licensing on Cisco’s website then you are in the right place. Navigate using the highlighted menus below (Inventory > Licenses) to find out which licenses are stored on your SmartAccount. Don’t forget to select the correct Virtual Account in case you have more than the DEFAULT account. In the example below you can see that my SmartAccount has a bunch of 9200 and 9200L Network Essentials (lifetime licenses) and DNA licenses (subscription-based) available.
Create a SmartAccount Token
To connect your 9K switches to your SmartAccount you first need to access your SmartAccount and create a token to be used for the registration. A token is essentially a generated string that is used for identification when you switch connects to Cisco’s SmartAccount service. Go through Inventory > General and click on the New Token… button.
A window will pop up where you can set the options of the token. Give it a good description and a reasonable valid time (set in days) or enter how many devices can use the token until it is considered redeemed. Click on Create Token when you are done.
Your newly created token should now appear in the Token list. Click on the token to view and copy it, you will need it for the switch configuration. The token should look something like the one below (which isn’t real, by the way).
Configure Basic Connectivty Setting
Now then, assuming your switch is up and running in your network and it has basic access to the internet, you need to make sure the switch has the following configuration.
A DNS-server to use for looking up the Cisco SmartAccount portal:
SW-9200(config)# ip name-server 8.8.8.8 Don’t forget to use the VRF version of the command above if you are running VRFs!
SW-9200(config)# ip dns source-interface Vlan250Next up we need to configure an NTP-server so that your switch has the correct time and date.
SW-9200(config)# ntp server 193.228.143.22And the last thing we need is in interface selected for HTTP/HTTPS communication:
SW-9200(config)# ip http client source-interface Vlan250To test connectivity from your network device to the Cisco Cloud service, try to telnet to Ciscos URL in the image below using port TCP 443 (HTTPS).
Change Licensing Method on Network Device
With all the basic parameters in place, we now need to enable the “old” way of registering network devices to our SmartAccount. The default licensing setting is called CSLU (which uses a Windows application) and we are going to change this to the “old” Smart method.
Using the “show license status” command, we can see the current licensing method.
To change the licensing method, use the commands below.
SW-9200(config)# license smart transport smartSW-9200(config)# license smart url defaultSW-9200(config)# do write memoryRun the “show license status” command again to confirm that the licensing method has changed.
Now we have all the pieces in place and it is time to tell the switch to go claim its rightful licenses from your SmartAccount. Please note that the following command is entered in Privileged Exec Mode (“enable mode”):
SW-9200> enableSW-9200# license smart trust idtoken <TOKEN> all forceThe Token in the image above has been shortened to fit the whole command.
The “all” parameter makes sure to register each of the switches if you are using a stack and the “force” parameter tells the switches to re-register themselves even if they already consider themselves registered (useful if you are running into an error of some sort).
Now the switch is going to connect to the Cisco SmartAccount portal using your token. Give it a few seconds and you will be able to see that the connection has been successful using this command:
SW-9200# show license statusAs you can see below, the registration went okay because at the very bottom of the output, you can see that a “Trust Code” has been installed. Eventually, the Last ACK Received will also update to a newer time and date, meaning the network device has kept connecting to the Cisco cloud services as planned.
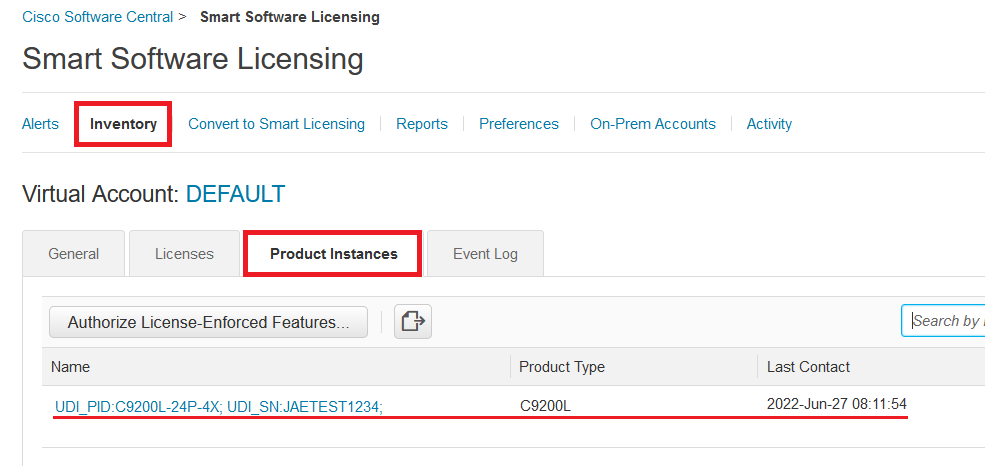
In your SmartAccount you can also see which devices have been registered to your account and claimed their licenses. Before 17.3 code, the actual hostname of the network device showed up here, but in 17.3+ you can only see the serial number. Use the Search function to find your switch. The icon next to some of the serial numbers in the list below means that the item is in High Availability mode, which means it’s either a switch stack (9200, 9200L, and 9300) or a StackWise Virtual stack (9400, 9500).
The serial number above has been edited for privacy reasons.