Introduction
In this article, we take a look at the process of replacing a failed standby master in a Cisco StackWise Virtual solution, without causing traffic interruption to the still active master switch.
While I am using the term Active/Standby "master switch" throughout this article, it is not an official term for this solution by Cisco. However, I think it is misleading to simply call the switches Active Switch and Standby Switch, as that could imply that one switch is actually not taking part in forwarding traffic until the other one has failed, which is not true.
Both switches will always forward traffic, but the processing of features like routing protocols, spanning tree, management, syncing config to the peer switch, and more is only performed by one of the switches (the active master switch) at a time.
Scenario
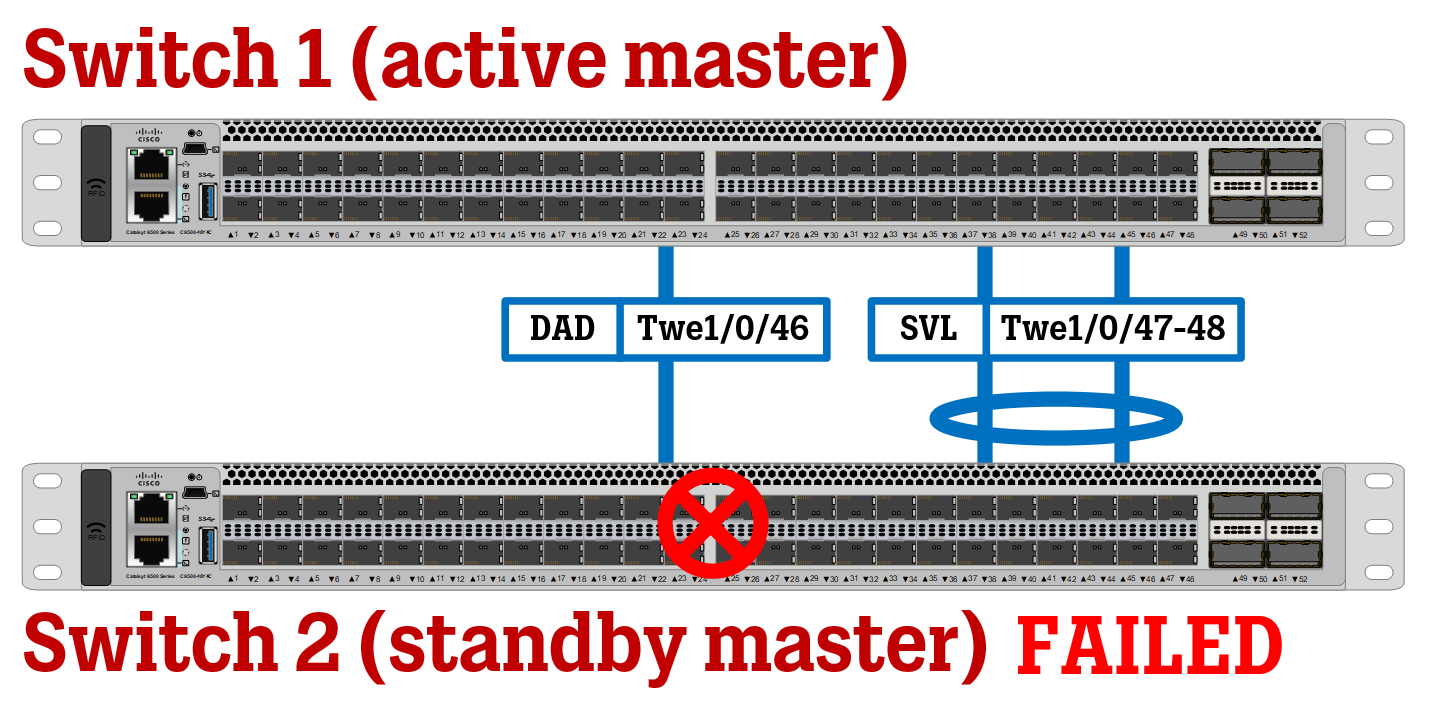
In this scenario, the standby switch (switch 2) fails and needs to be replaced.
Replacement Switch Requirements
A list of requirements must be considered before the replacement switch can take the failed switch's place.
Replacement switch must be of the exact same model as the failed switch and the currently working switch. Unlike traditional switch stacks where you can mix and match different switch models within the same family of switches, StackWise Virtual only works between two switches of the exact same model.
Replacement switch much run the same IOS-XE version as the failed switch and the currently working switch.
Replacement switch must have the same licensing level as the failed switch and the currently working switch.
Replacement switch must be running the same SDM template.
When the standby switch has failed, use the command "show switch" on the active master switch to confirm the "removal" of the failed switch.
Boot up your replacement switch and follow the steps below.
Configure Switch Number
The Switch Number determines the numbering of the switch and its port. Since most people tend to use Switch 1 as the active master switch (more on that below), this lab assumes that it is Switch 2 (the standby master switch) that has failed.
Change the switch number of the replacement switch using the "switch renumber 2" command and confirm your settings by typing "yes" after the question prompt is shown.
Switch# switch renumber 2Configure Switch Priority
Switch priority determines which switch is the active master of the StackWise Virtual deployment, and it is in charge of configuration and syncing it to the standby switch. The switch with the highest switch priority will assume the active master role.
The image with the "show switch" command at the top of this article shows that the currently active switch has switch priority 15, which means it was the active master switch even before the other switch failed.
Set the switch priority to anything below 15, to make sure this switch doesn't try to "take over" the active master role when connected to the other, currently active master switch. The now failed switch used priority 5, so we will use that here as well.
Switch# switch priority 5Apply StackWise Virtual general settings
The next step is to enable the StackWise Virtual feature and configure its settings.
Head into global configuration mode and enable the StackWise Virtual mode. Here, you must also configure a Domain Number.
The Domain Number must match between the two switches. You can check what the Domain Number is currently being used in the active switch by using the command "show StackWise-virtual switch 1" command.
As you can see, the Domain Number is 101.
Switch# config terminalSwitch(config)# stackwise-virtualSwitch(config-stackwise-virtual)# domain 101Switch(config-stackwise-virtual)# exitAs you can see from the informational output, these settings will be applied on the next reboot.
Configure StackWise Virtual port settings
Next up, we must configure the ports used to communicate between the two switches, which are the StackWise Virtual Links ("SVL") and the Dual-Active-Detection ("DAD") link. In reality, the Dual-Active-Detection link is an optional setting, but you should really use it to avoid split-brain problems. The setup in my lab is using this setting, so we will cover it here as well.
Configure StackWise Virtual Link ports (“SVL”)
If your currently dead switch is filled with connected fiber SFP ports and you are unsure which physical ports were being used as SVL ports, you can check this out by using the command “show stackwise-virtual link” on the current active master switch.
Only a crazy person would use different ports on each switch’s side of the StackWise Virtual pair, so it is mostly safe to assume that if port X and Y is being used for SVL links on the currently active switch, the same ports were used for the currently dead switch.
As you can see, ports Twe1/0/47 and Twe1/0/48 are used for SVL links. You can also see that the SVL ID used is “1”. This value must match on the other side of the SVL links, which is the side of the replacement switch.
You don’t need to configure the SVL Links in a port-channel, the switch will do this automatically.
Configure the same ports on the new switch as SVL links using the commands below.
Switch(config)# interface range twe1/0/47-48Switch(config-if)# description STACKWISE-VIRTUAL-LINKSwitch(config-if)# stackwise-virtual link 1Configure Dual-Active-Detection port (“DAD”)
Moving on to the Dual-Active-Detection port, which is used to prevent split-brain scenarios. To see which port is being used for this feature, use the "show stackwise-virtual dual-active-detection" command.
Now, configure the same settings on the new switch using the commands below.
Switch(config)# interface twe1/0/46Switch(config-if)# description DUAL-ACTIVE-DETECTION-LINKSwitch(config-if)# stackwise-virtual dual-active-detectionYou can now save your configuration using "write memory" or "copy run start".
Reload and Connect Physical Ports
With all the configuration now in place on the new switch 2, it is time to reload the switch.
While the switch is reloading, connect the physical StackWise Virtual Link ports (Twe1/0/47 and Twe1/0/48) and the DAD link (Twe1/0/46) to each other on each switch. Since reloading takes a few minutes, you should have plenty of time to do these steps.
Confirm StackWise Virtual stacking
During bootup of the new replacement switch, you can see in Switch 1 that the new switch 2 has been added to the deployment.
The new Switch 2 will be getting configuration synced from Switch 1, which can take a few minutes. You can check the status of this sync using the "show switch" command. You cannot enter global configuration mode before this sync is complete.
After a few minutes have passed, you can see that the configuration sync has been completed from this console output, and you can once again use the "show switch" command to verify that everything is in order.
Previous configuration specific to the old Switch 2, like interface configuration, has now been applied to the new Switch 2.
Now that the sync is done, all normal ports/interfaces will be activated as well over the next few minutes.