Introduction
In this article, we are going through the process of performing a software upgrade for your whole Mobility Express deployment using a TFTP-server containing the new access point images needed for all the access point models in your deployment.
There is also a mode where you connect your Mobility Express Controller to Cisco.com to automatically download access point images on the go as needed, but that requires having an active SmartNet contract tied to the serial number of your access points, which is a whole other story and not covered in this article.
I can also verify this guide works for Mobility Express deployments where in which there are multiple Mobility Express Controllers, the upgrade process is exactly the same.
In my case, we are upgrading from version 8.5.161.0 to version 8.10.130.0.
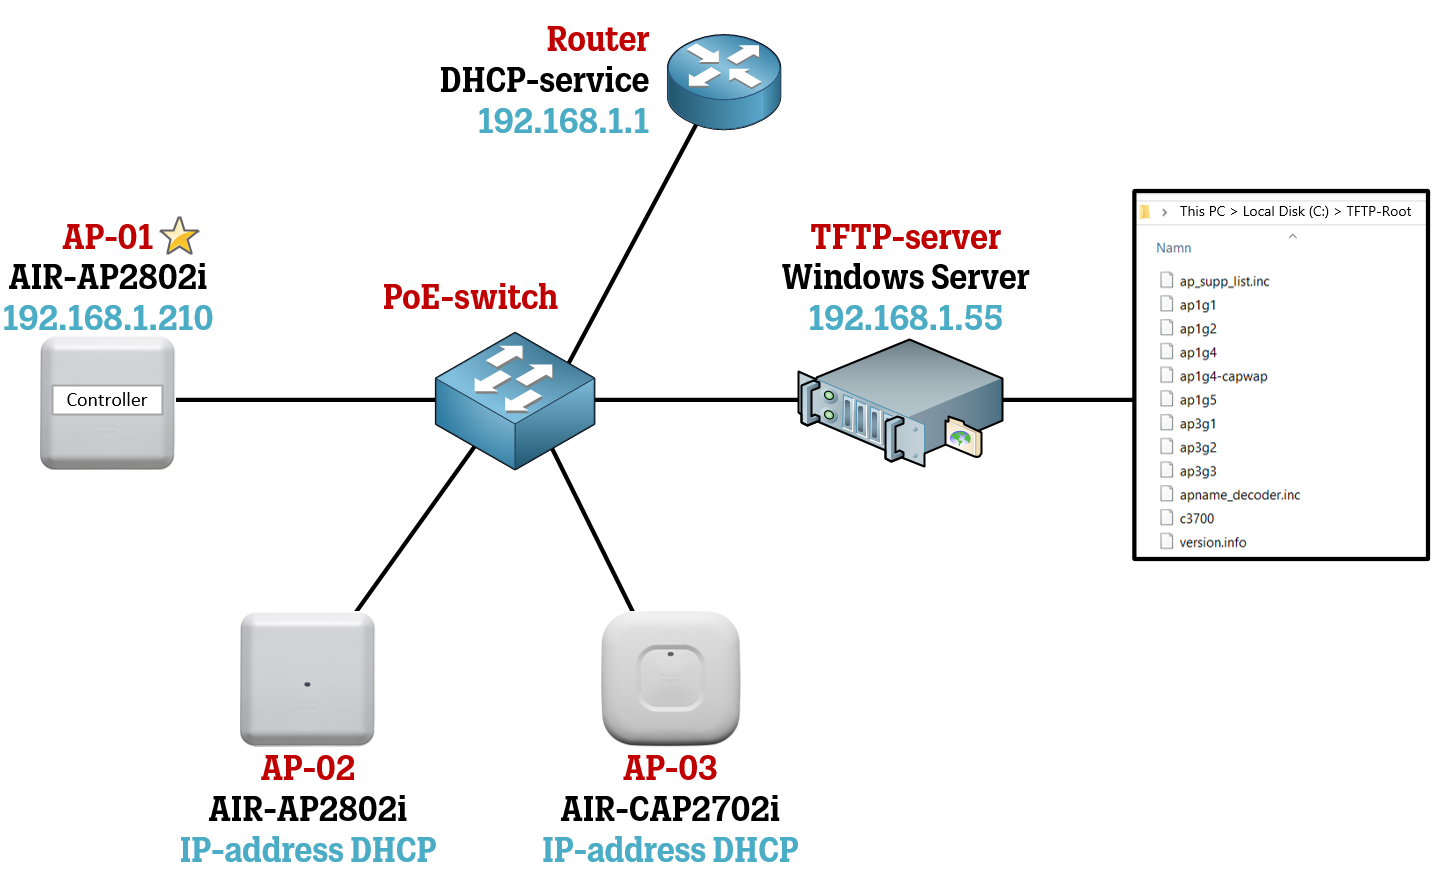
The topology is as follows: one AP-2802 (AP-01) acting as the Mobility Express Controller with another AP-2802 (AP-02) and one AP-2702 (AP-03) acting as a regular CAPWAP access point.
Set up the TFTP server
Start by installing a TFTP server on your network. I used the free TFTP-server from Solarwinds, which you can easily find using your search engine of choice. In my case, I installed the TFTP-server on a Windows server. The default installation settings created the directory C:\TFTP-Root\ on my server and any file placed in this folder will be available for download using TFTP.
If you have a network firewall between your Mobility Express Controller and your TFTP-server, make sure that UDP port 69 is allowed from the Mobility Express Controller’s IP address to the server’s IP address.
Make sure the local firewall on your server is permitting TFTP traffic from the Mobility Express controller's IP address.
If your server is very somewhat locked-down, also take a look at the Permissions settings for the TFTP-Root folder and make sure it can be accessed by outside sources (giving the “Everyone” entity read-permissions is usually enough).
Download the AP Bundle of images
Head over to Cisco.com and in the Software Download section, search for your model of access point that is acting as the Mobility Controller. Navigate to the version you want to upgrade your Mobility Express deployment to and download the "Access Point image bundle" for that version. In my case, I want to upgrade to version 8.10.130.0.
As you can see, the download size of the access point image bundle is way bigger than just downloading the image that runs on the Mobility Express Controller, which makes sense.
Select the package titled “Access Point image bundle” as it contains all the access point images for all different access point models supported in your deployment.
Put the AP Bundle of images on the TFTP-server
Unzip the file you downloaded from Cisco and open the folder it contained. Move all the files from the folder to your TFTP-Root. For simplicity, I am not using any particular structure inside my TFTP-Root folder, so I will just put all the images straight into C:\TFTP-Root\
If you did everything right, you should have something like this:
Configure the WLC to access the TFTP-server
Log in to the management web-GUI of the Mobility Express Controller (for me it’s IP-address 192.168.1.210) and head over to Management > Software Update.
Set the Transfer Mode to TFTP and put in the IP address of your TFTP-server (which is 192.168.1.55 in my case). For File Path, I am simply putting in a "/" which tells the Mobility Express Controller that the access point software images are in the root folder of the TFTP-server, and not inside any other folders in the TFTP-Root-folder itself.
Click Save when you are done.
We are now ready to start the upgrading process.
As you can see, it is possible to perform a Scheduled Update, but it is probably best to keep an eye on this kind of upgrade since wireless connectivity is such an important part of most businesses these days and you wouldn’t want to take any chances here by scheduling the upgrade at a time like 3 AM only to find out something went wrong when you get to work 5 hours after the upgrade started and the wireless network doesn’t work.
Start the Upgrade Process
!! Caution, the next step is going to disrupt your network !!
To manually proceed with the upgrade, click on Update.
A few things are going to be triggered by your clicking on Update. The first thing that happens is that the Mobility Express Controller is going to take a look at which access points are active in the deployment right now and then go to the TFTP-server to download the new image for every one of the access points.
It will also download the new image for its own model. The Mobility Express Controller already knows what the name of each image needed for each access point model should be, as the name is always the same. The version of each image is not included in its filename.
I have included a snippet of the log of the TFTP-server in the image down below where you can see that the Mobility Express Controller starts 3 different sessions to download 3 images.
Even if the Mobility Express Controller shares the same access point model number with one of the regular CAPWAP access points, it will still need to download every image separately.
The flow of traffic is displayed below when applied to our earlier topology picture. The process of sending the new images to the access points is referred to as a Pre-download, which is similar to the process with the same name in regular non-ME Cisco WLC deployment.
This means that the access points will be ready to change to the new image much quicker when the Mobility Express Controller has to reboot and change its image.
After a minute or two, the Pre-download phase is complete and every access point is now ready to jump to the new version. We can see in the log of the TFTP-server that the download-sessions of the access point images are complete, and also the Mobility Express Controller will tell us that the Pre-download is complete as well.
Save your configuration using the Save icon in the top right corner and then head over to Advanced > Controller Settings. Click on Restart Controller to issue a reboot of the controller which will cause it to activate the new image version 8.10.130.0 when it comes back up again.
When all other (regular) access points will try to re-establish their connection to the Mobility Express Controller that is now reachable again, they will see that it is running a different image than before. Since the access points already have the new image downloaded onto them, all they need to do is reboot.
The regular access points will now reboot themselves and in the process also change their active image to 8.10.130.0 and set their old image as the backup image (8.5.161.0).
Assume around 10-15 minutes of downtime as the regular access points reboot and re-join the Mobility Express deployment.