In this article, we take a look at a quick fix for the Queue Link Error alarm message resulting in empty RADIUS and TACACS Live Logs and an empty System Summary widget on the front page Dashboard inside Cisco ISE.
Introduction
When setting up a new ISE deployment either from scratch or re-imaging old nodes in order to upgrade them to a newer version, it is very common to see Queue Link Error alarm messages in the Alarms widget on the Dashboard if you are building a Distributed Deployment (which consists of many different ISE servers with different roles/personas).
The Problem
The Queue Link Error alarm messages can appear in different forms with different descriptions, and it is common to see these error messages for a moment when joining ISE nodes to an ISE deployment.
However, in some cases, these Queue Link Error alarm messages never go away and you keep seeing new ones appear in the Alarm widget on the frontpage Dashboard. At this stage, you may also see that the System Summary widget is empty of data, meaning it shows no statistics for RAM/CPU/Authentication Latency for your various ISE nodes.
Even worse, you probably can’t see anything in the Live log for either RADIUS or TACACS+ login attempts and sessions. In other words, both of these Live logs are empty.
The Solution(s)
To get back on track, you may need to re-generate the internal ISE Messaging Services certificate or even the internal Cisco ISE Root CA certificate.
This is especially important if you are doing a re-image and Backup and Restore upgrade. Cisco does recommend in their “Cisco ISE 3.1 Upgrade Guide: Post-Upgrade Tasks” that you re-generate the internal Cisco ISE Root CA Certificate.
The internal Cisco ISE Root CA function is mainly used for the pxGrid feature and the Bring-Your-Own-Device (“BYOD”) feature, which issues endpoint certificates to devices that are successful in the network onboarding. I have not seen many customers use this feature as it has been rocky in implementation due to Apple and Google/Android making it harder and harder to enroll a device to a network without using a proper MDM/EMM tool.
If you are using pxGrid, you may need to upload the pxGrid certificate onto other networking components that need to speak pxGrid with your ISE deployment in order to establish trust again.
Solution 1 - Generate new ISE Messaging Service Certificates
If you haven’t enabled the Internal Root CA features yet, you need to do this under Administration > System > Certificates > Certificate Authority > Internal CA Settings and click on Enable Certificate Authority. It may take up to 5 minutes to start the internal CA service, so be patient before moving on to the next step.
Once the Certificate Authority is enabled, navigate to Administration > System > Certificates > Certificate Management > Certificate Signing Requests > Generate Certificate Signing Requests (CSR) and in the Usage dropdown list, select ISE Messaging Service and then select all of your ISE nodes below, then click on the big blue Generate ISE Messaging Service Certificate button.
This process will take around a minute but will NOT disrupt any authentication services.
Solution 2 - Generate new internal Cisco ISE Root CA Certificate
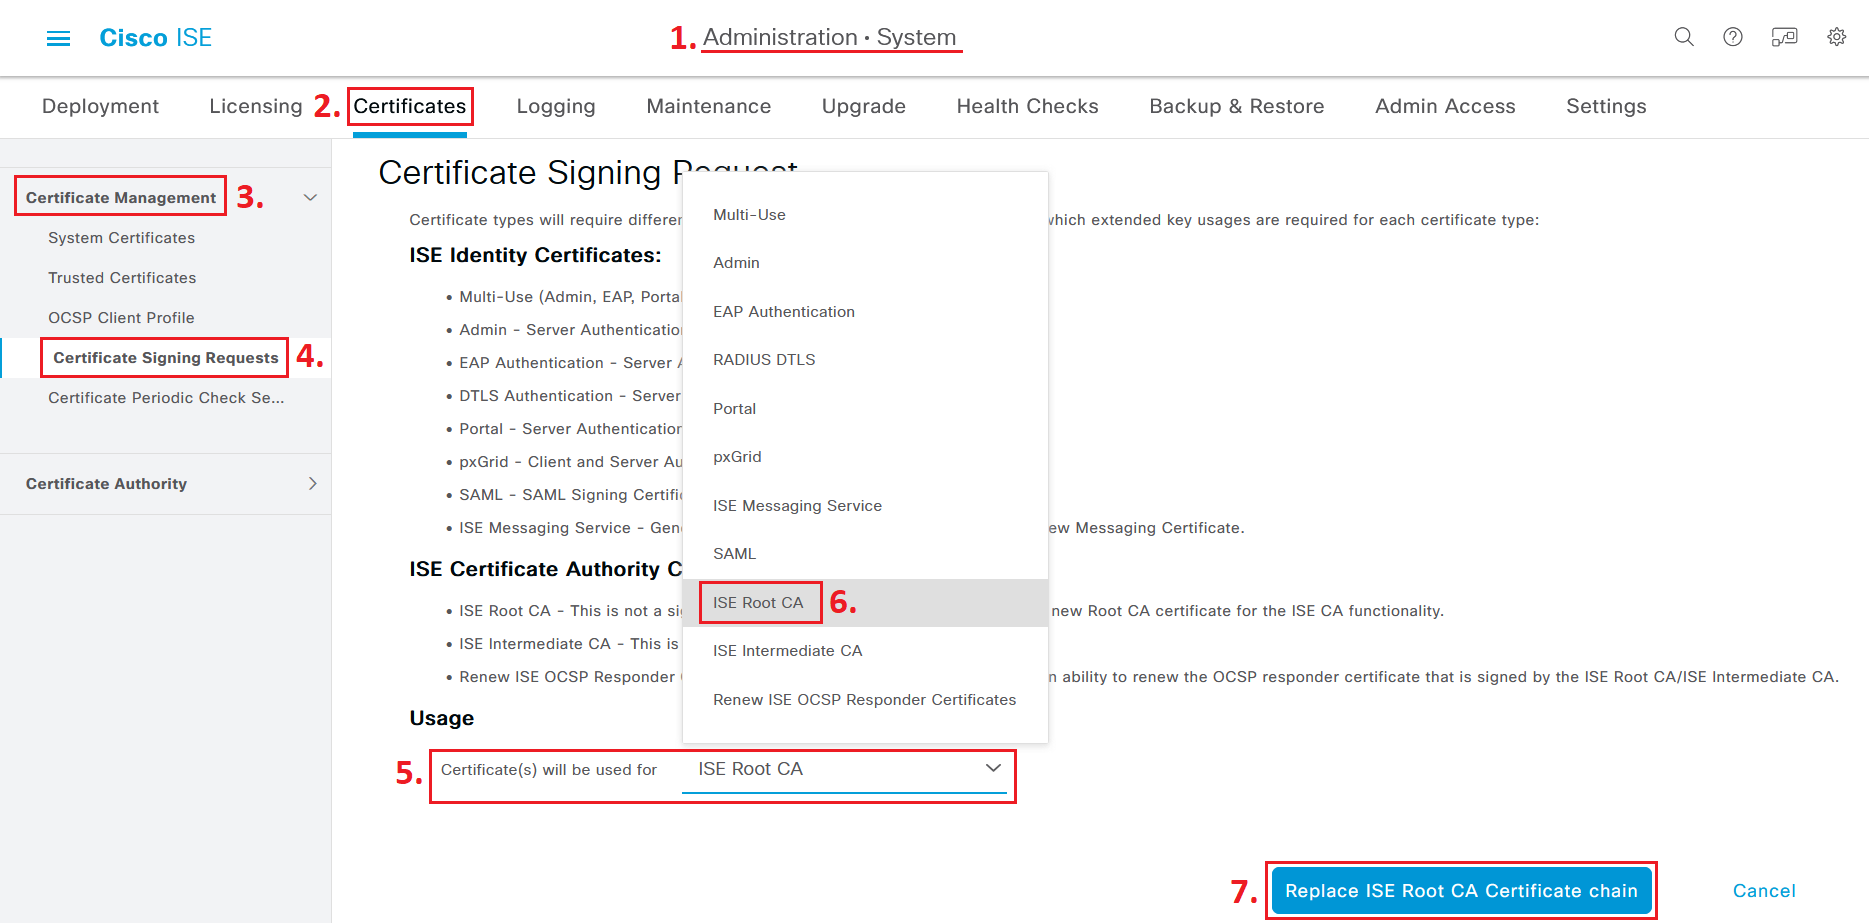
Navigate to Administration > System > Certificates > Certificate Management > Certificate Signing Requests > Generate Certificate Signing Requests (CSR) and in the Usage dropdown list, select ISE Root CA then click on the big blue Replace ISE Root CA Certificate Chain button.
This process will take around a minute but will NOT disrupt any authentication services in ISE.
ISE will NOT delete the previous internal Root CA Certificate so it (ISE) should still trust certificates issued to BYOD endpoints that are using them to present to ISE for network authentication.
With that said, once again, if you are using pxGrid, you may need to upload the ISE pxGrid certificate onto other networking components that need to speak pxGrid with your ISE deployment in order to establish trust again.
Solution 3 - Disable ISE Messaging Services
If neither of the actions above works for you, you may need to disable the ISE Messaging Service (which was introduced in ISE 2.6) and go back to the old log delivery mechanism.
Navigate to Administration > System > Logging > Log Settings and uncheck Use “ISE Messaging Service” for UDP Syslogs delivery to MnT and click on Save. After saving the configuration, give it a few minutes and see if the System Summary widgets and Live Log starts to populate with information/logs again.
References
Cisco ISE 3.1 Upgrade Guide: Post-Upgrade Tasks
Bug - “Queue Link Error alarm generated after signing of ISE CA certificate by external Root CA”
Cisco Support Forum - “ISE- Queue Link Error”
Cisco Support Forum - "ISE 2.7 Node shows no data available in System Summary"
Cisco Support Forum - "ISE 3.0 Upgrade + Regenerate the Root CA Chain"