In this article, we take a look at the different use cases of certificates inside Cisco DNA Center, how they are used to establish trust inside your network, and how to set up proper certificate management in your deployment.
This article assumes you have a basic understanding of certificates and Public Key Infrastructure (PKI).
About certificates in DNA Center
Certificates continue to make their way deeper and deeper into the networking world, requiring network engineers to at least dip one toe into this area so that they can work properly with the security and management aspects of modern networks.
Cisco’s management and automation platform DNA Center (soon to be renamed Catalyst Center) is not any different, certificates are part of its core features and it can sometimes be a bit hard to grasp when and where certificates are being used and what the best practice for working with them is.
Below we will go through the two types of certificates inside DNA Center: the System Certificate and the PKI Certificate.
About the System Certificate
The System Certificate has several uses, including the ones below:
Admin Web Interface
Controller Certificate (Network Device management trust)
Integrations with ISE/external services
By default, the System certificate is issued by a self-signed Root CA certificate that exists inside DNA Center. In earlier versions of DNA Center, this self-signed Root CA certificate was called “kube-ca” and the System certificate itself was named “kong”. In later versions of DNA Center, the Root CA certificate “kube-ca” name was replaced with a string of numbers and letters, for example: “48425d5a-3680-a7ec-c238-7f79405cba7b”.
The default self-signed System Certificate is only valid for 1 year, so you will have to deal with managing this certificate sooner rather than later, anyway.
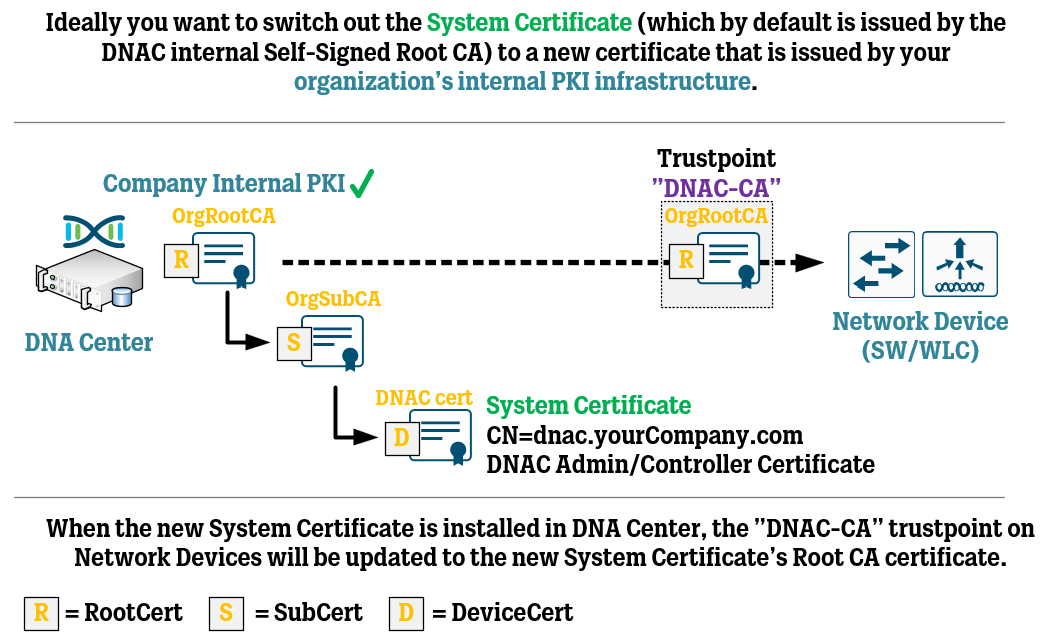
A best practice for the System Certificate is that the default self-signed System certificate should be replaced with a certificate that is issued by your organization’s internal PKI infrastructure. Down below, we will go through the steps necessary to do this. Ideally, you should try to get this “proper” System Certificate in place before you start adding Network Devices to DNA Center or integrating with external services, otherwise, you might have to redo some of the work.
When the System Certificate has been switched out for a new certificate signed by your organization’s internal PKI infrastructure, the setup will look something like this:
With that said, it’s now time to go through the steps of requesting a new System Certificate.
Create CSR for new System Certificate
Navigate to System > Settings > Trust & Privacy > System Certificates
The System Certificate should contain several hostnames and IP addresses that match the configuration of your DNA Center deployment. Do note that many of these parameters are optional, especially if your deployment only consists of a single DNA Center node with no plans of expanding to a High Availability cluster in the future.
Include all of these parameters in your Certificate Signing Request:
The DNAC deployment’s DNS name (for example “dnac.yourCompany.com”) as CommonName and SAN DNS name.
“pnpserver.yourCompany.com” as SAN DNS name.
All node’s Enterprise Port IP addresses as SAN IP addresses.
The Enterprise Port VIP address as SAN IP address (if used).
All node’s Cluster Port IP addresses as SAN IP addresses.
The Cluster Port VIP address as SAN IP address (if used).
All node’s Management Port IP addresses as SAN IP addresses (if used).
The Management Port VIP address as SAN IP address (if used).
All node’s Internet Port IP addresses as SAN IP addresses (if used).
The Internet Port VIP address as SAN IP address (if used).
You do NOT need to include your Cisco IMC’s hostname or IP address.
Issuing the new System Certificate
With the Certificate Signing Request created, it is now time to hand it over to the PKI administrator who will get the Certificate Signing Request signed and the certificate issued.
Cisco’s official guide for this process uses the Active Directory Certificate Services for the example of the internal PKI infrastructure since it is probably the most common one around. In this example, they use the built-in certificate template called Web Server to issue the certificate.
However, this built-in certificate template will most likely need to be adjusted to fit the DNA Center use cases, because it must contain some certificate parameters that are not as common on typical web server certificates.
The main parameter that needs to be adjusted is that the certificate must include both ServerAuthentication and ClientAuthentication as Extended Key Usage (“EKU”) parameters. Ask your PKI administrator to duplicate the built-in Web Server certificate template but to add the ClientAuthentication parameters, because it is most likely not included by default. If you try to import a new System certificate into DNA Center that lacks these two parameters, you will get an error message that some features might not work as intended.
Also, see if you can get them to increase the validity time of certificates issued from this certificate template so that you don’t need to go through this process every single year or so.
With these changes made, you should be handed the issued certificate with or without the complete certificate chain included in the certificate file.
Importing new System Certificate
To import the new System Certificate into DNA Center, it has to be put in a file together with the complete chain of the certificate. This means you need to get a hold of both the root and intermediate (issuing) CA certificates and place them in the same file as the system certificate (which is dnac.yourCompany.com or whatever name you chose earlier).
Use your favorite text editor of choice to build a PEM file (.pem) in which you paste in all of the three certificates of the certificate chain. There can also be only two or up to four certificates, depending on your long your internal PKI infrastructure is.
The order of the certificates in the file is important. The system certificate (dnac.yourCompany.com) should be at the top, followed by the intermediate (issuing) certificate and finally the root certificate. If you have multiple intermediate certificates, make sure to add them both, in the correct order.
system certificate (-----BEGIN CERTIFICATE-----)
sub/intermediate-CA (-----BEGIN CERTIFICATE-----)
root-CA (-----BEGIN CERTIFICATE-----)
Save this file as “complete-chain.pem” or similar.
With the certificate ready, navigate back to System > Settings > Trust & Privacy > System Certificates and click on Replace Certificate.
Click on “Choose a file” and select your PEM file containing the new System Certificate and the complete certificate chain. Click on Save when you are done. If everything is successful, you should now be logged out of the system while it activates the new certificate, which may take a minute or two.
Following the installation of this System certificate, DNA Center will now start updating the “DNAC-CA” Trustpoint on every Network Device that is managed by DNA Center. This means that the previous self-signed Root CA certificate that was put into the “DNAC-CA” Trustpoint will now be replaced with the Root CA certificate of your organization’s internal PKI.
And that’s it! You are now done with the System certificate, time to move on to the PKI certificate.
About the PKI Certificate
The PKI Certificate is mainly used for just one purpose:
Acting as a Root CA certificate and issuing unique Device Certificates to Network Devices for Assurance/telemetry trust.
Network Devices that will need to stream telemetry data to DNA Center for Assurance purposes will be instructed via SSH to configure another trustpoint (called “sdn-network-infra-iwan”) which will use SCEP (Simple Certificate Enrollment Protocol) to request a Device Certificate. The CommonName of these certificates will be the Network Device’s model number, followed by the serial number and the words “sdn-network-infra-iwan”. In addition to the Device Certificate, the PKI Certificate will also be installed inside this new Trustpoint. The PKI Certificate has a CommonName of “sdn-network-infra-ca”.
The Device Certificates are valid for 1 year by default, which is the maximum validity period configurable inside DNA Center. After some time has passed, the Network Device will automatically renew the Device Certificate, so you should not have to worry about this.
As for the PKI Certificate, it has a validity period of 15 years, meaning it should most likely outlive the DNA Center itself. While you can make DNA Center a Subordinate CA of your organization’s internal PKI Root CA to make it issue certificates based on your organization’s Root CA, most implementations tend to not do this as the PKI administrators might not like this idea.
Using DNA Center to set up SCEP Broker for Network Device certificates
An alternative to making your DNA Center a Subordinate CA of your organization’s Root CA to issue more “proper” certificates to your Network Devices is to set up the SCEP Broker feature inside DNA Center.
Using this feature, you can have DNA Center instruct Network Devices to send their SCEP requests to a Certificate Authority / SCEP service that is external to DNA Center. For example, you could use this feature to tell your Network Devices to send SCEP requests to an internal Certificate Authority server with SCEP enabled.
For more information, check out the official documentation below:
Cisco DNA Center Administrator Guide, Release 2.3.3 - Use an External SCEP Broker
Verifying DNA Center certificates installed on Network Device
To confirm that your Network Device has created Trustpoints for the different DNA Center certificates and its own Device Certificate, you can use show commands to verify this.
Use the “show crypto pki certificates DNAC-CA” command to see if the Network Device has a Trustpoint that contains the Root CA certificate of the DNA Center’s System Certificate (used for management trust).
Use the “show crypto pki certificates sdn-network-infra-iwan” command to see if the Network Device has a Trustpoint that contains both the DNA Center’s internal PKI Certificate and a unique Device Certificate for the Network Device itself (used for Assurance/telemetry trust).
References
Cisco DNA Center Security Best Practices Guide - Manage Certificates