Introduction
Earlier this year (2019) Cisco released their new family of access switches called the Catalyst 9200 series. While there has been a similar series of switches out since last year called the 9200L, which is a non-modular “lite” version with a few fewer features and capabilities, the new 9200 series are looking to be the go-to for most enterprise networks in terms of access switches.
I recently had the opportunity to perform a fresh install of a bigger site where we chose the Catalyst 9200 series of switches for all things access layer-wise and made quite a few stacks to take care of wired users, access points, printers, facility systems, and so on.
One of the first things we took a look at when booting the switches for the first time was the IOS-XE version the switches were shipped with. In our case, they all had Gibraltar 16.10, which was full of trouble according to the Cisco “TAC Times” I attend from time to time. We found that there was new software out in the form of Gibraltar 16.11 which also was the “starred” version on Cisco’s website. Since this series of switches were completely new I’m not expecting the software to be on point just yet but going from 16.10 to 16.11 seemed logical.
Change Boot Mode from Bundle Mode to Install Mode
Before upgrading the IOS-XE on every switch stack we went ahead and changed the boot mode from Bundle Mode to Install Mode. Some previous Catalyst switches (like the C3850) also operated this way.
Bundle Mode is pretty much the old school way of feeding the IOS to the switch: you simply upload the IOS file to the switch’s flash memory and set a boot variable using the command boot system flash <image-path> or some version of it. This is the old and slow method of booting/running the IOS image.
Install Mode is more of a modern way to run the IOS on the switch in that it is actually unpacked and installed onto the switch, which leads to vastly improved startup time, in my experience. I’m sure there are other benefits to running the IOS in Install Mode since it is the mode Cisco is recommending if you read the documentation on their website.
Switch# config terminalSwitch(config)# no boot systemSwitch(config)# boot system flash:packages.confSwitch(config)# do write memUpgrade IOS-XE image in a C9200 Switch Stack or Standalone
Alright, so assuming you got your switch stack all setup (or just a standalone non-stacked switch, the process is the same), the first thing we got to do is upload the IOS-XE image to the flash memory of the switch (the master switch in case of stack, you do not need to manually upload the IOS-XE image to every switch in the stack.).
Copy the new IOS-XE image to the storage unit called “flash:”. This refers to the flash memory of the active switch of the stack.
Switch# copy tftp flash:Address or name of remote host []? 10.1.1.150Source filename []? cat9k_lite_iosxe.16.12.01.SPA.binDestination filename [cat9k_lite_iosxe.16.12.01.SPA.bin]?Accessing tftp://10.1.1.150/cat9k_lite_iosxe.16.12.01.SPA.bin...Loading cat9k_lite_iosxe.16.12.01.SPA.bin from 10.1.1.150 (via Vlan1): !!!!!!!!!!!!!!!!!!!!!!!!!!!!!! !!!!!!!!!!!!!!!!!!!!!!!!!!!!!!!!!!!!!!!!!!!!!!!!!!!!!!!!!!!!!!!!!!!!!!!!!!!!!!![OK - 444031957 bytes]In this case, I used the TFTP protocol to fetch the image to my switch. Since TFTP is kind of wacky at times I will run an MD5 verification to make sure there were no errors during the transfer. Compare the calculated MD5 value with the one shown on Cisco’s website where you downloaded the image.
Switch#verify /md5 flash:cat9k_lite_iosxe.16.12.01.SPA.bin………………………………………………………………………………………verify /md5 (flash:cat9k_lite_iosxe.16.12.01.SPA.bin) = 727cfc785bc304b985656dee660b0382With the image in place on the active switch (or just THE switch if it’s a standalone switch deployment) we now need to start the upgrading process.
Run the command below to start:
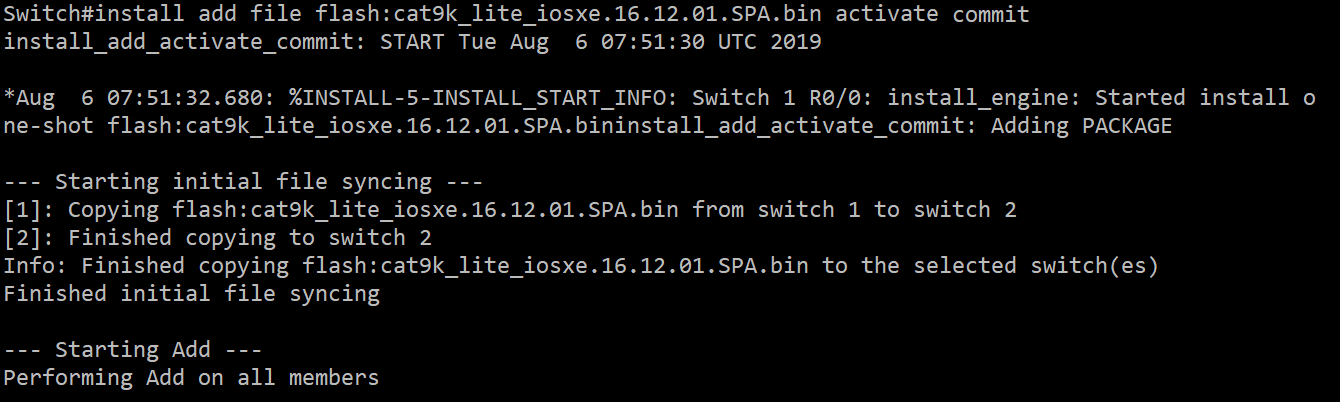
install add file flash:<imagefilename> activate commitIn my case I have a stack of 2 switches, below you can see Switch 1 (the active switch) copying the new image to Switch 2.
After the file has been copied to the flash of Switch 2 you be asked if you want to continue with the upgrade. Simply answer “Y” to continue.
During the upgrade process, you can follow the flow of IOS-XE being unpacked and activated switch by switch.
After the upgrade is done, all switches will reboot and then they are ready to go.